I know, you’re here for the pictures. Here you go. There’s a link to the actual A&S documentation at the end.
This was the inspiration pic. It turns out it’s actually a painting from a Russian artist from just a hundred years ago, but this was the jumping-off point:
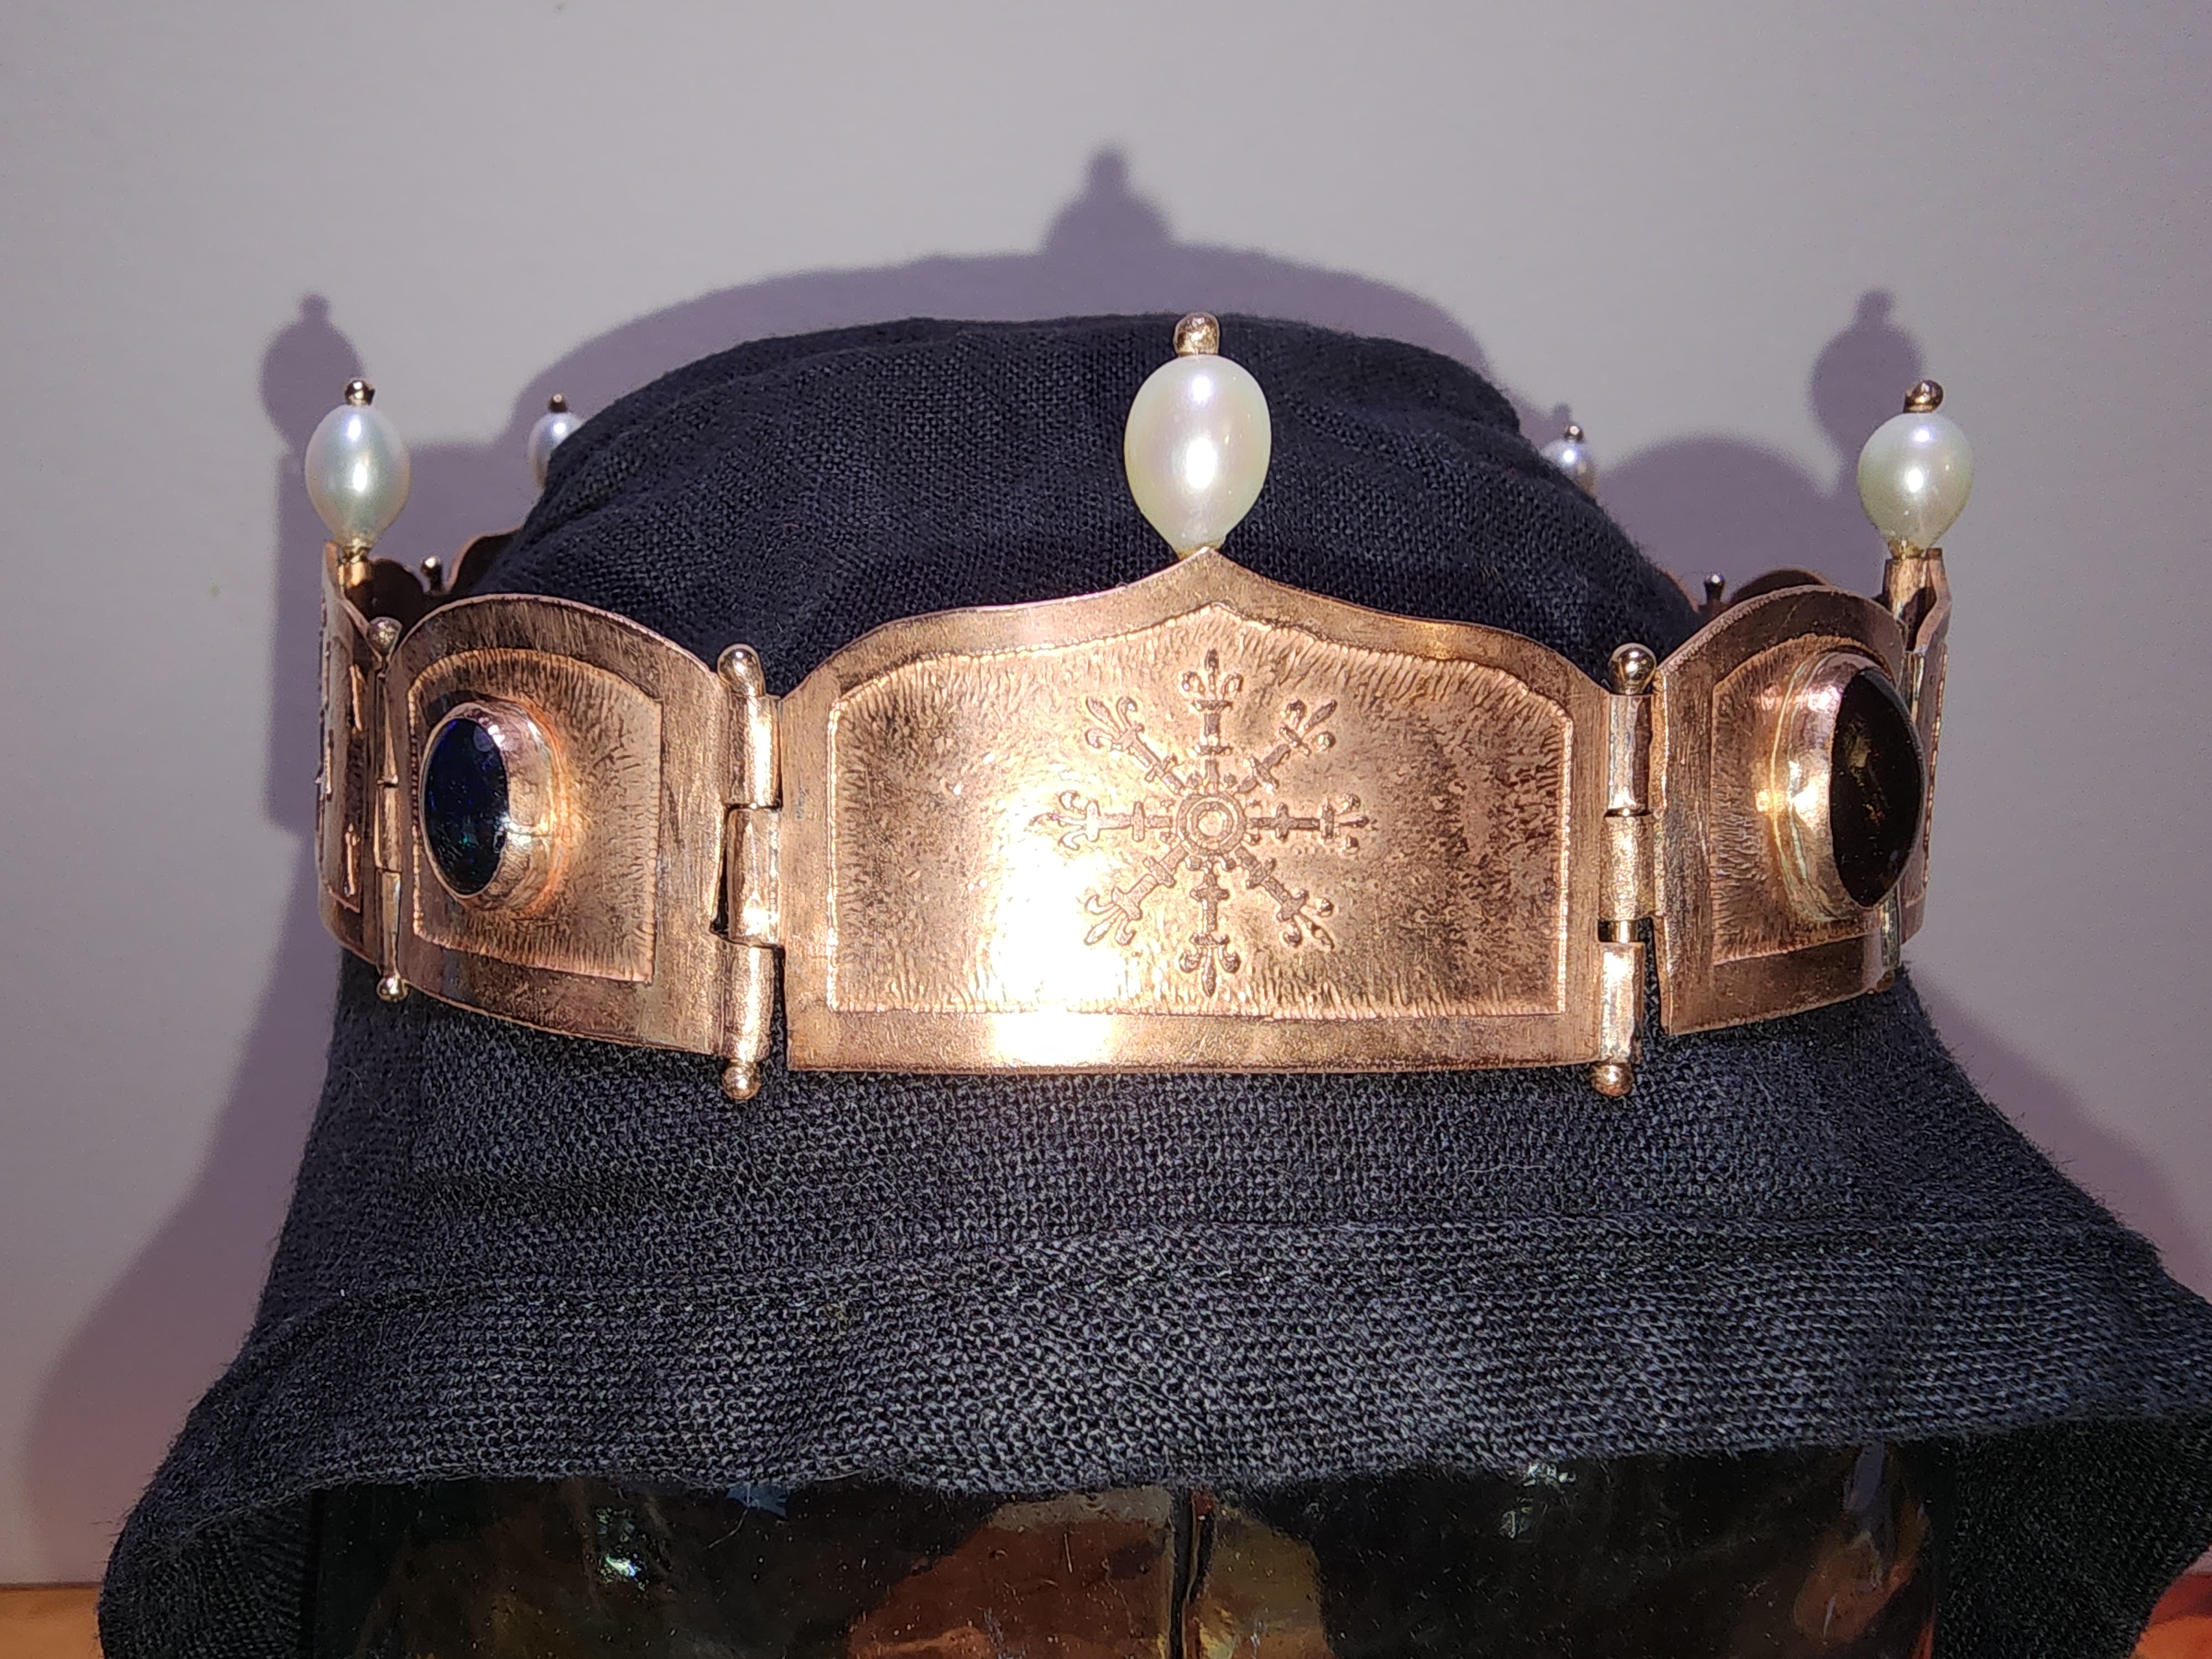
The actual coronet I made looks like this:
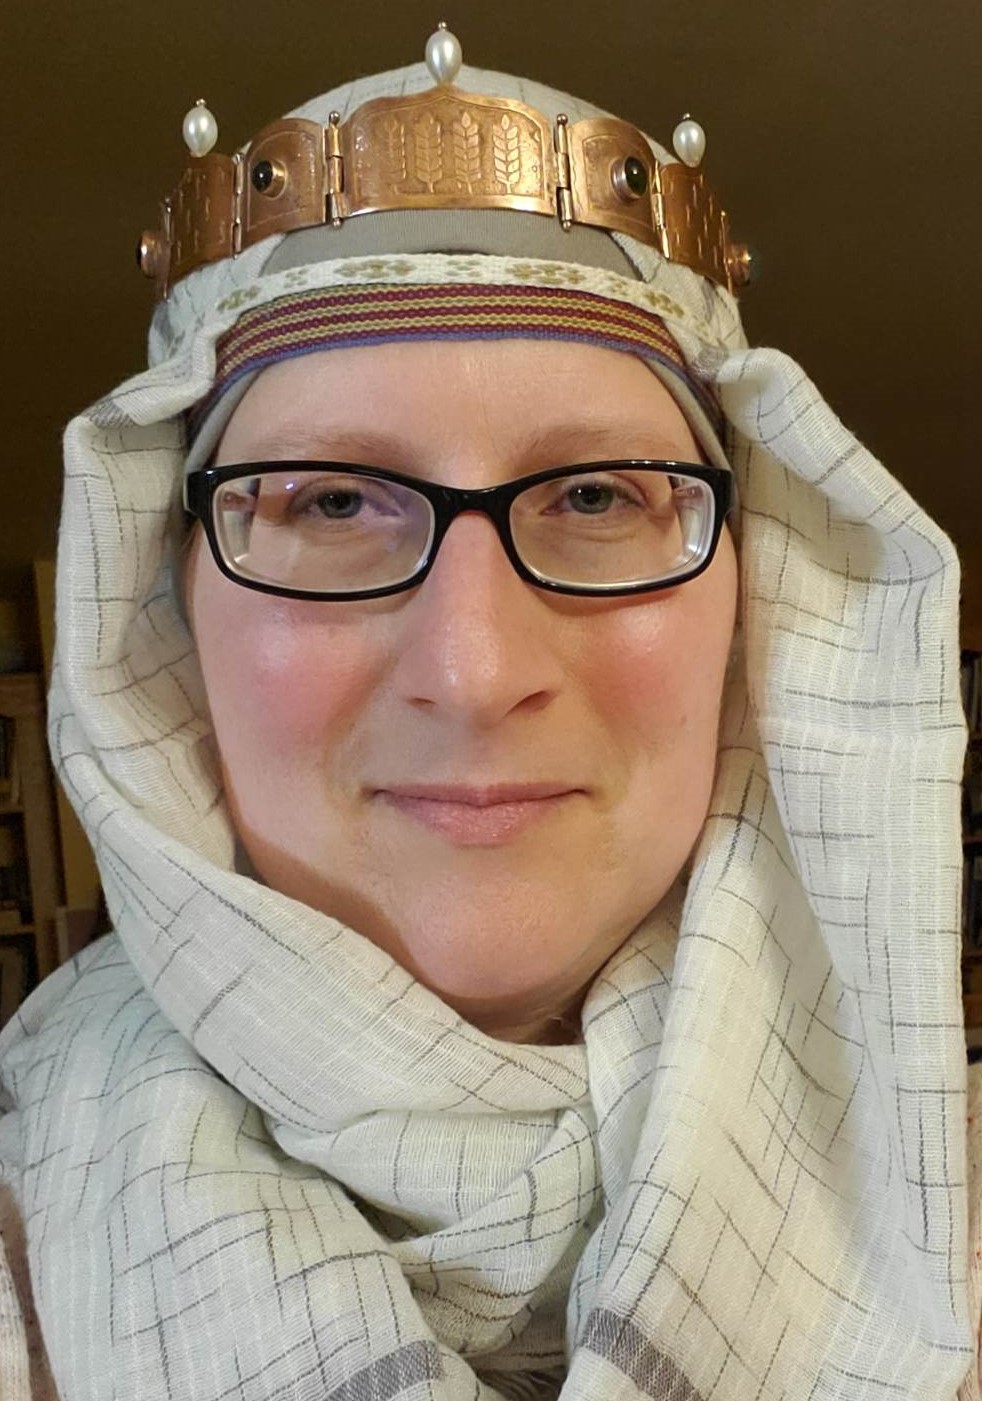
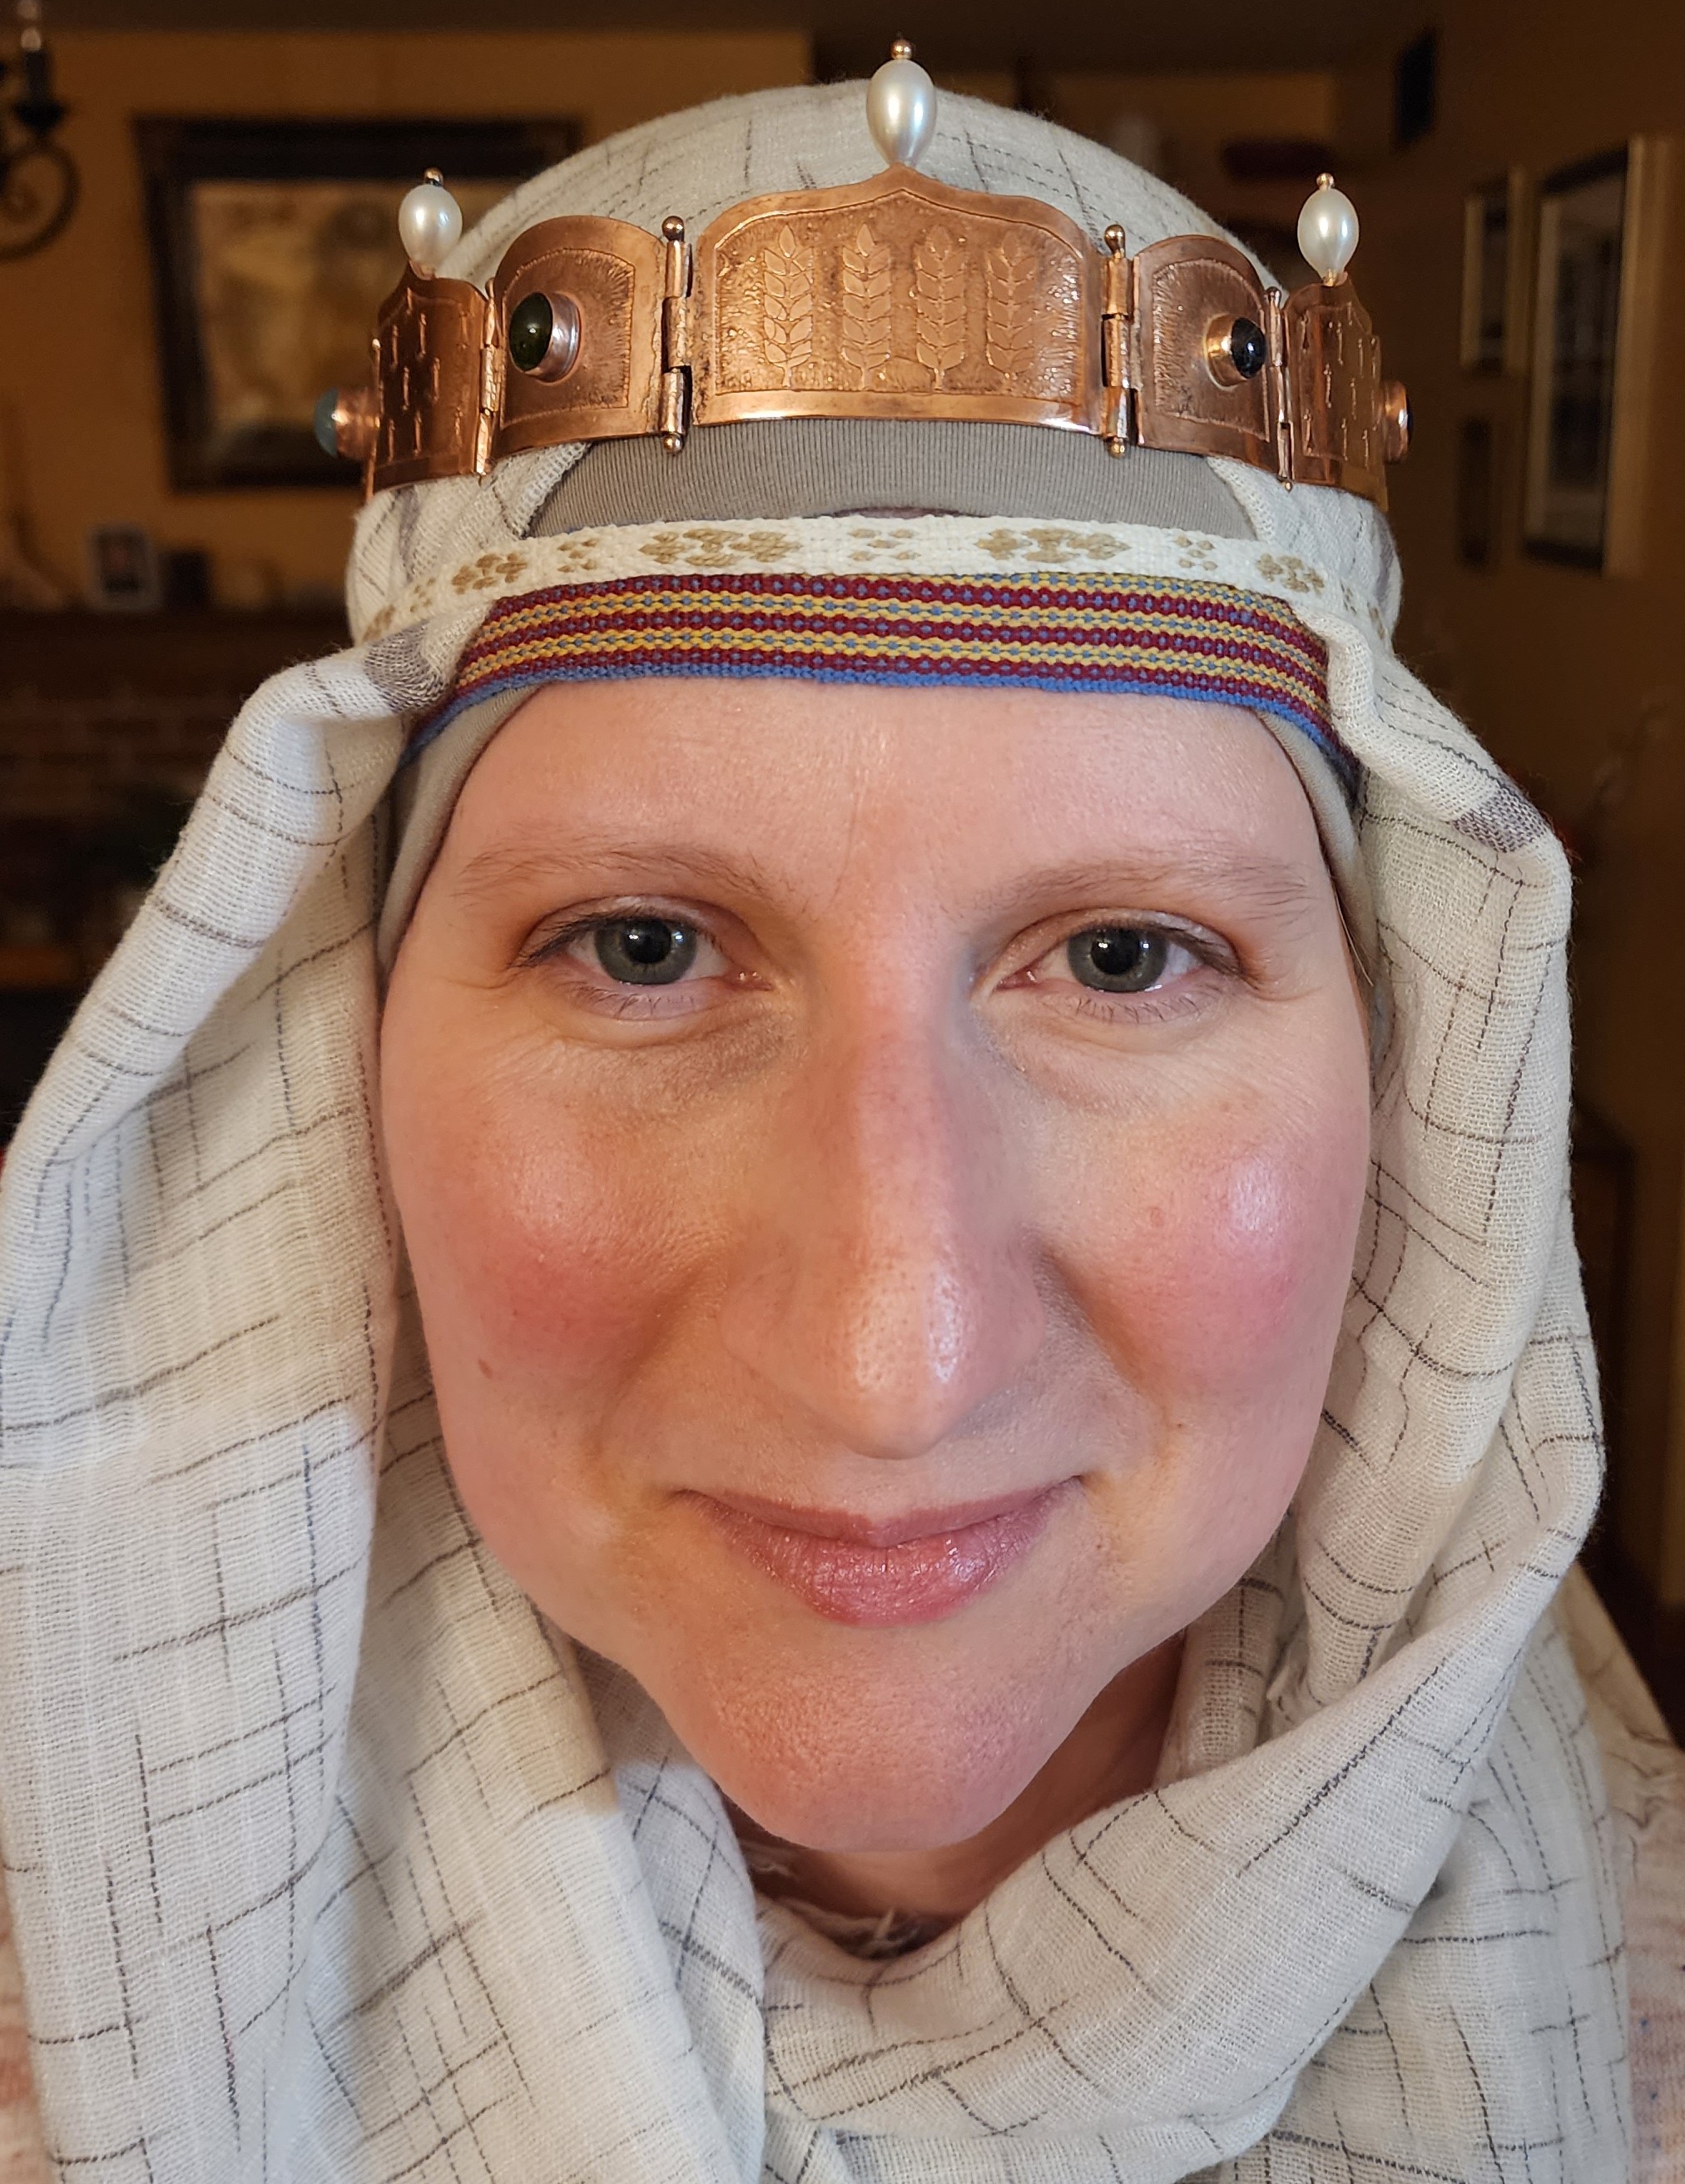
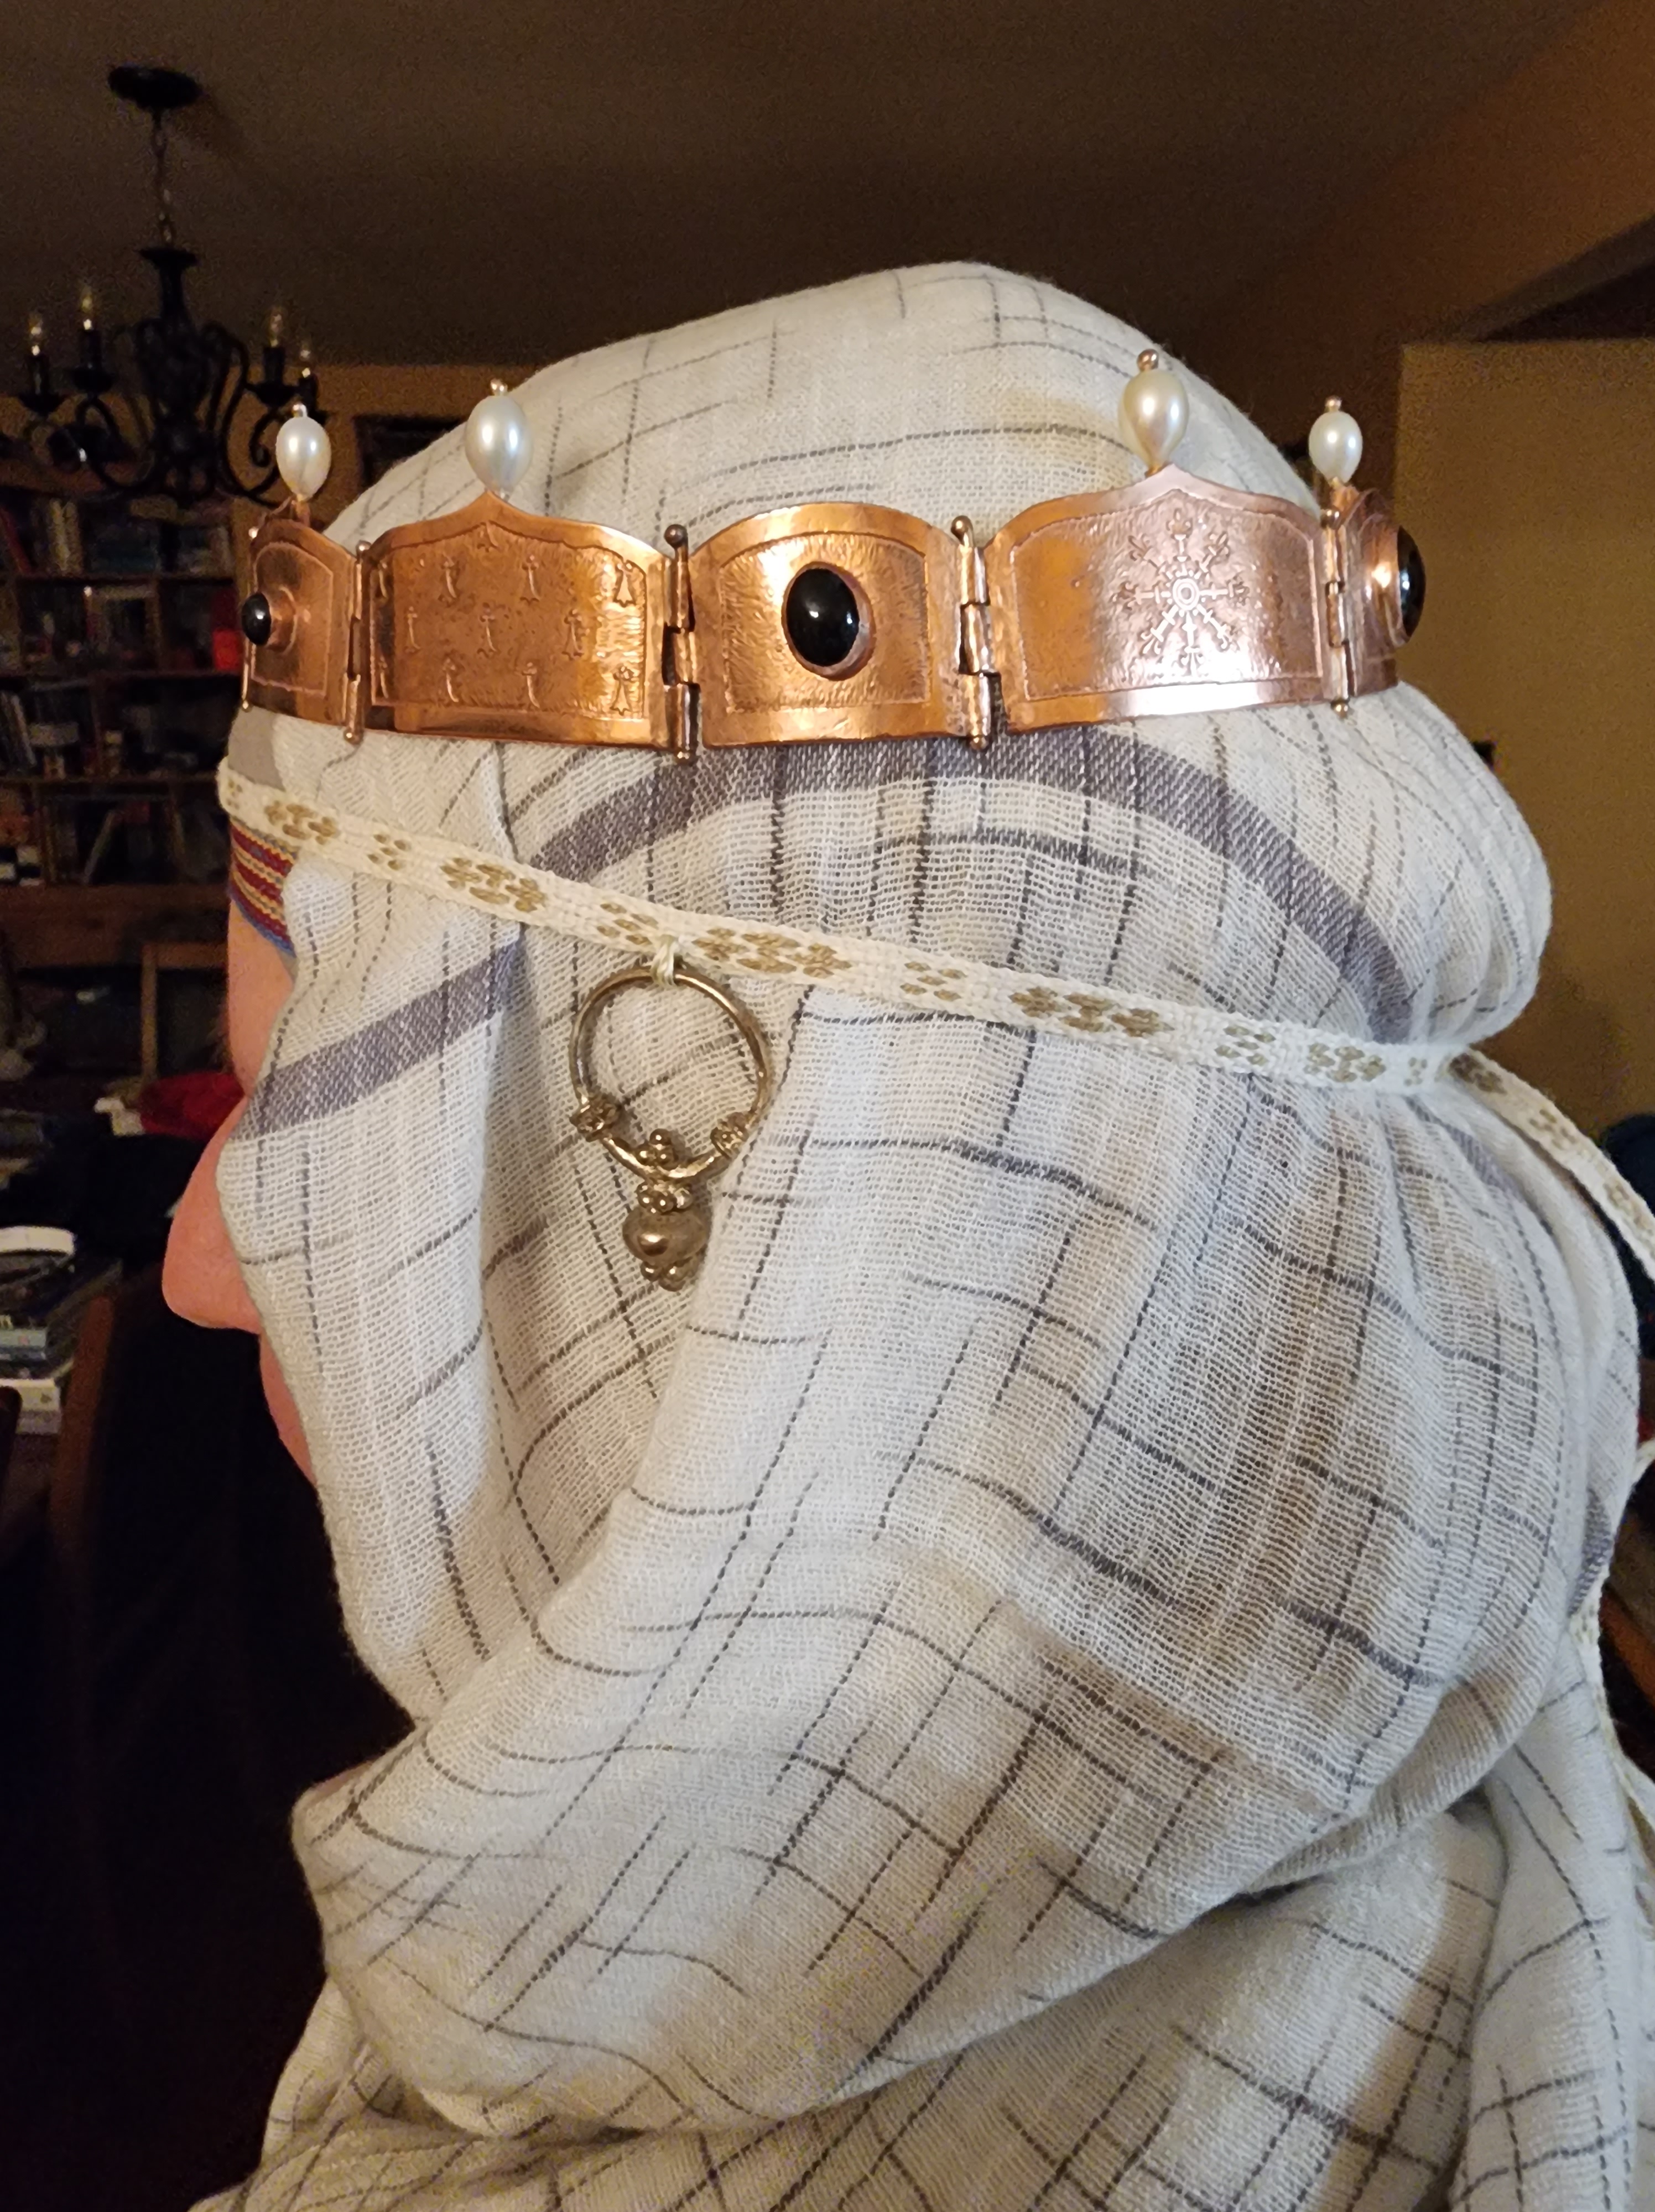
Here it is on the recipient:
This ended up tying for Populace Choice at the Queen’s Prize A&S Faire today.
DISCLAIMER: This is a rough outline for a work-in-progress class. It’s not done, it’s going to change, etc. and so forth. No warranties, no guarantees, use at own risk, et cetera and so forth. I’ll re-publish when it’s actually done.
Introduction to SCA Period Archery
What is it?
SCA Target Archery Marshal’s Handbook
Why do it?
Why WOULDN’T you want to do medieval archery at medieval events?
You ARE at a disadvantage against Open shooters
Where to do it?
Anytime there is archery, you can shoot Period equipment
Various Period Shoots
Bows
Self-bows, bow made of one piece of wood or laminated woods
Horsebows / static eared recurves
Recurve bows – Korean bows
Fiberglass is always okay
Cut-out shelves are never okay
Sources ++ Horsebows: AliBow – http://www.alibowshop.com ++ Horsebows & Longbows: Flagella Dei – traditionalbowshop.com ++ English Longbows: Ebay – ArcheyBowman
Crossbows
Most handmade crossbows are already period bows
Rising block, thumb lever, roller nut, claplock/latch
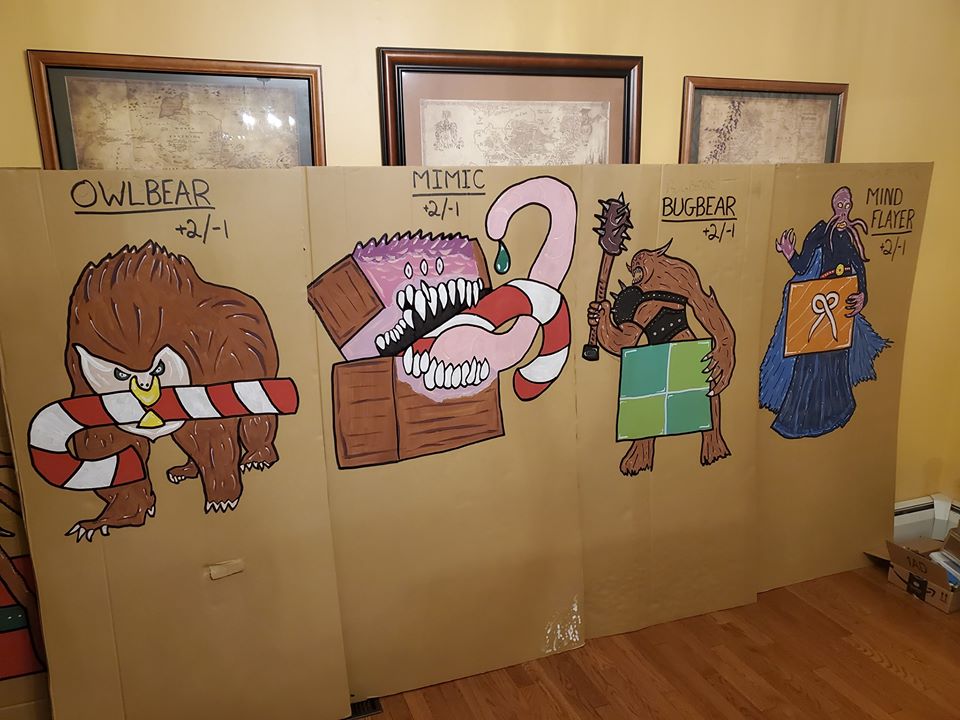
As archers, we spend a lot, I mean a LOT, of time shooting at circles at known distances. Whether they’re 24″ Royal Round 5-color bullseye targets at 20 yards, or historical green-and-gold Luttrell Psalter targets, or Vegas 3-spots, or 40cm NFAA bullseyes at 18 meters, it’s generally circles all the way down. Don’t get me wrong, circles are great targets for building skill and consistency, plus they’re readily available and cheap. But after a while, they get BOOOOORING.
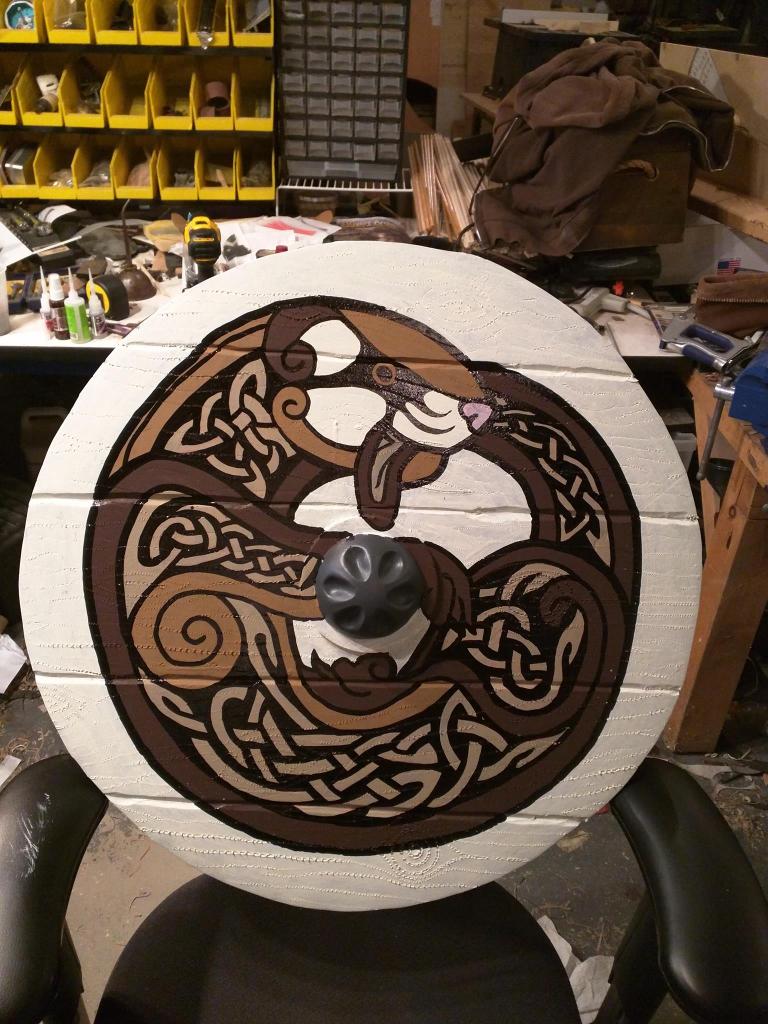
So, typically, when you go to an SCA event that offers archery, the Marshals in Charge try to give you something that’s NOT circles at known distances. Enter… the “novelty target”:
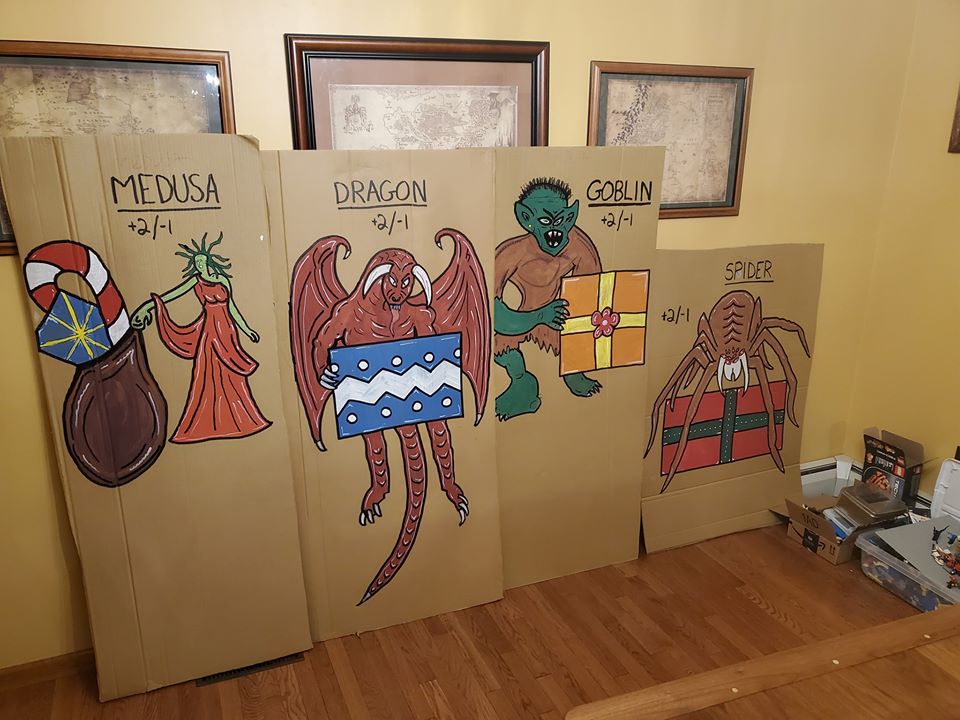
These were some of the targets from the Shire of Coppertree’s 4th Annual Holiday Shoot, the theme was “Monsters Steal Christmas”
I sometimes have a member of the populace tell me that I’m an amazing artist when they see these. NOTHING could be further from the truth! All I did was trace pictures I liked, slap on some paint, then outline them with a black marker. Honestly, there’s no art to it. A little craftsmanship, maybe, but definitely not “art”. If you’re a Marshal and want to know how we make these targets, here’s how we do it!
Tools & Materials
Computer (laptop/Chromebook preferable. You can probably use a tablet or smartphone, too.)
Pencil (I use a square carpenter’s pencil for thicker lines)
Cardboard, in the sizes you want
Projector
Cheap paints and brushes
Jumbo Sharpie black paint marker
More targets from Coppertree’s Holiday Shoot. All the targets were “friend/foe” scoring – archers lost points if they hit the holiday goodies instead of the monsters!
Process & Methods
1. Get a $50 projector on Amazon. Go to Amazon, search for “projector”, filter to $50 or less, and look for one that has the connections you need (DVI/VGA/HDMI/USB C) and find one that’s 4- or 5-star rated. Some of these cheap projectors now even have Bluetooth, so even if you don’t have a laptop, that’s fine – you can hook your smartphone or tablet to them!
2. Find a picture on the internet that you want on the target.
3. Hit up your local appliance sales store and score a bunch of big, thick cardboard for free. Just ask at their front desk and they’ll let you have all you can haul. Best time is afternoon, as their delivery trucks are returning. They’re just going to throw it all into a recycling bin anyways, and pay to have it emptied when it’s full, so they’re happy to let you take as much as you want. Pro Tip: bring a utility knife with you when you go, and you can trim them to the size you want right there, and throw the trash into their dumpster/recycling skip.
4. Lean the cardboard against the wall, use the projector on a table to throw the picture onto the cardboard. Just set the laptop’s display settings to the “duplicate screen” setting, and open the picture in any kind of photo viewing app. Don’t be nervous about using a projector, they’re simple: your computer will see it as a second monitor, and typically just ask you what you want to do when it does.
5. Turn off most of the lights, grab a writing utensil, and trace the picture. Just get the general idea and outline, don’t worry about fine details like fur or hair. Sketch the major elements.
6. Turn your lights back on. Clean up your tracing a little bit.
7. Buy (or have your shire/barony buy!) the cheapest craft paint you can find. Typically this is some variety of kids tempera arts & crafts paint. Get some brushes too – you’ll want a variety of sizes: 2″, 1″, and 1/2″ chip brushes were about all we used. Just cheap chip brushes are fine; avoid foam ones though. They’ll tear, and don’t give fine detail.
8. Paint them all. Go ahead and refer to your originals for the colors. Mix as needed – we used paper plates for palettes. Stay between the lines, more or less. Don’t worry about being too neat right now, we’ll fix that in step 9. If this is absolutely not your thing, enlist your group’s scribes. Pizza and beer work as bribes.
9. Get out your Jumbo Sharpie black paint marker and go over all the lines you traced. Makes a HUGE difference, and provides nice thick lines for scoring.
10. Hang them on your favorite backstops and GO SHOOT THEM UP!
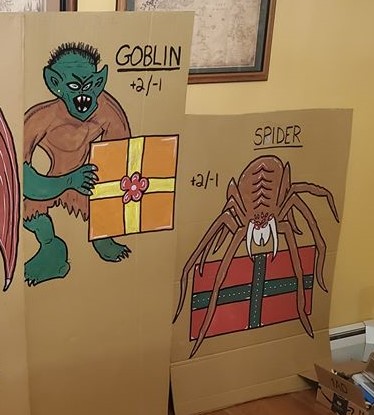
Heavily-bribed Shire member applying paint to the Owlbear. Giant Spider target after paint, but before outlining with the jumbo paint SharpieWhen I say, “don’t worry about the details” I really mean it!Goblin and Spider targets after outlining. What a difference!
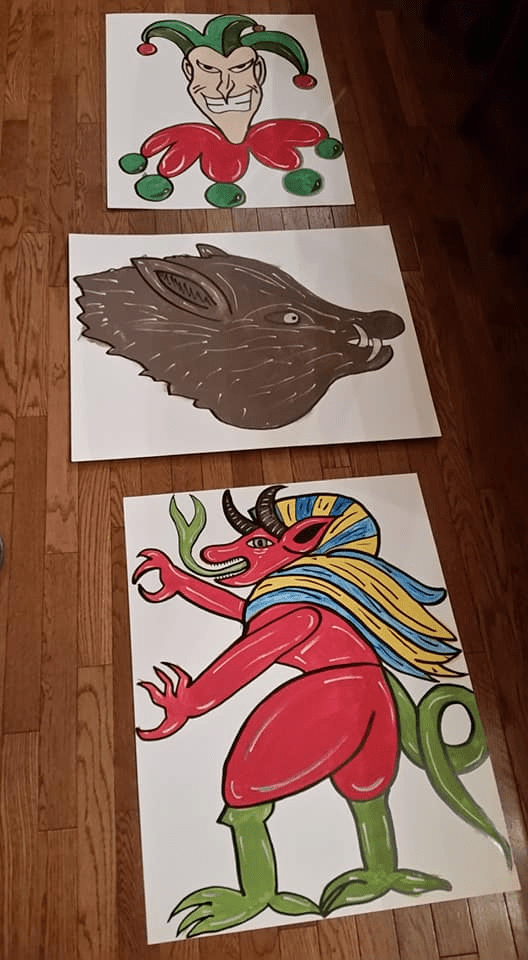
Here are some other targets from a previous year’s Holiday Shoot, “Midwinter in History”, made using this method. Again, the black paint marker is, essentially, magic.
The Lord of Misrule, wild boar for the Christmas feast, and the Omnimalevolent Ahriman.
As a bonus, your heavy fighters can use this same method to get their heraldry onto their shields: prop the shield against the wall and use the projector to throw their heraldry onto the shield. Trace, paint, done! You can do some extremely complex designs using this method:
Using the projector to throw art onto a shield. Setting up the whole thing on a single table, as shown, seems to be the best way to do this. Use of a projector to trace an image, and outlining it with paint markers, can result in very complex shield designs done easily!
Pitching the idea that your group’s projector can be used for archery targets, by the heavy fighters when they’re painting shields for Crown Tournaments and wars, and by your A&S folks for presentations makes it much easier to get your finance committee to sign off on the projector being a group purchase!
I hope this helps you create fun and challenging targets for your next shoot! It’s not hard to do, and only takes about $100 in materials and tools to get started, with everything being reusable (paints and markers until they run out, but projector and brushes forever) for your next shoot.
Artisan: Baron Snorri skyti Bjarnarson m.k.a. David A. Haldenwang
Artisan’s Piece
Copper alloy construction
Rolled terminals
Large size, circular
Stamped decorations
Rolled attachment of pin
Filework decorations
Historical Pieces
Copper alloy construction (all)
Rolled terminals (#16)
Large sizes, circular (all)
Stamped decorations (#22)
Rolled attachment of pin (#16, 18)
FIlework decorations (#21)
Historical Justifications & Documentation:
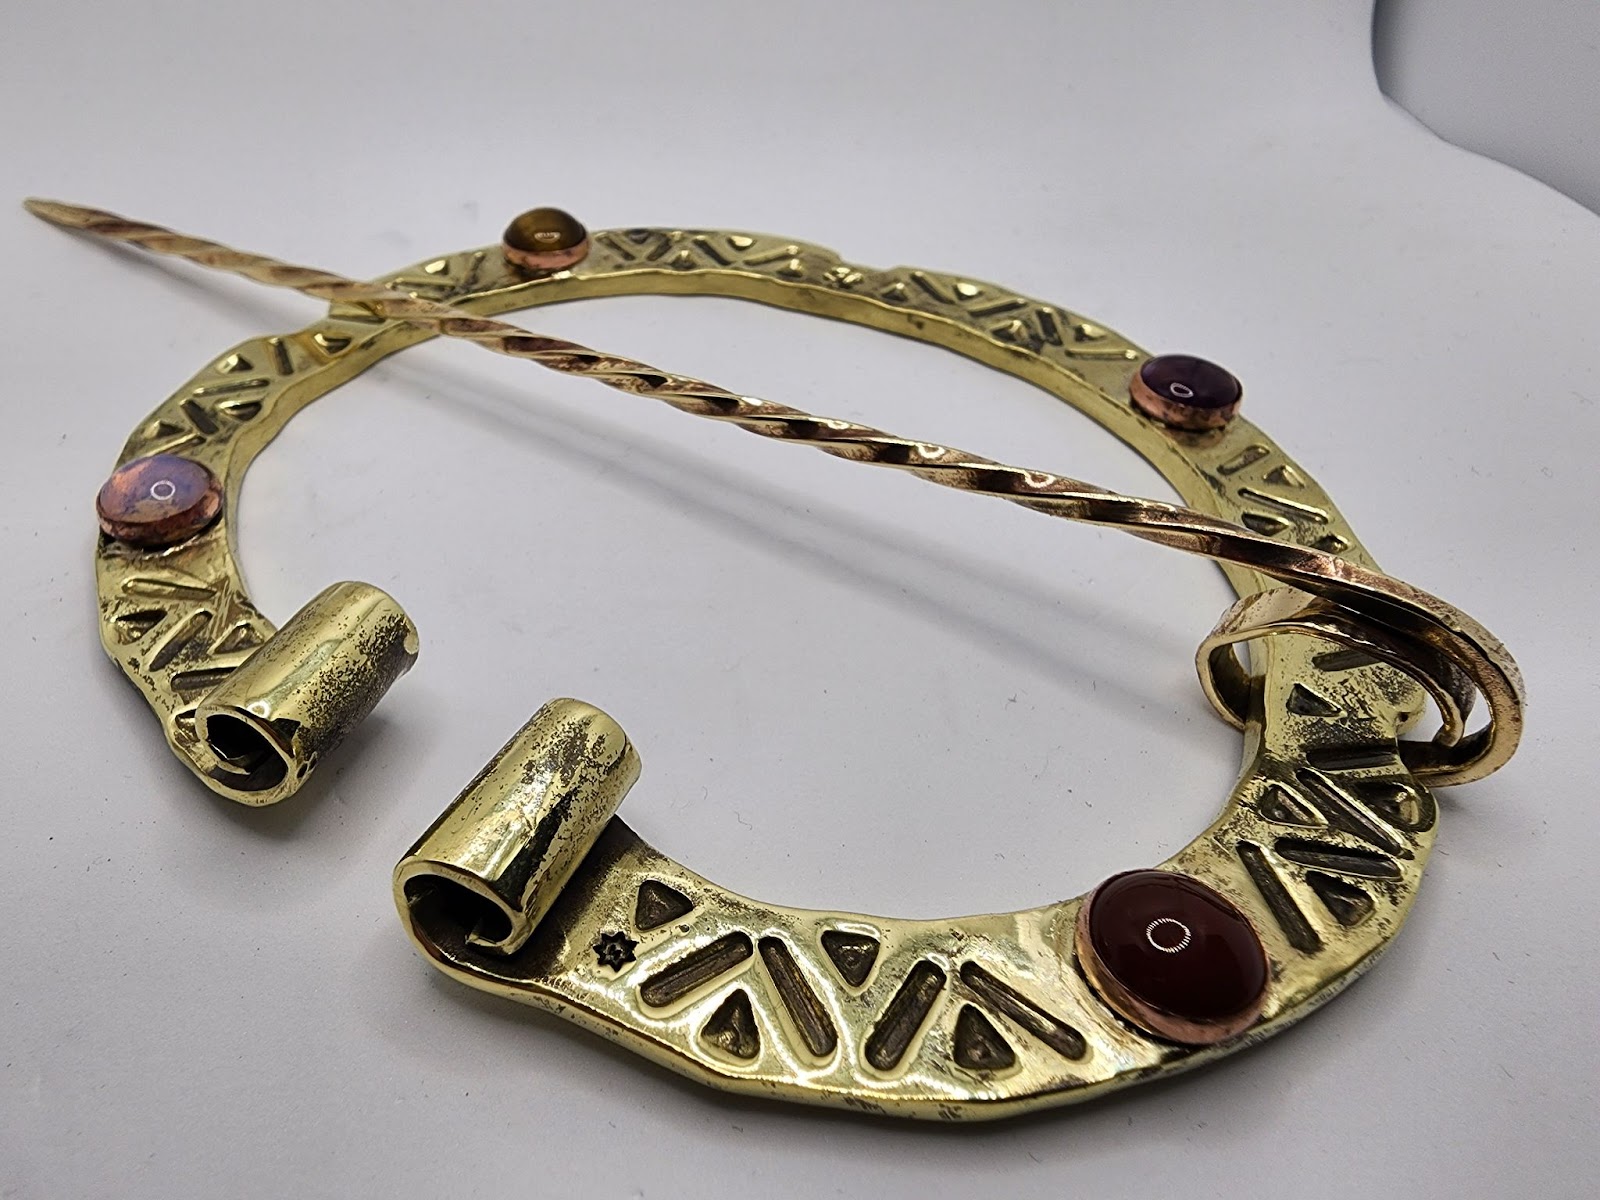
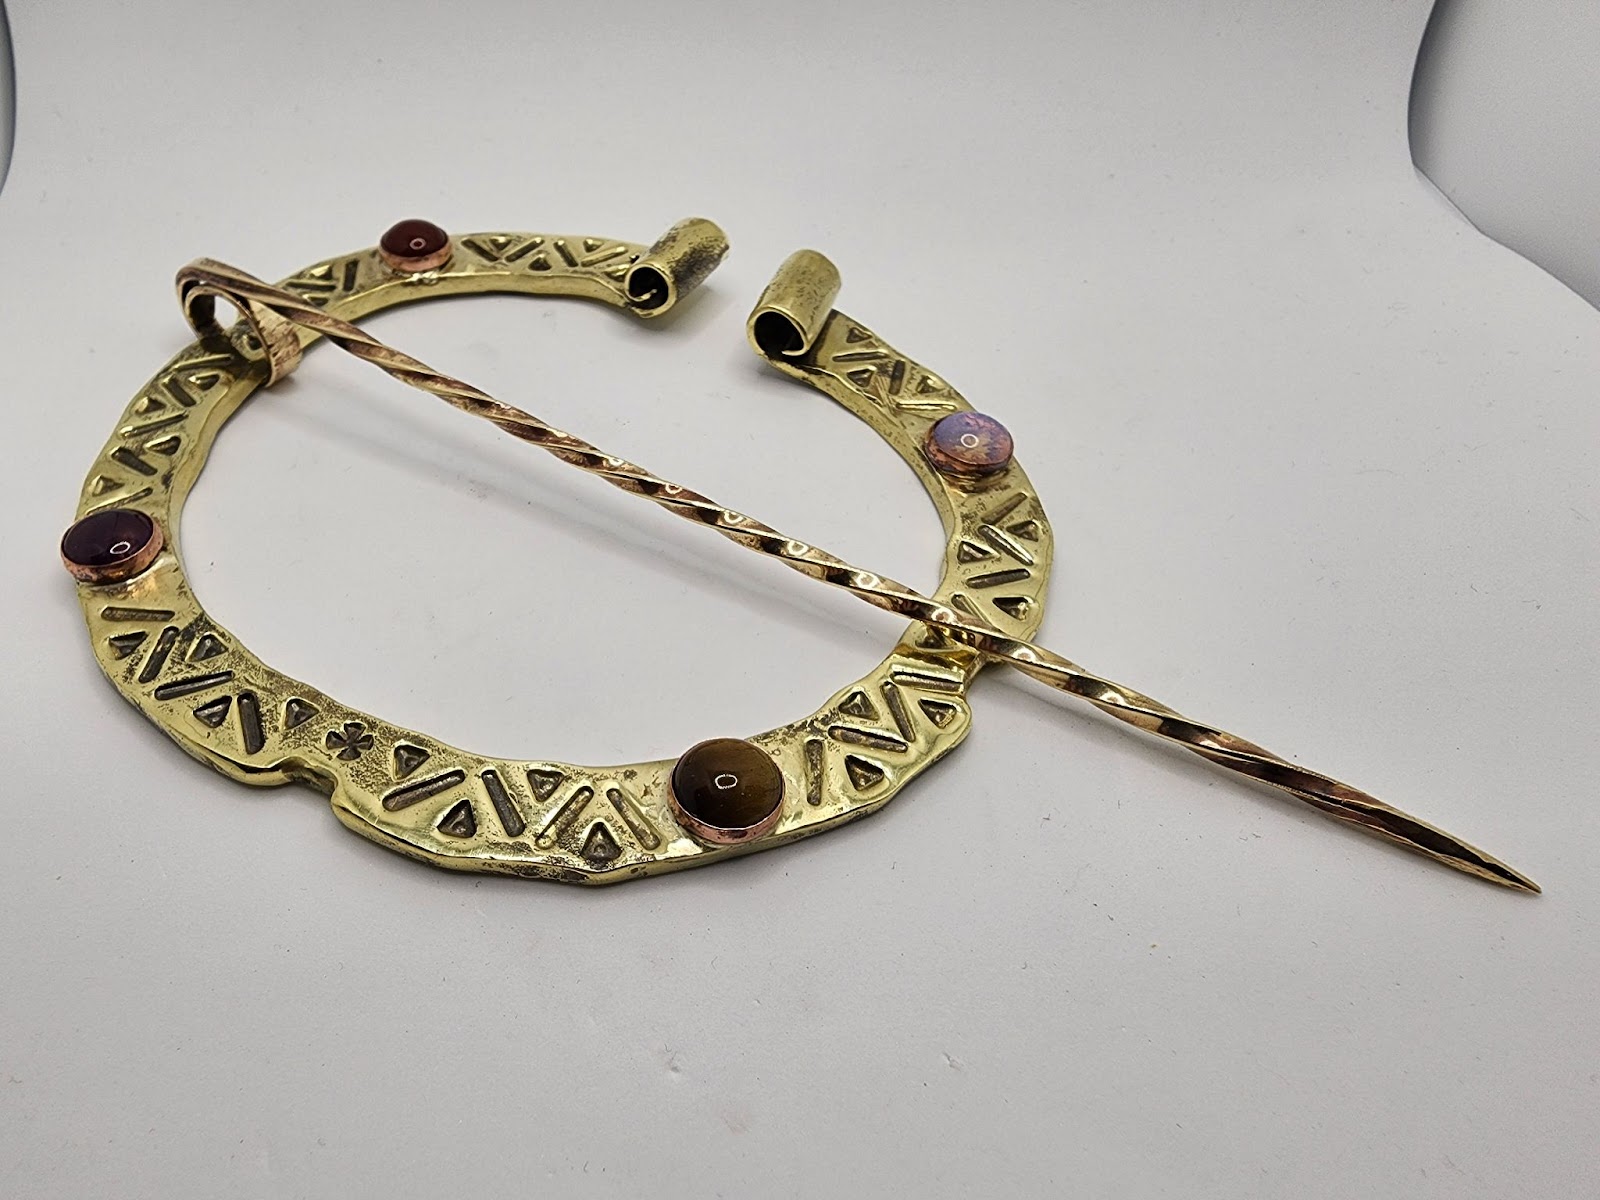
Fig.1: Artist’s finished piece
In the fall of 2022, I was asked to contribute to a Royal Garb Project for TRMs Arnthor and Cierech. Among the various accessories I was tasked with creating was a “Rus Cloak Brooch”.
I wasn’t sure what that actually meant, so I reached out to one of the coordinators of the project, Lady Aurelie of the State College, Pennsylvania shire. She provided me with some reference pictures:
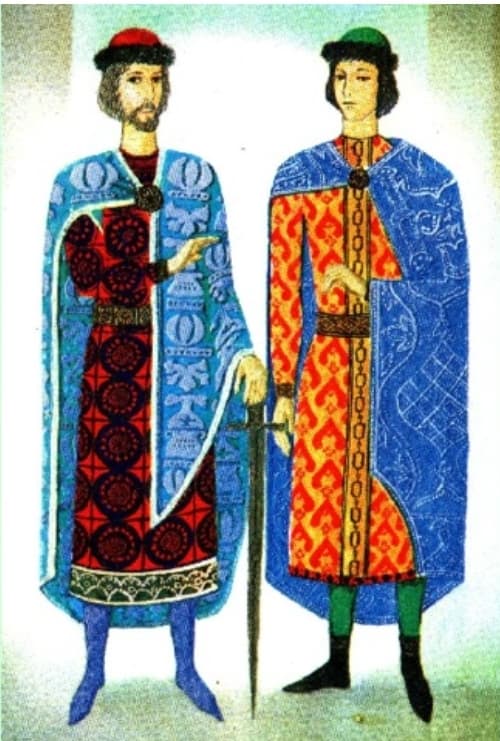
Fig.2: Illumination of Kievan Rus male nobility from the manuscript “Izbornik Svyatoslav” (1073). The cloak-korzno was a draped garment of the Byzantine type, which was worn only by the feudal princely elite. Note the extra-large brooches holding the korzno closed at the neck – this is what I was aiming to evoke.
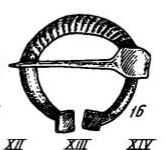
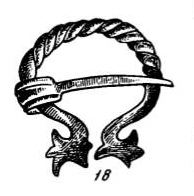
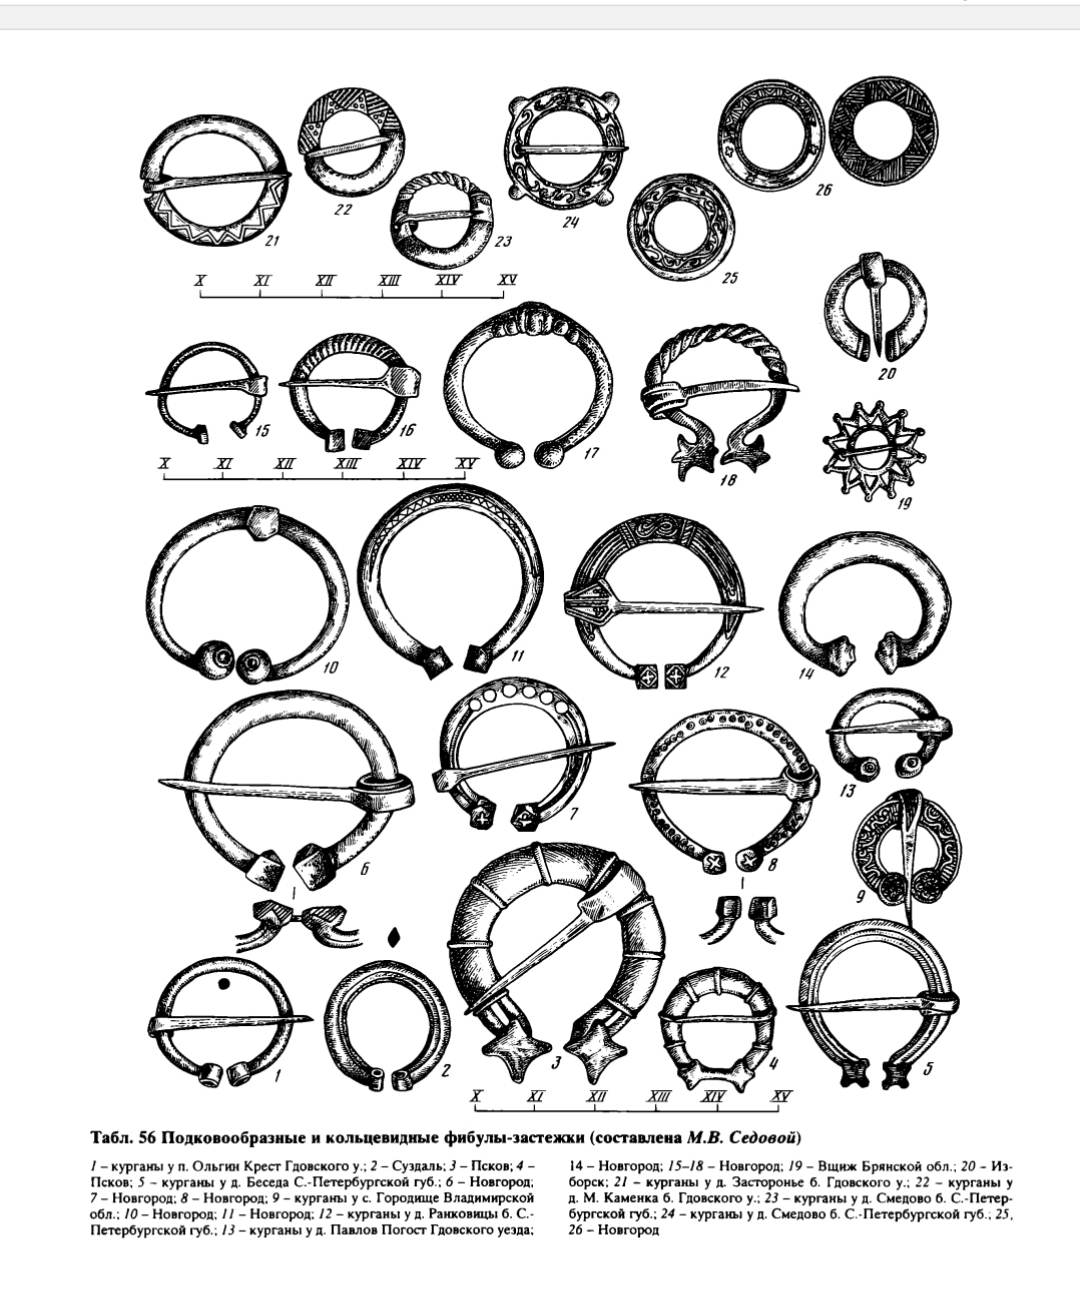
Fig.3: Illustrations of Kievan Rus cloak pins from Rybakov, 1997.
Looking carefully, you can spot all the physical elements (except the gemstones, which are addressed herein later) I incorporated into my piece on this page:
1. Geometric stamping
2. Rolled terminals
3. Pin end rolled around the brooch body
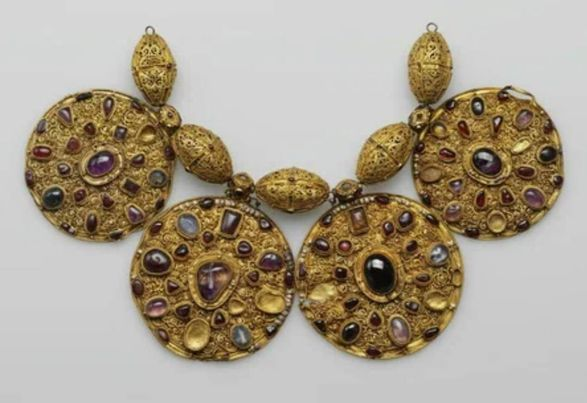
There was a bit of back-and-forth amongst the Garb Project participants as to whether or not I should mount gemstones on the finished product. While Scandinavian Viking jewelry is almost completely devoid of mounted stones (they almost exclusively fashioned gemstones into beads) the Kievan Rus labored under no such aesthetic restrictions. Kievan Rus jewelry exhibits mounted stones in cabochon style on many items owned by high-status individuals, largely due to the strong influence of Byzantine culture. This “barma”, or necklace, is a representative example of such:
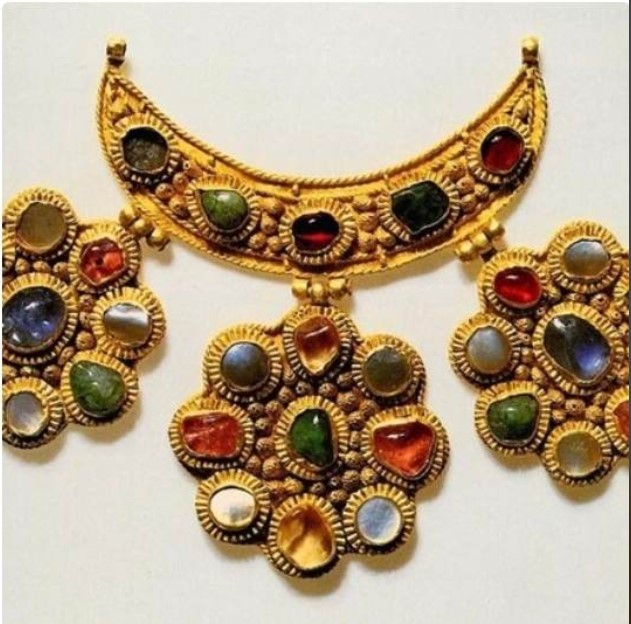
Fig.4: Necklace (barma) from the Ryazan treasure, 12th century. Gold, pearls, precious stones; filigree, granulation. State Historical and Cultural Museum-Reserve “Moscow Kremlin”.
As is this tsata, a piece of religious jewelry:
Fig.5: Tsata with three pendants, Russia. Late 14th – early 15th century Gold, sapphires, emeralds, tourmalines, almandines, mother-of-pearl. State Museums of the Moscow Kremlin.
Additionally, Rybakov’s book shows several illustrations of different pieces of jewelry with gemstones:
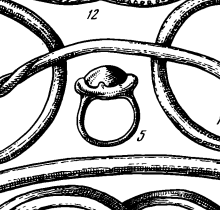
Fig.6: Ring with cabochon-cut gemstone, Rybakov pp.284
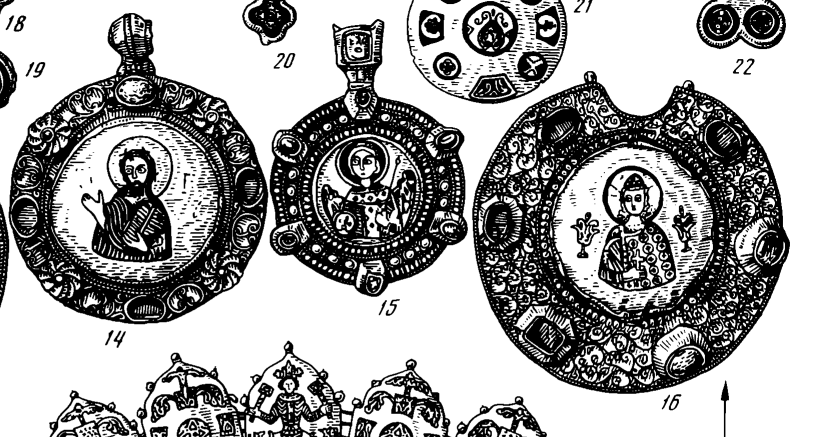
Fig.7: Christian pendants with cabochons mounted around the edges, Rybakov pp.291
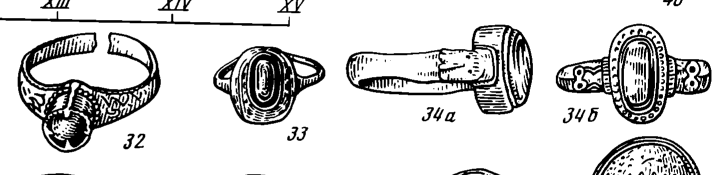
Fig.8: Additional finger rings with cabochon-cut gemstones, Rybakov pp.305
In the end, it was decided that this was a piece for a king, and as such, rated gemstones, so I added them.
Tools & Materials:
The following materials were used in the construction of this piece:
Liquid flux (flux is a chemical to make solder flow evenly)
The following tools were used:
Bench vise with 1 ¼” steel pipe section
Bench-mounted Beverly shear
Dykes (used for convenience rather than a cold chisel and mallet)
MAPP gas torch (I lack a forge)
Oxy-MAPP torch (I still lack a forge)
Firebricks (used as a work surface to prevent tabletop fires)
Ceramic soldering tile (fireproof surface to solder on)
15 pound anvil
Assorted hammers: planishing, flat-faced, and drawing
Assorted mallets: rawhide, poly, and rubber
Jeweler’s stone setting tools
Polishing buffer and polishing compounds (I have no information on period polishing techniques or materials)
Various jeweler’s files: flat, half-round, round, and square
Decorative triangle-dot, Byzantine cross, and bar stamps of my own construction (stamp construction detailed on my blog)
Containers of water and mineral spirits (water for quenching after annealing, mineral spirits for cleanup after polishing)
Assorted non-marring jeweler’s pliers (would have been small blacksmith’s tongs in period)
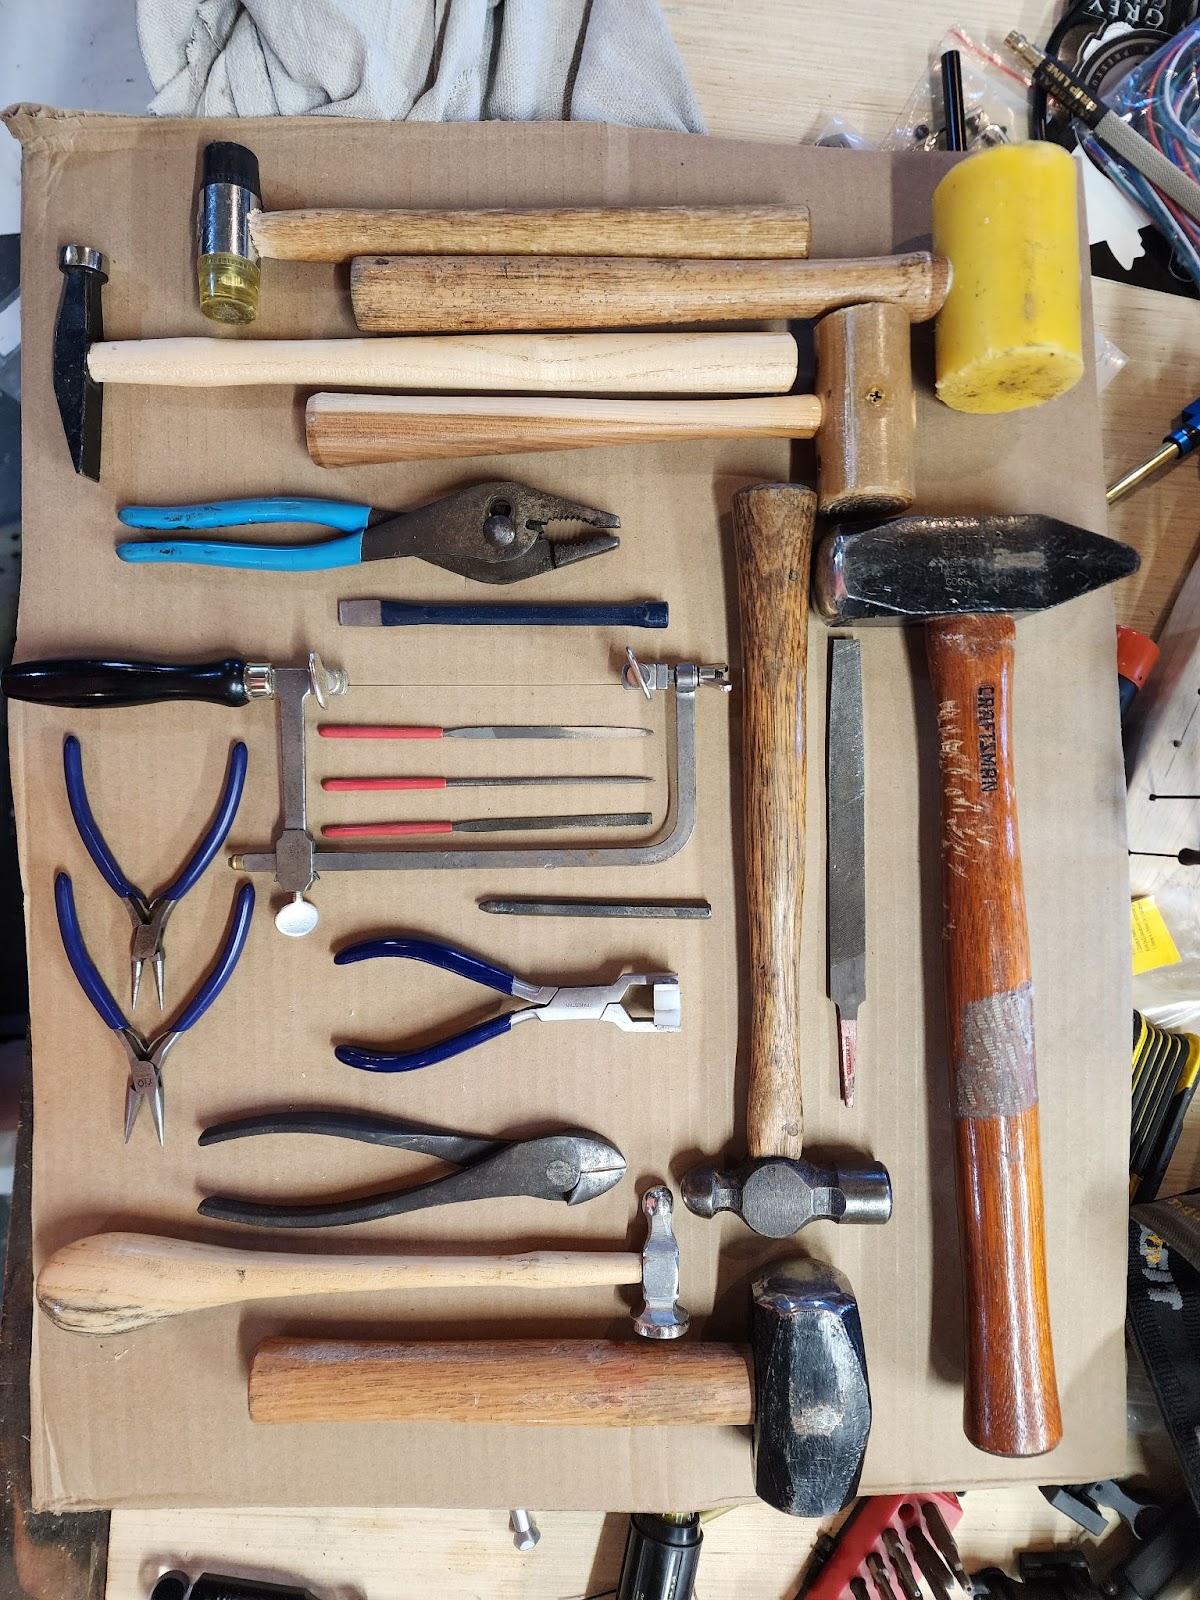
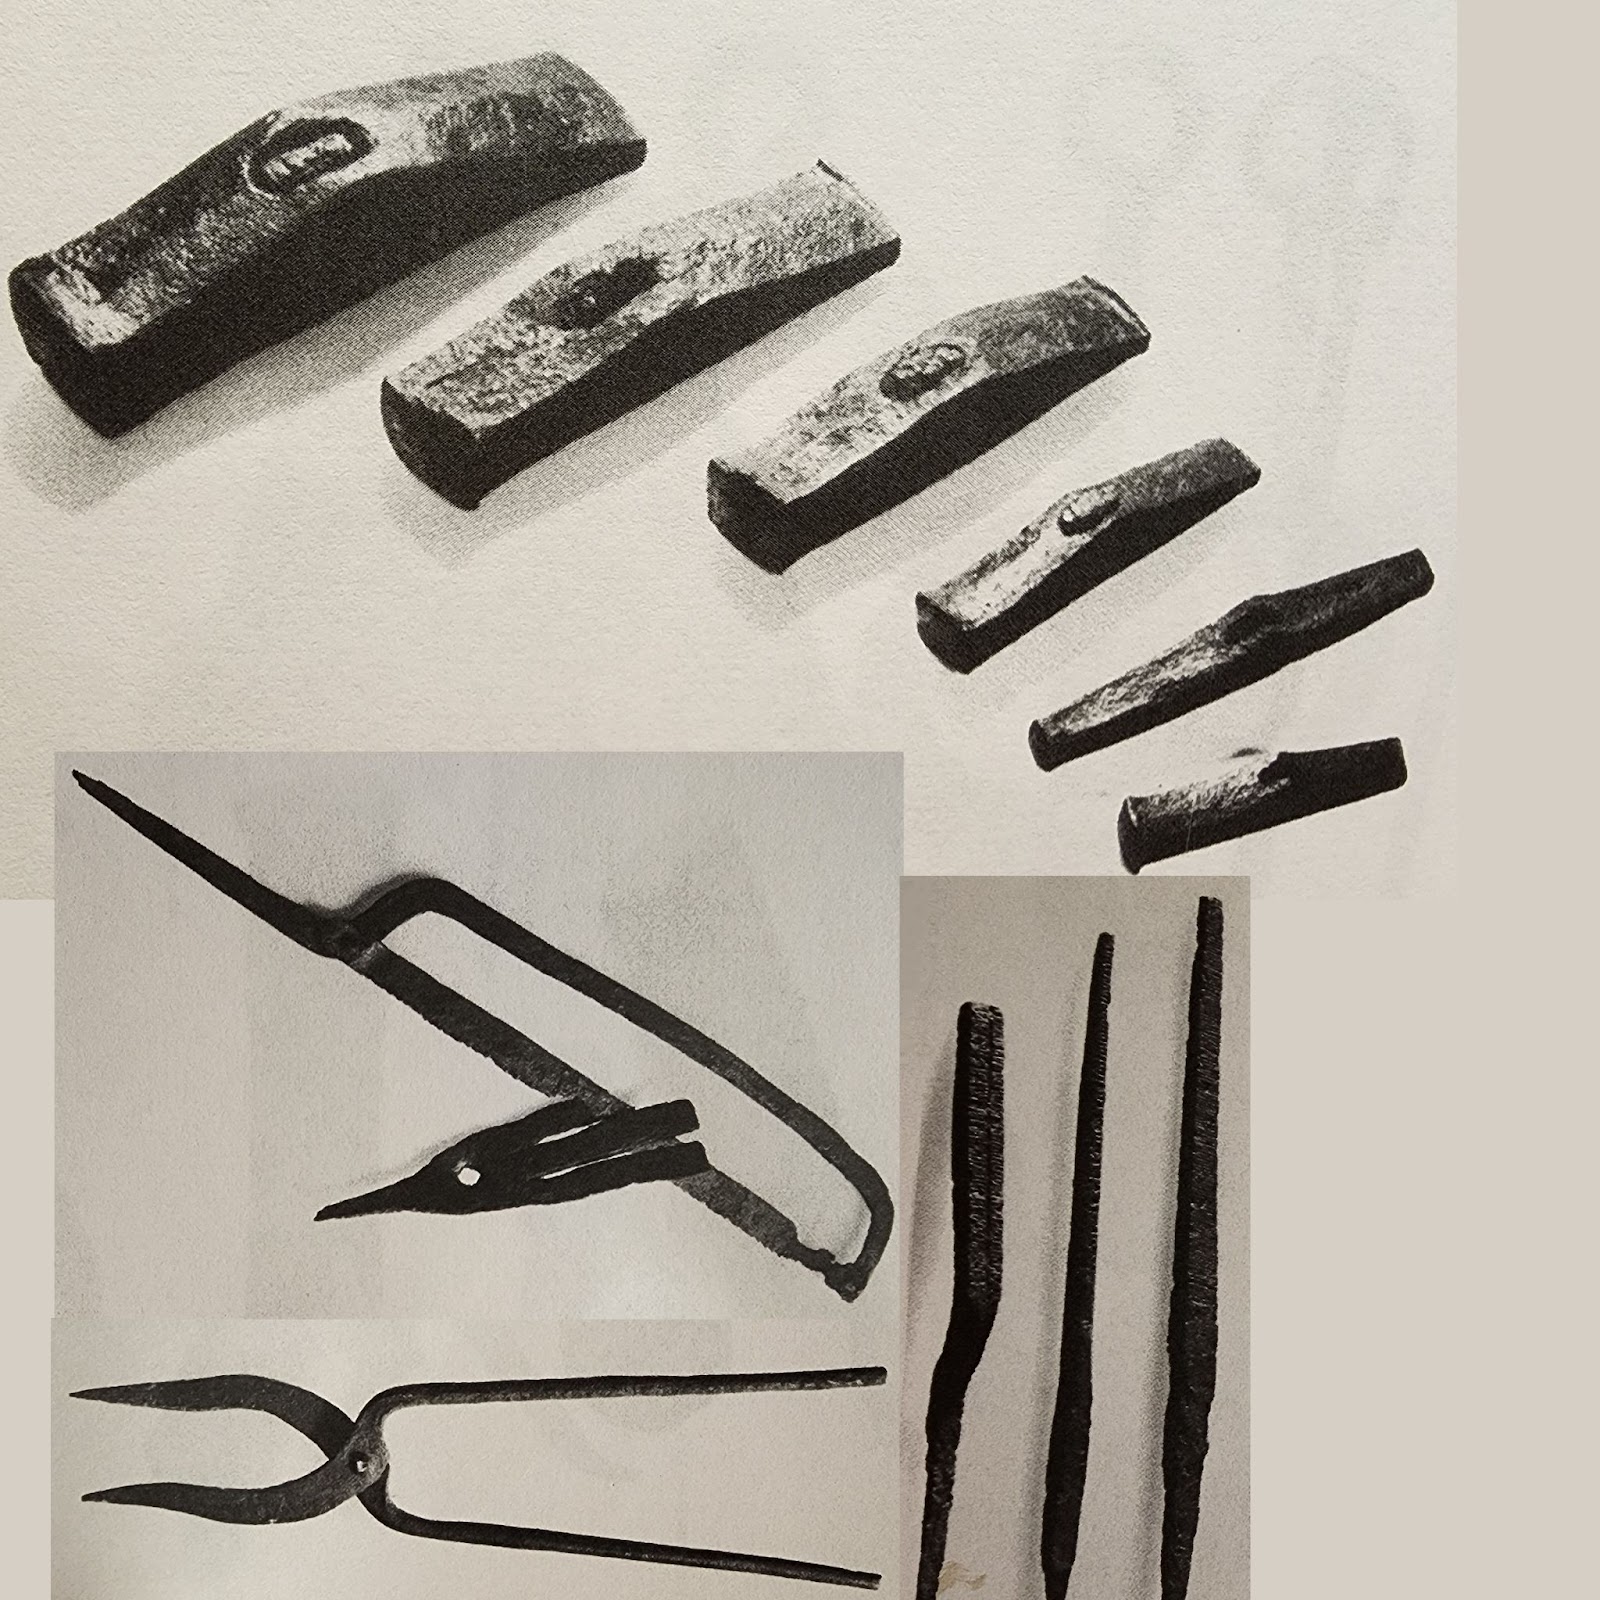
We know that files, decorative stamps, hammers, chisels, and blacksmith’s tongs are period tools due to their inclusion in the Mastermyr find (Arwidsson et al, 1999).
Fig. 9: The author’s own hand tools
Fig. 10: Hammers, saw, tongs, and files from the Mastermyr tools
Construction Methods:
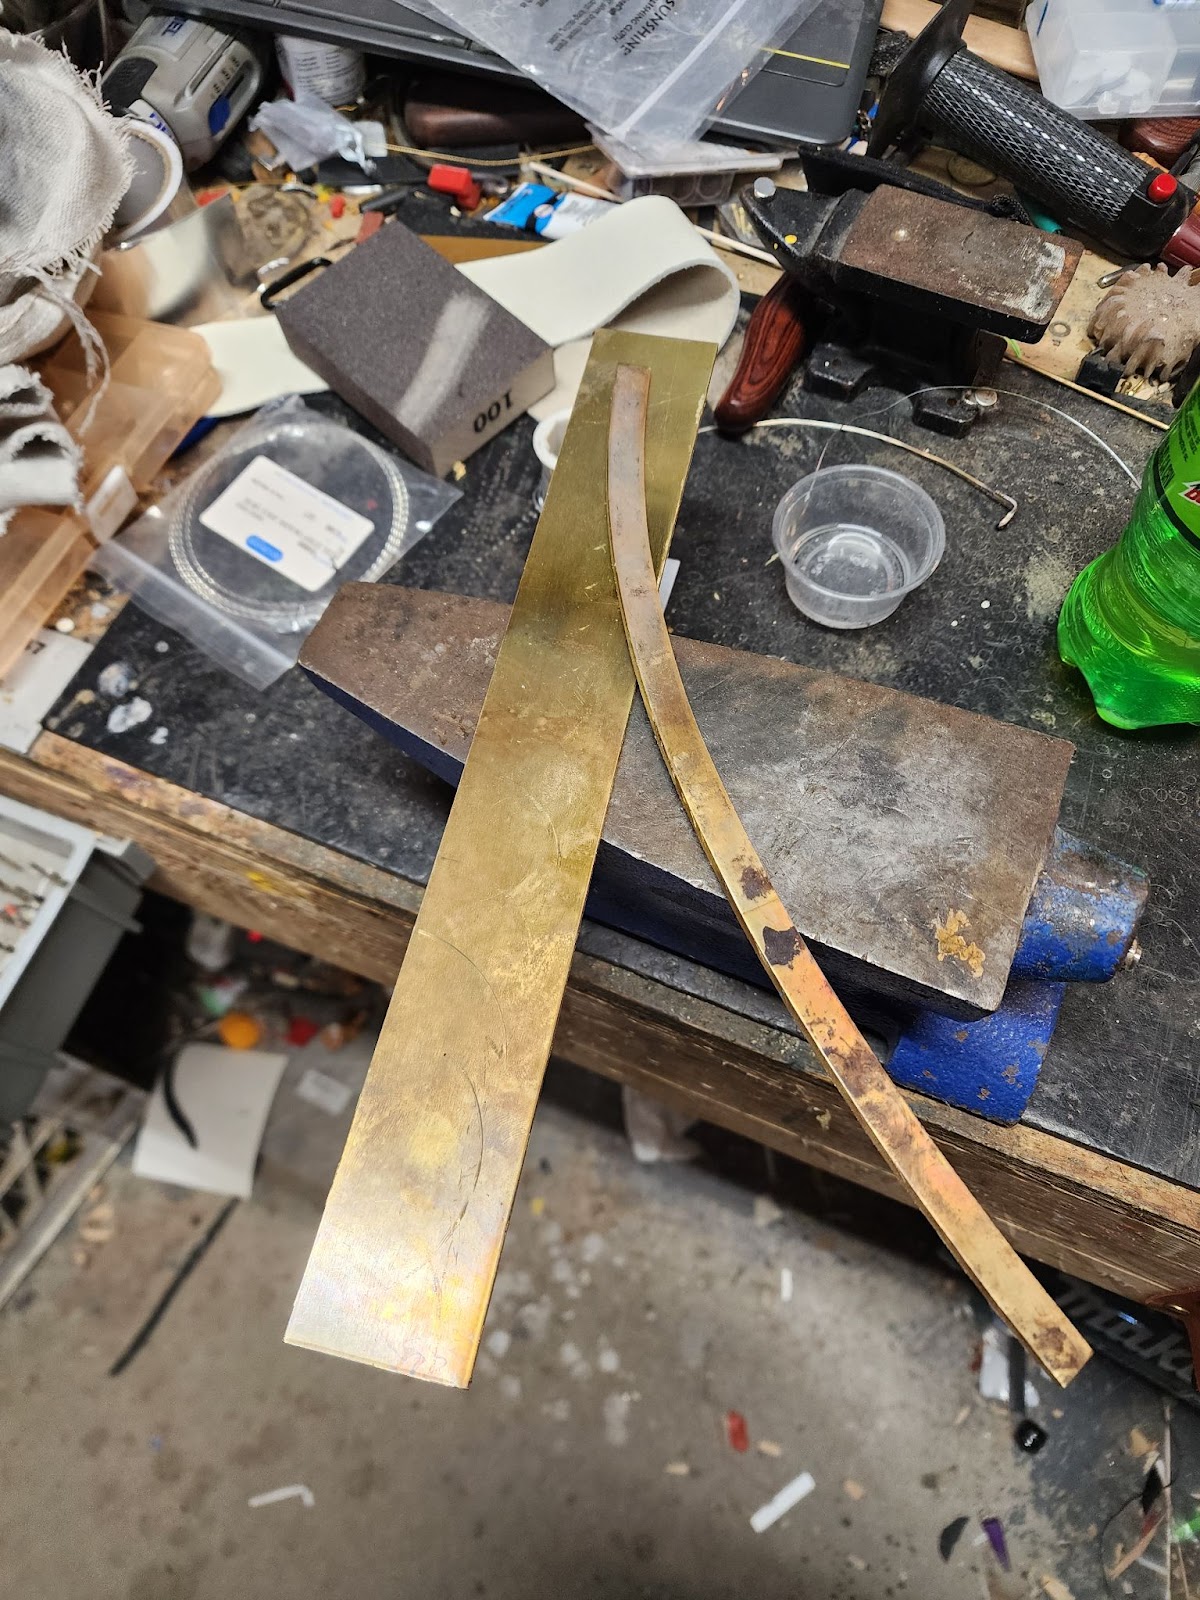
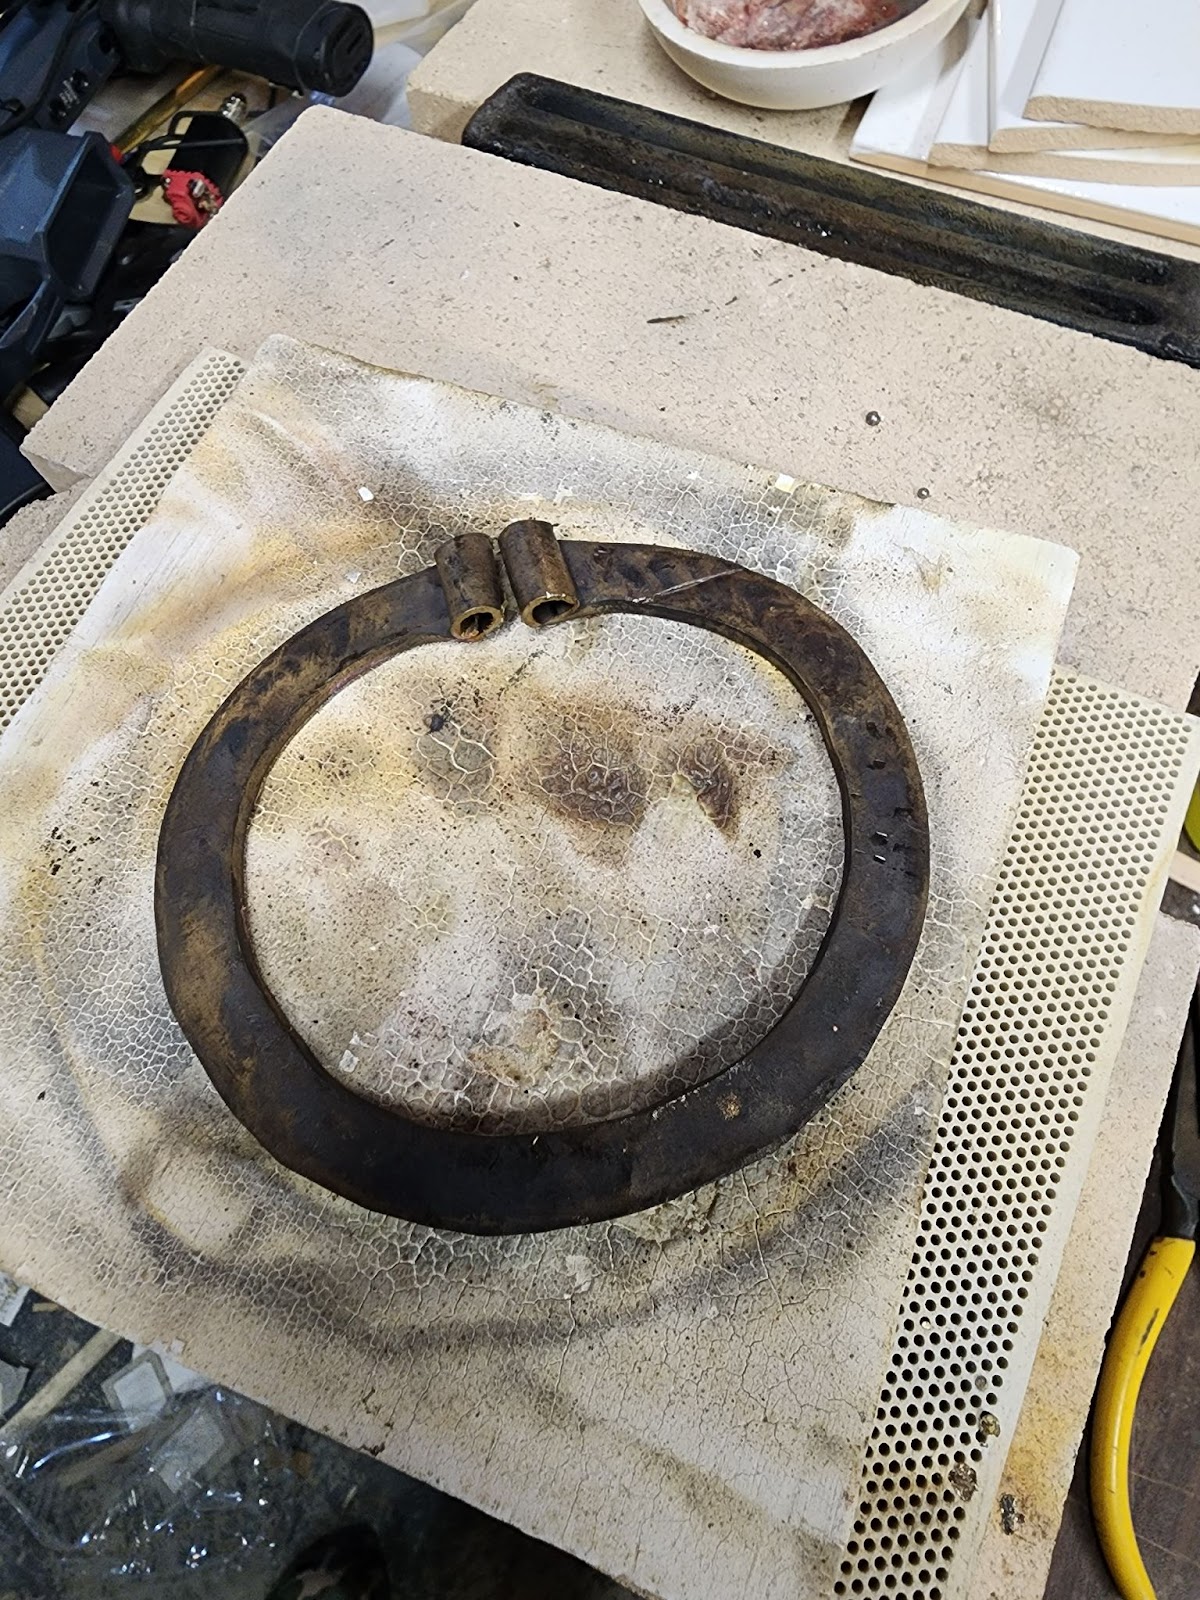
To start, I annealed a sheet of 14 gauge red brass with a Mapp gas torch to make it more malleable, and cut off a half-inch strip using the Beverly shear. This naturally gave the piece the correct curvature to start with, which is convenient.
Fig. 11: The initial cut off the annealed sheet
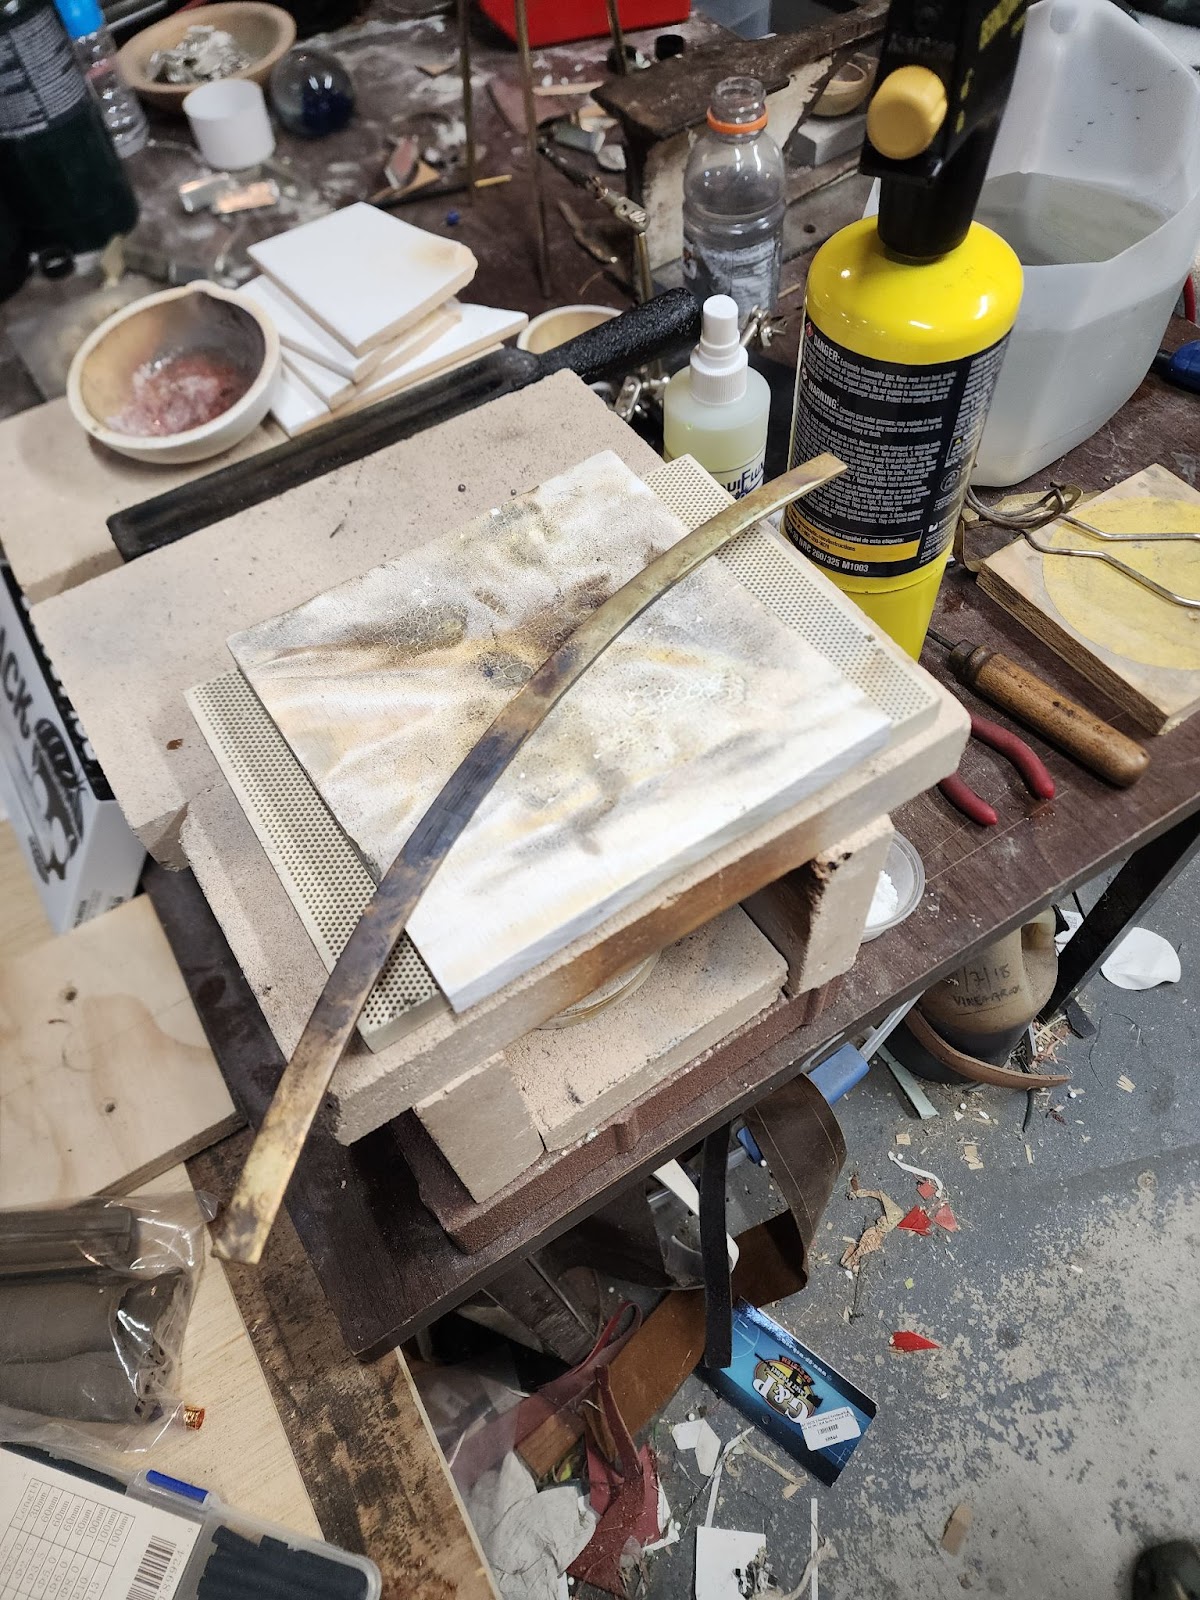
I then clamped a piece of steel pipe in my bench vice, to give me a curved working surface to form the brooch’s circular shape on. In this period, this would have been done over the horn of a large anvil; I do not have such a large anvil, so a pipe suffices. I annealed the piece again, and began forming it into a circle, using heavy blows from a rawhide mallet (using a steel hammer would mar the edges of the piece too much).
Fig. 12: Beginning to curve it more
Between each round of forming, the piece is annealed again. Copper-alloy metals quickly work-harden, and must be softened by annealing or they will crack.
Fig. 13: Continuing to make the circle shape
After several rounds of forming on the pipe, the circular shape is close enough to done that I’m ready to move on to the ends prior to a final true-up of the form.
Fig. 14: Curve done for now
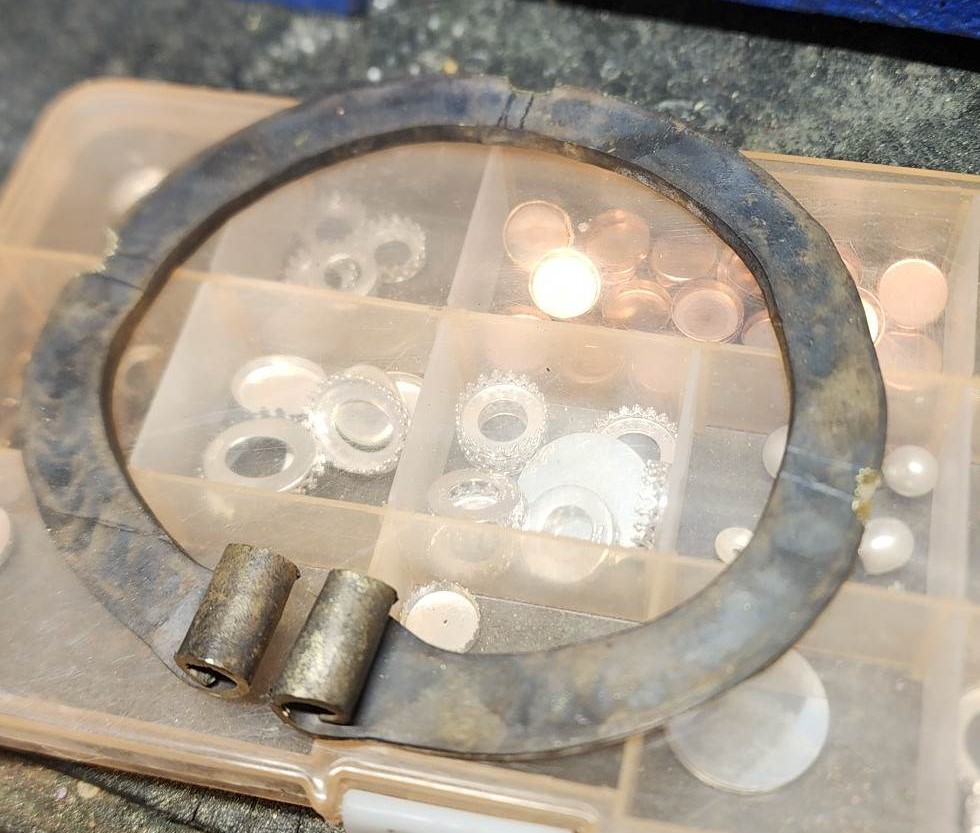
Again, it’s annealed, then I draw out and flatten the ends thinner, using a convex-faced hammer clamped in my bench vice as a small anvil, and another convex-faced hammer to strike glancing blows. This gives much the same effect as a rolling mill, albeit at the expense of much more work. Then, I clamped one of my decorative stamps in the vice and used a smaller hammer to roll the ends over it, into something like the shape shown in #16, Figure 3. The sides were cleaned up with a large, aggressive file, then with smaller jeweler’s files after they were rolled.
Fig. 15: Flattened and rolled the ends
After forming the rolled ends, the large pipe was replaced in the bench vice as an anvil, and the final round form was shaped with a rawhide mallet.
Fig. 16: Finished the circular forming
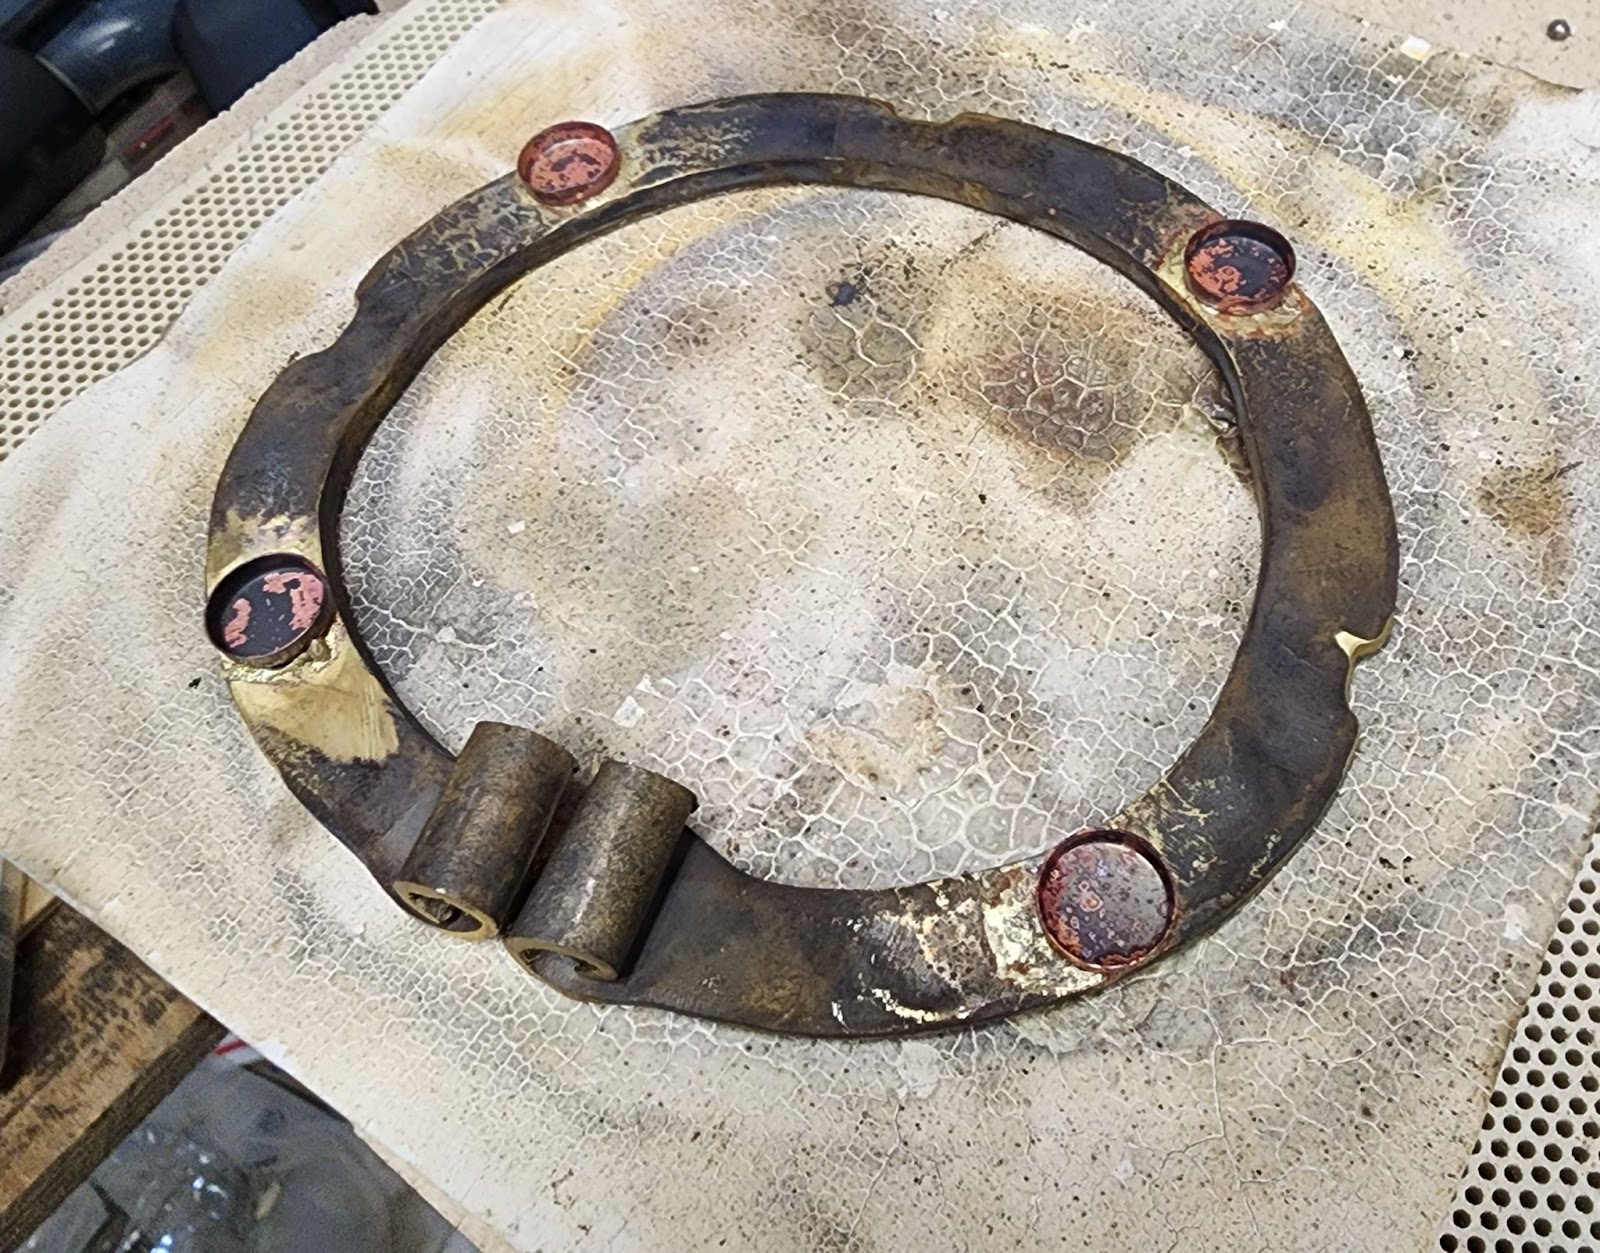
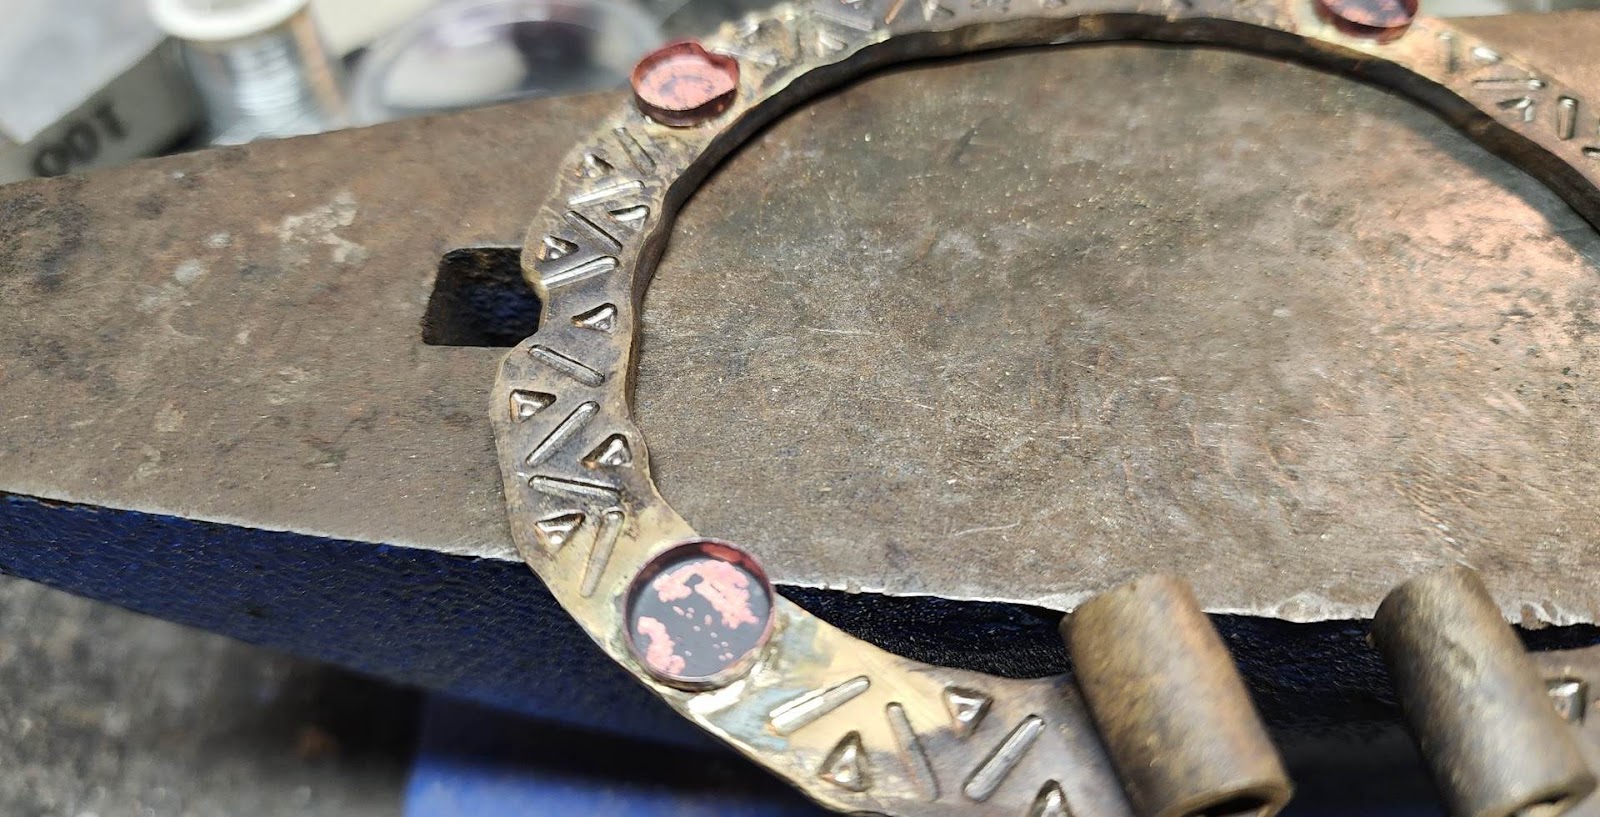
When the forming of the terminals is done, I anneal again, then mark the piece with a pencil into quadrants. I do a little decorative filework on the outer edges, similar to the shapes shown in #21-24, Figure 3.
Fig. 17: Simple decorative edge filework
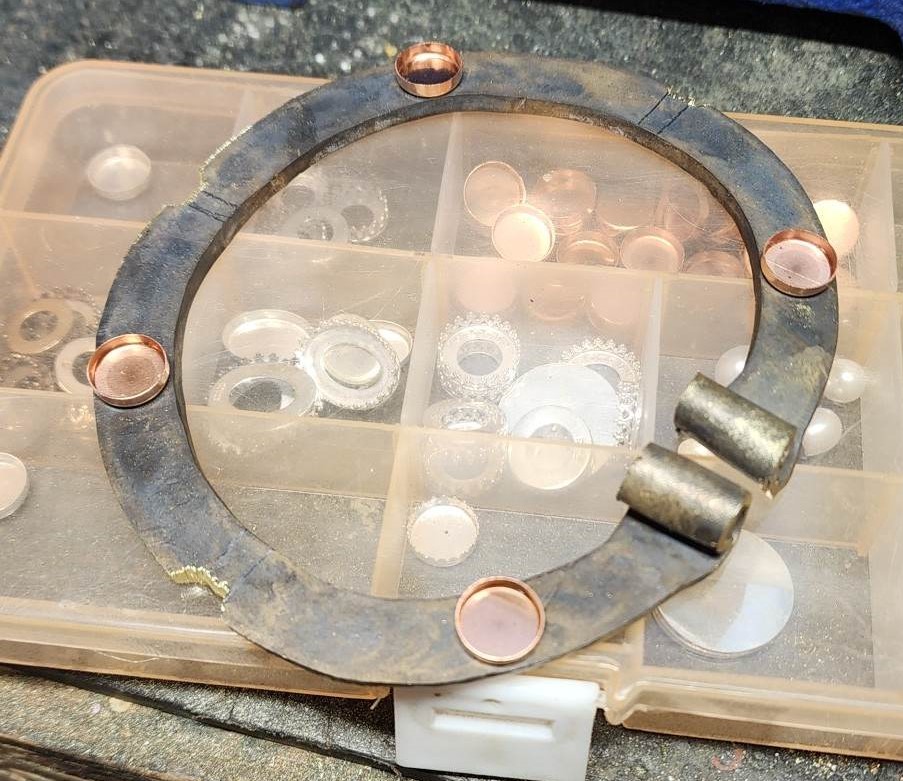
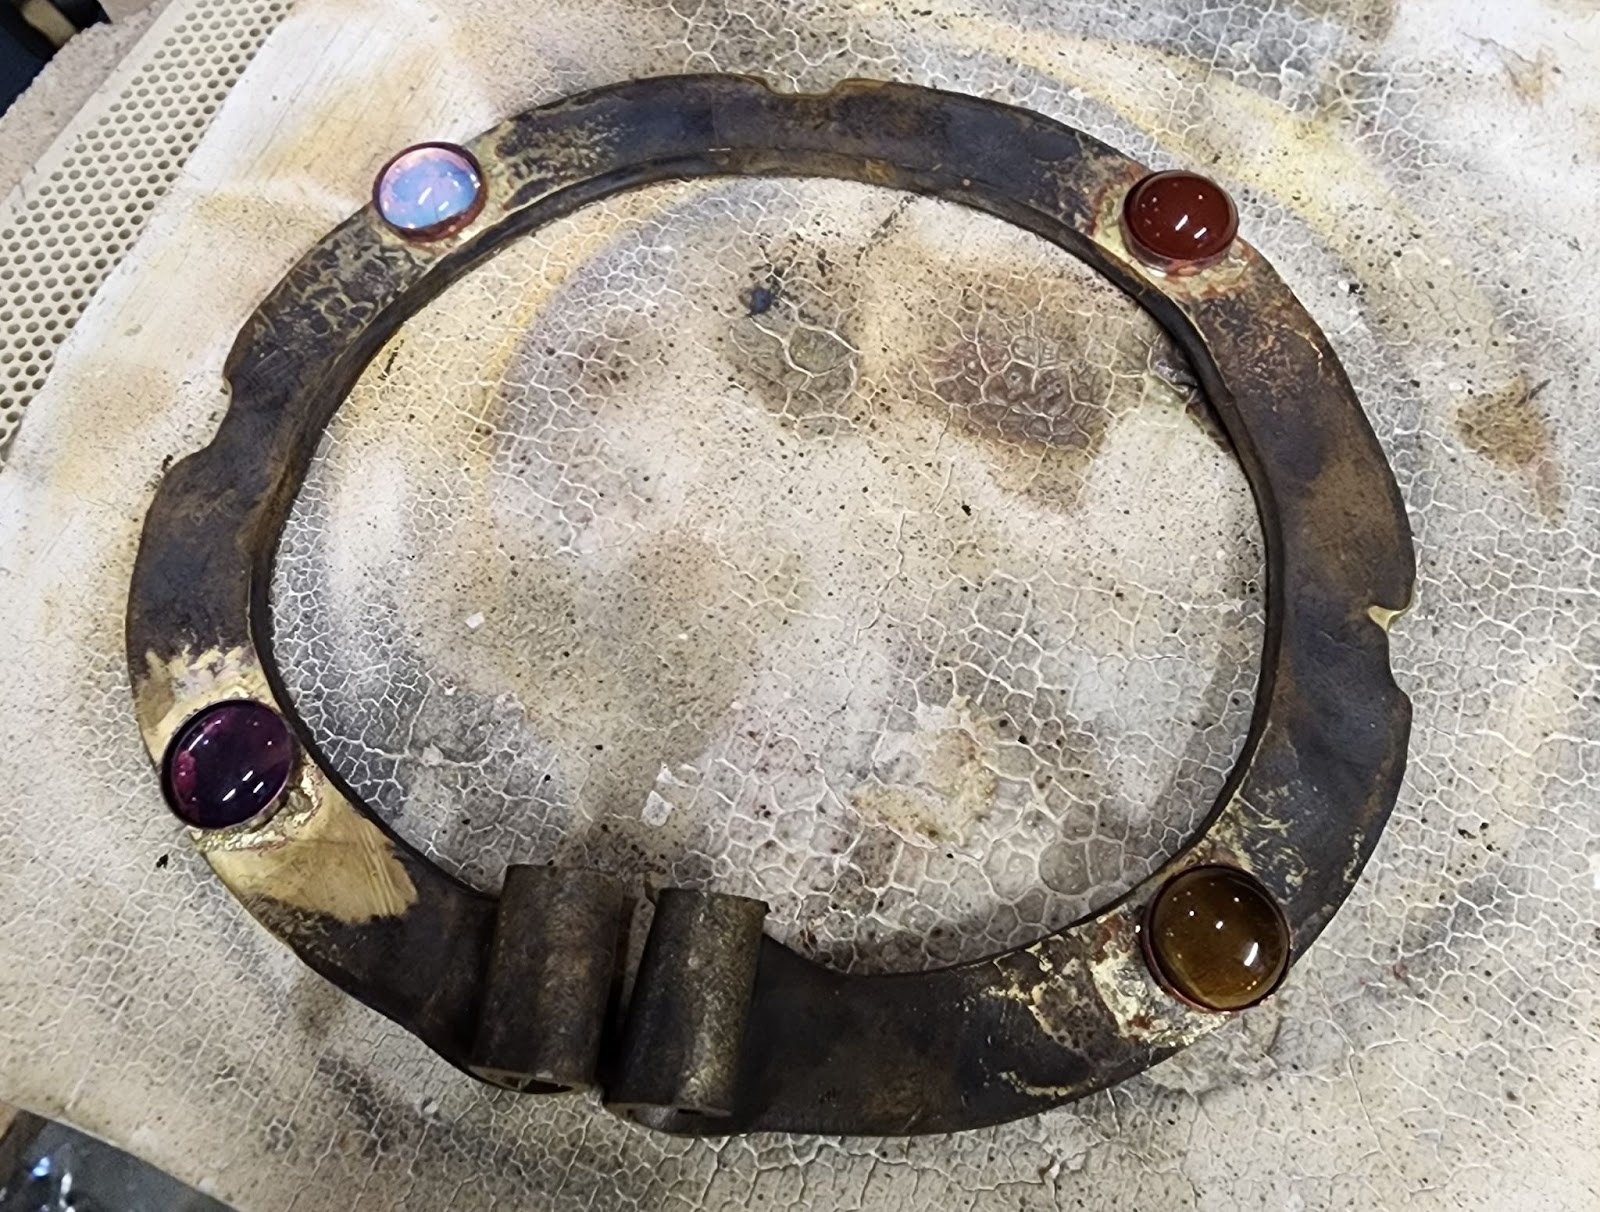
Now that I’ve marked the piece into quadrants, the next step is to mount the bezel cups for the gemstones. I move them around until I’m happy with where they look.
Fig. 17: Figuring out gemstone placement
Then I solder them into place. The area to be soldered is first lightly cleaned up with an abrasive, some flux is brushed on the bottom of the bezel and the place it is going to be placed at, brass-colored medium silver solder is laid in between the bezel cup and the piece, and heat is very precisely applied to the underside of the piece (applying heat directly to the bezel cup will cause it to melt before the body reaches the temperature at which solder will flow) with an extremely fine oxygen-MAPP gas jeweler’s torch until the solder flows.
Fig. 17: Post-solder
Once the piece is quenched to cool it, I lay the stones in the bezels to test the fit and overall aesthetic – it’s possible one of the bezel cups got malformed in the heat, but everything fits well.
It is at this point that I am starting to think this might not be a total waste of time and materials; this might actually result in a usable piece that does not look terrible.
Fig. 18: Test-fit of gemstones
Because the piece was just heated for soldering, and the bezel cups are now in place, this is an ideal time to do the decorative stamping. I choose stamps from my collection that seem plausible for a Kievan Rus piece: a simple bar, the ubiquitous triangle-dot, and a small Orthodox cross stamp. I will only use the cross stamp once, at the top of the circle of the brooch.
I set the piece flat on my 15 pound anvil and strike the stamps very sharply with a 2-pound hammer. This results in good, clear, deep imprints.
Fig. 19: Decorative stamping done
With the stamping done, the next step is polishing. Polishing is accomplished by using polishing compounds with a buffer machine. Very little effort is made to give this piece a perfect mirror polish; this could not have been accomplished in this period. I feel the piece has a more authentic look with an imperfect polish.
Cleaning the insides of bezel cups that are dirty with forge scale from being soldered is a truly miserable and tedious task, but necessary for mounting translucent gemstones such as moonstone and amethyst.
Fig. 20: Polished piece
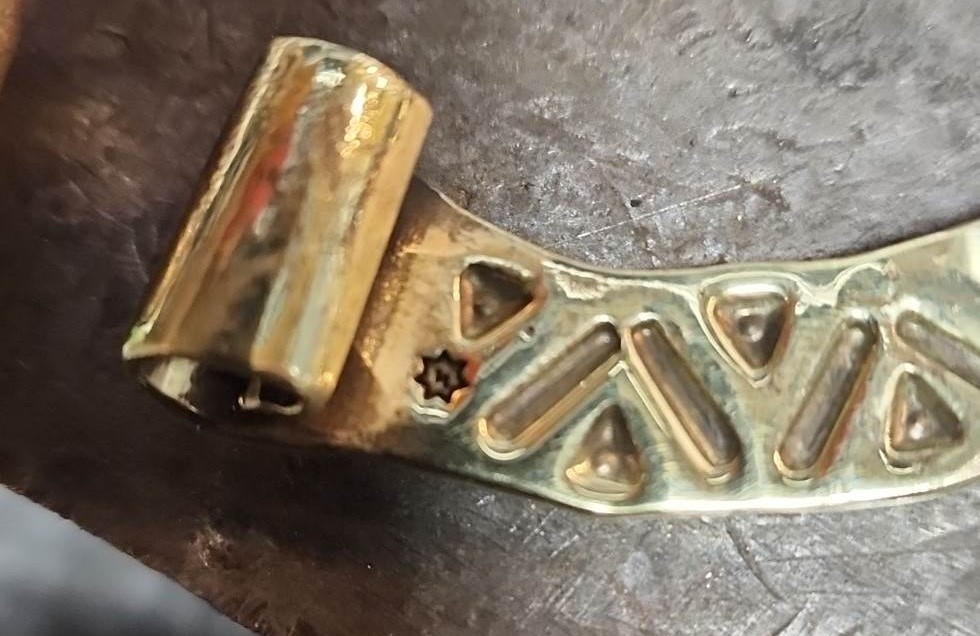
At this point I also add my maker’s mark, then do a final cleanup with mineral spirits, which remove the residue of the polishing compound.
Fig. 21: Author’s maker’s mark, a septagram with a Sowilo (S) rune inside, for Snorri
Time now to mount the stones. A small drop of super-glue is placed in the bottom of each bezel cup, then the cabochon is placed in the cup and tapped gently snug with a small rubber hammer. Special jeweler’s stone-setting tools are then used to gently press the edges of the bezel cup up and around the edges of each stone. The resulting mount is quite secure.
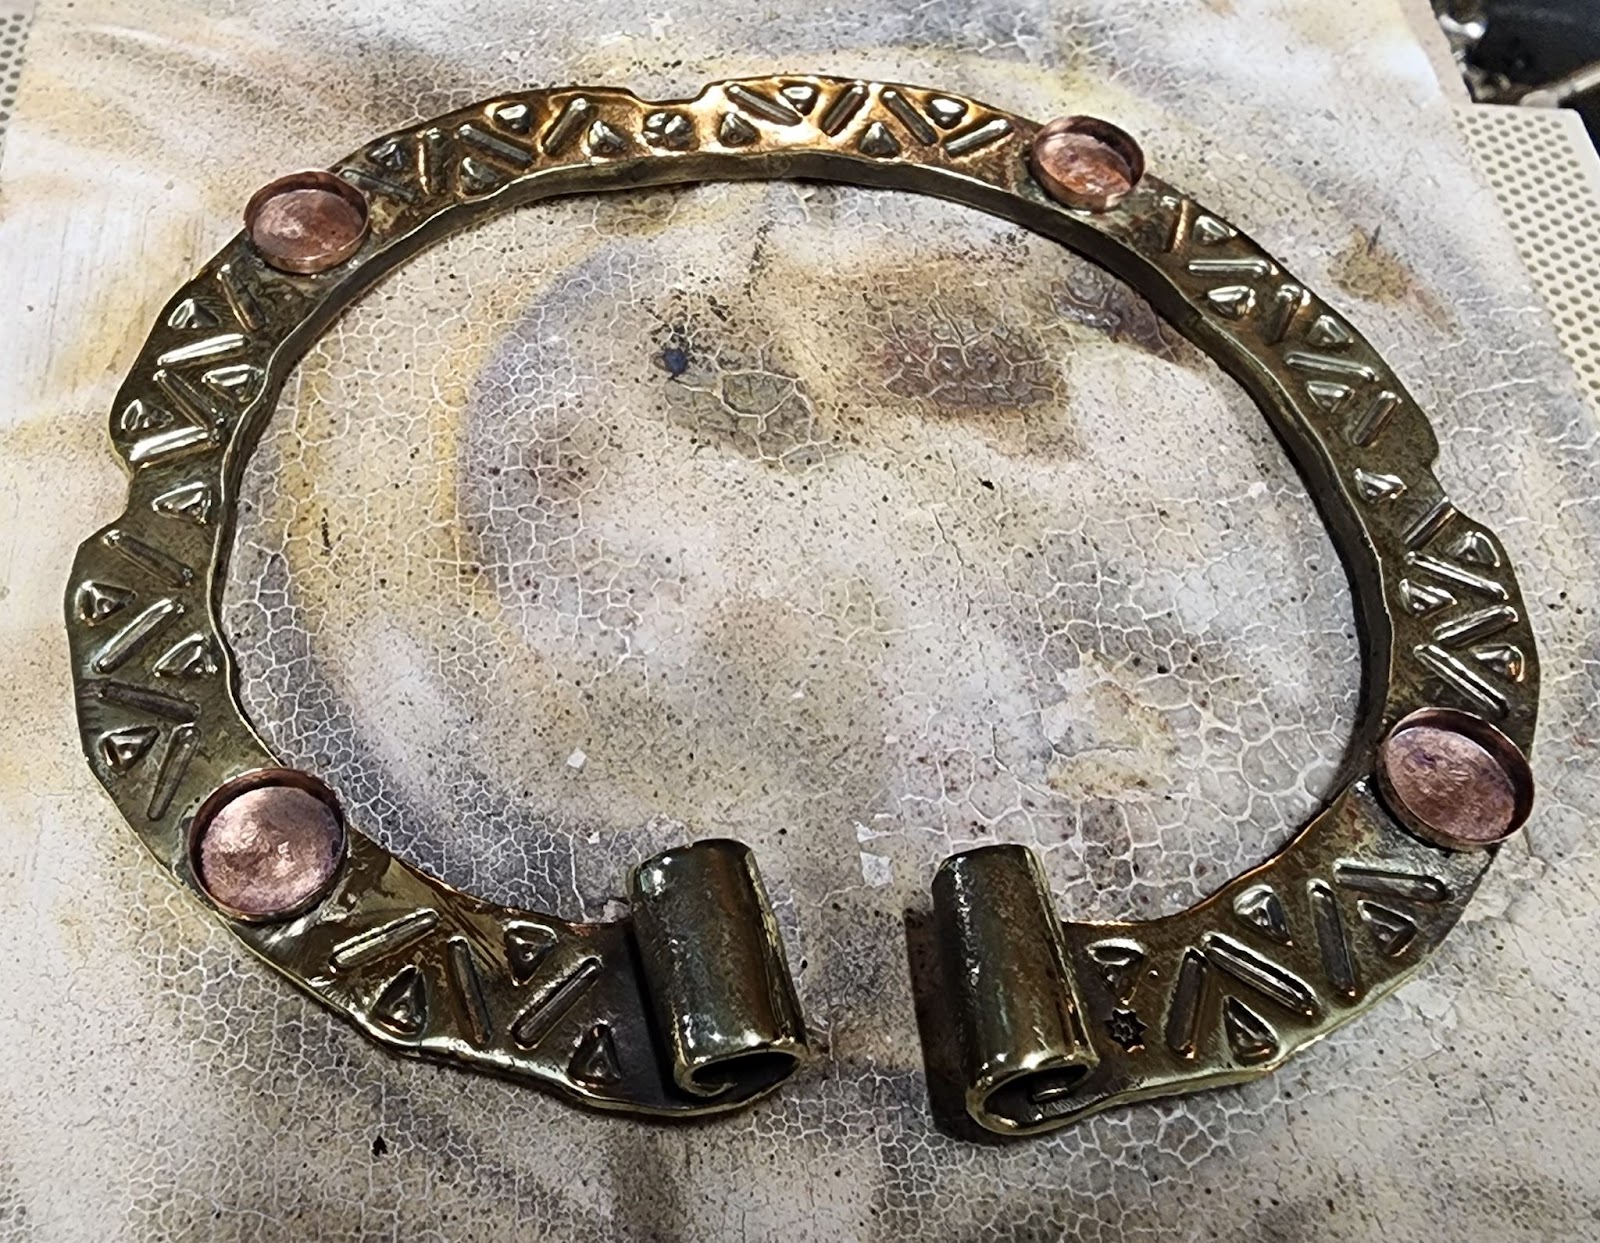
Finally, I cut off a section of square brass wire and anneal it. One end is flattened, then clamped in the bench vice. The wire is then twisted to give it some sparkle and visual interest, then sharpened on the end by hammering, then filing. The pin is then polished, and the flattened end wrapped around the brooch body, taking care to leave the loop large enough to clear all the gemstones.
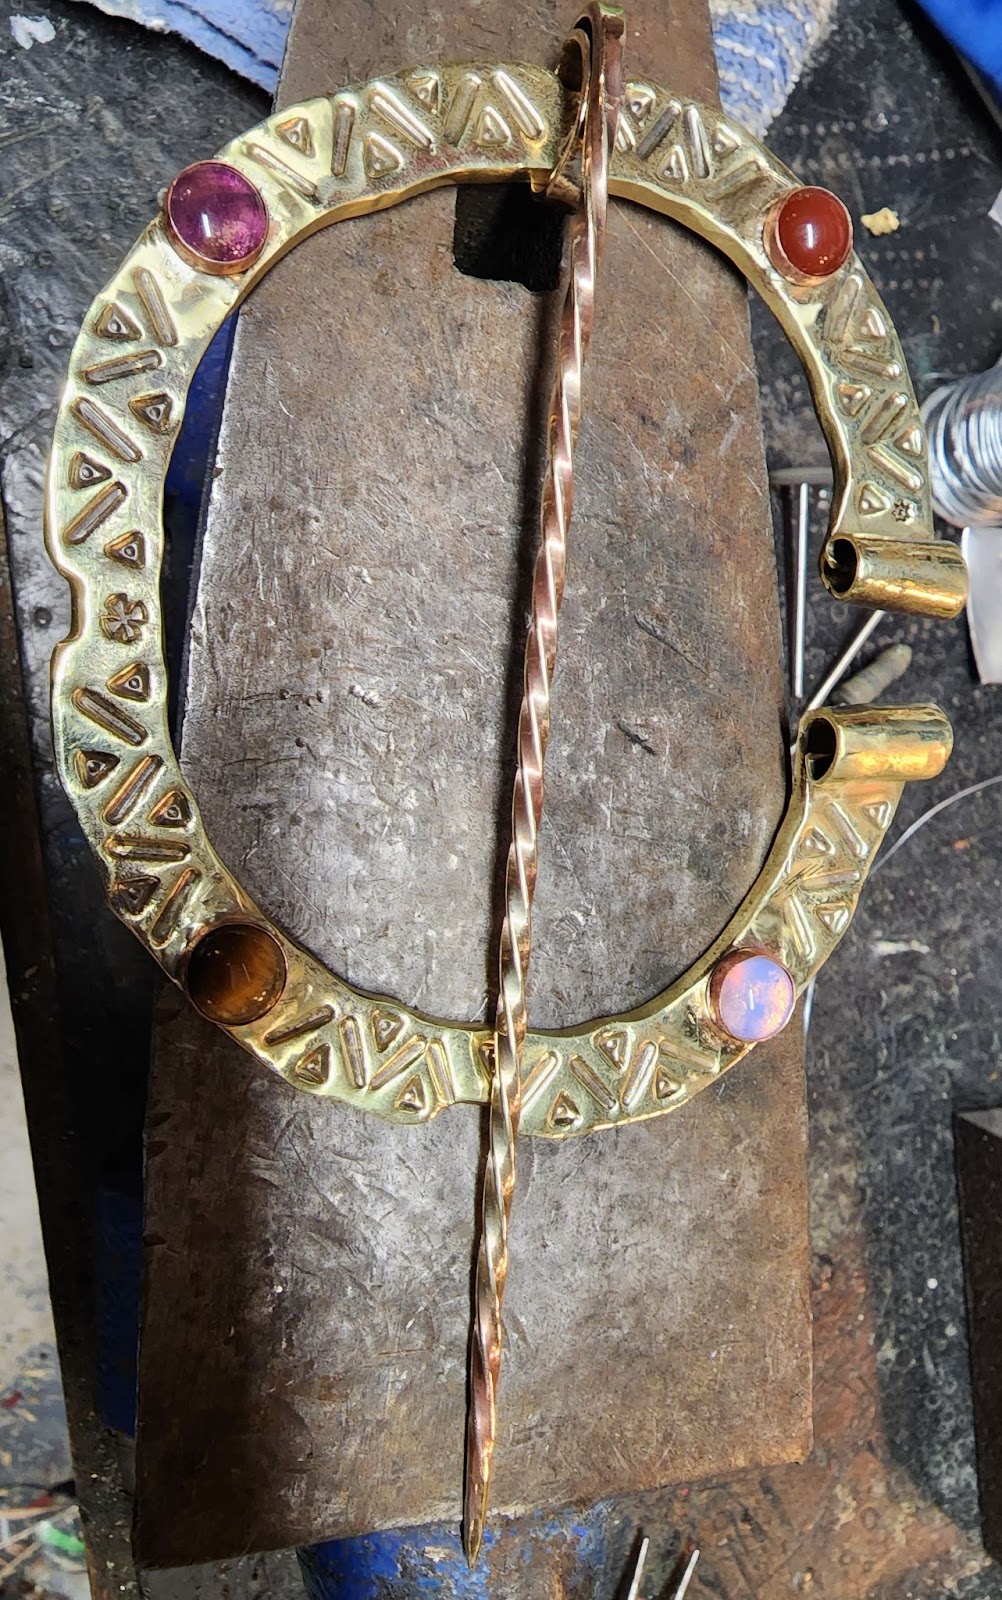
The final product looks like this:
Fig. 22: The author’s finished piece
My methods vary from period methods solely due to my lack of skill and tools, primarily my lack of a forge, which necessitates the careful use of torches to anneal and join metal. I used vise-grips to twist the pin, as I do not own blacksmith’s tongs. Period metal polishing is thought to be quite similar to modern methods, using abrasives in a semi-fluid medium such as wax (similar to today’s jeweler’s rouge), probably applied with cloth strips and vigorously rubbed. For the sake of expediency, I used modern motorized buffers and polishers for that. Finally, I occasionally use a modern tool as a shortcut for efficiency; this accounts for my use of dykes to snip wire, rather than a cold chisel and hammer, and so forth.
However, most of the use of hand-tools is similar or identical to how they would have been used in period: the hammer-forging of the terminals, the decorative stamping, the shaping with mallets and mandrels, the polishing, filework, etc. all mimic closely period practices. The similarity to period pieces of my piece is an indicator that I am using the same tools in the same ways.
Future improvements could be:
Hammering the body from an ingot
Closer examination of period stone-setting methods and materials, so as to stop using commercial bezel cups
Shaping my own stones
Cleaner hammerwork
Attempting period polishing techniques
Acquisition of more period tools, such as swapping my 15 pound anvil for more period anvils, such as those found in the Mastermyr find
Acquisition of a forge to attempt hot-joining instead of soldering
Appendix A: Silver Soldering
Silver solder material is made of silver, alloyed with various other metals to affect the melting point of the silver, including copper, zinc, and tin. It is sold in four grades: hard, medium, easy (sometimes called soft), and extra-easy (sometimes called easy) (Stice, 2019).
Table 1: Silver Solder Alloys
TYPE
Ag
Cu
Zn
Sn
Extra Easy
56%
22%
17%
5%
Easy
65%
20%
15%
–
Medium
70%
20%
10%
–
Hard
75%
22%
3%
–
Operations that take multiple soldering jobs can then be accomplished by starting with hard solder, doing some work, then next medium solder, doing more work, and so forth. With careful application of heat, it is possible to make a lower grade solder flow without making the higher grade solder in the same location re-melt. This is a vital skill for a jeweler who, for example, wants to solder a ring shut, then solder a mount for a gemstone onto the ring.
Table 2: Silver Solder Melt & Flow Temperatures
TYPE
Melt (F)
Flow (F)
Extra Easy
1145°
1205°
Easy
1240°
1325°
Medium
1275°
1360°
Hard
1365°
1450°
Finally, care must be taken that the melting point of your raw materials is not lower than the melting point of your solder. Table 3 shows some common alloys and their melting points (EngineeringToolbox, 2005, and Smith & Glover).
Table 3: Melting Temperatures of Various Metals
METAL
Melt (F)
Aluminum
1220°
Brass, Red
1832°
Brass, Yellow
1706°
Copper
1983°
Gold, 24k
1945°
Iron, various
2061° – 2899°
Lead
622°
Nickel
2647°
Pewter
247° – 290°
Platinum
3218°
Silver, coin (90%)
1614°
Silver, pure (99.9%)
1762°
Silver, sterling (92.5%)
1639°
Steel, carbon
2597° – 2804°
Steel, stainless
2750°
Tin
450°
Titanium
5396°
Zinc
787°
Bibliography
Arwidsson, Greta, and Berg Gösta. The Mästermyr Find: A Viking Age Tool Chest from Gotland. Larson Pub. Co., 1999. Print.
Williamson, R. (2003, March 31). Non-ferrous metal working. Regia Anglorum – Anglo-Saxon and Viking Crafts – Non-ferrous Metalworking. Retrieved March 21, 2023, from https://regia.org/research/life/othermetalwork.htm
Please be aware that some attributions did not survive the conversion from Google Doc to WordPress article. I do not have the ambition to correct this issue. In the unlikely event you plan to cite this article for anything, please use the following as the canonical reference:
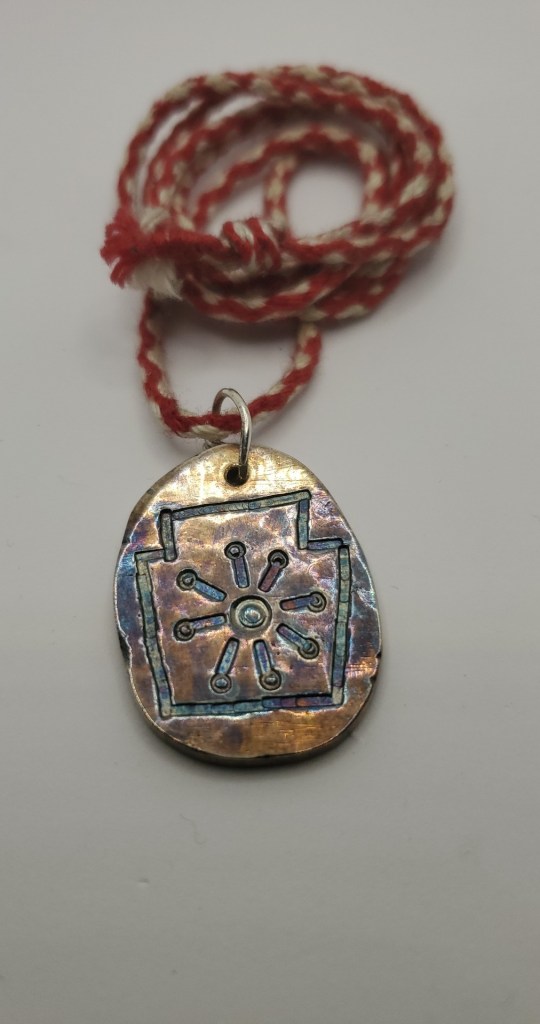
I learned a few years ago how to make acid-etched, resin-enameled medallions from Master Artemius in Delftwood. They’re awesome, but also very modern-looking. (I keep having this problem; as my knowledge of period arts and crafts increases, I get a corresponding decrease in my tolerance for non-period “stuff”, be that shoes or medallions or arrows or pouches or whatever. I try and keep a handle on it when in public.)
I wanted to see if I could use my knowledge of stamping and hammer-forging silver to make more period-looking medallions. So far, I’ve made a Keystone (Æthelmearc’s Order of Merit for Service) for Lady Vedis Aradottir (my pocket scribe):
and a Gage (Æthelmearc’s Order of High Merit for Heavy Fighting) for my buddy THL Bjarki:
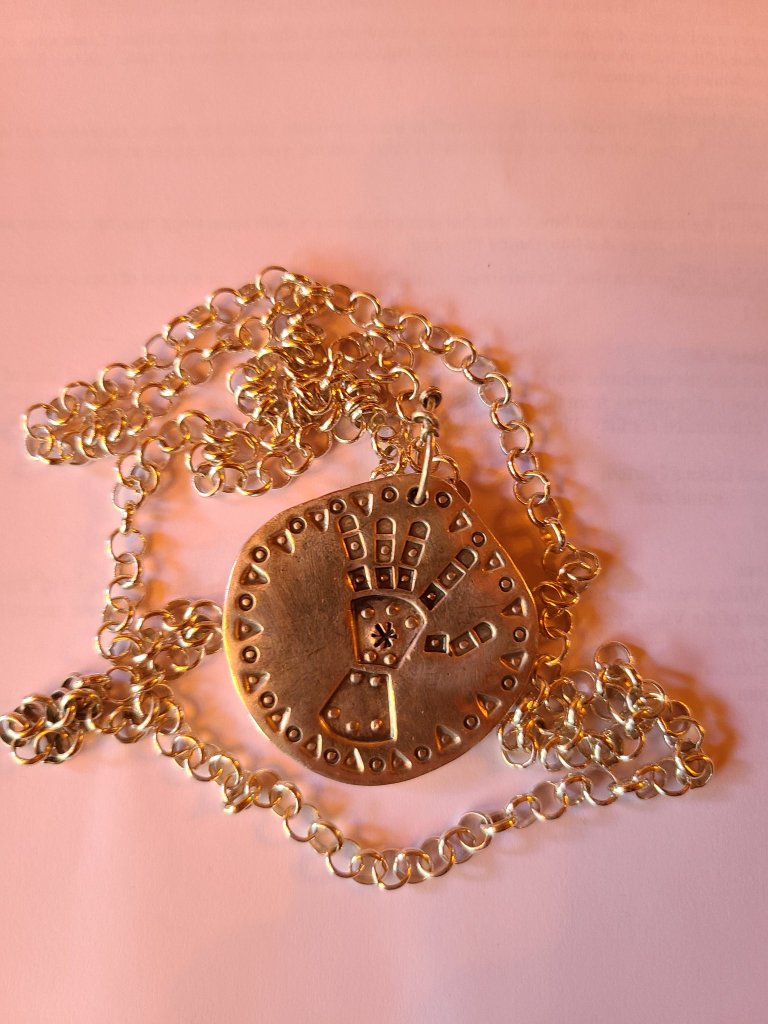
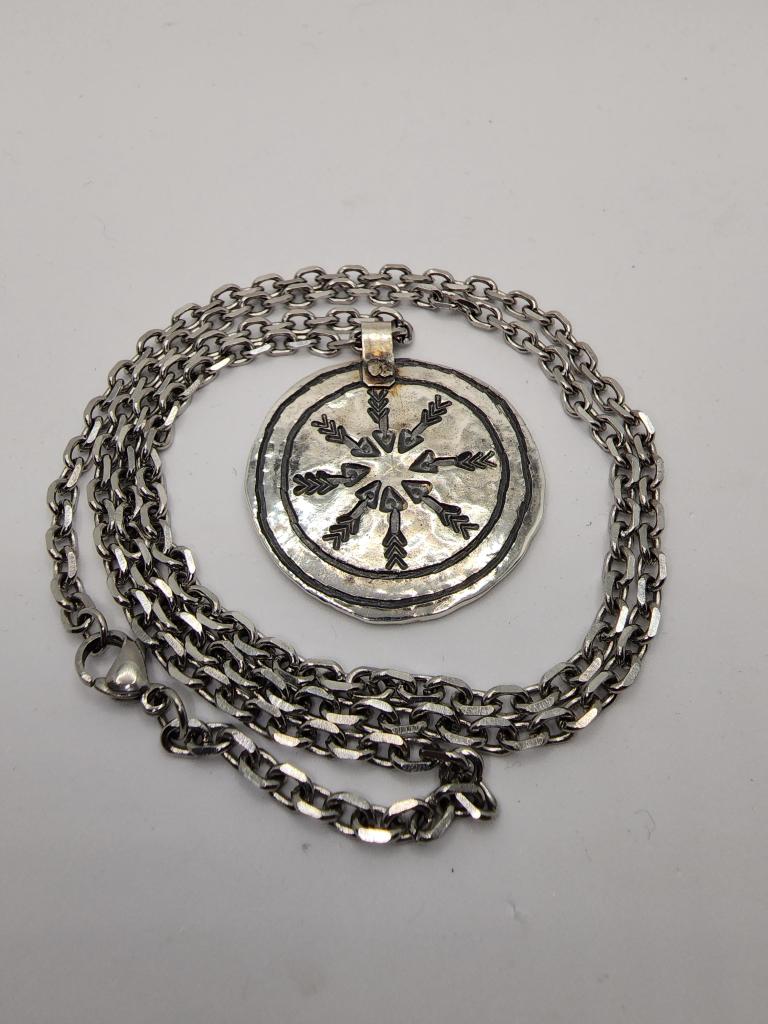
I needed to do a Master Bowman medallion for Lord Godzimir the Golden, another good buddy from down in the Pittsburgh area. These are rank medallions, not strictly speaking awards, as they’re earned, not given, but those of us who are serious archers prize them pretty highly.
I ended up casting a flat round slug from about an ounce of silver, hammering it out a bit more to make it more coin-like, stamping all the details on, riveting on a bale, and finally hitting the indentations with a little liver of sulfur to blacken them. Hung it on a silver chain I had on-hand, rather than constructing one this time. Ended up looking like this:
The actual badge is supposed to be yellow and red (you can see it in the title image of my blog’s front page), but I just can’t get behind that modern-looking aesthetic for us early-period personas. We’ll have to wink and nod and pretend we know it’s there.
I think these are pretty neat, but they’re only okay for a pretty specific subset of personas. Fortunately, everyone and their uncle wants to be some kinda Viking these days in the SCA.
Tell me how you feel about these in the comments! Would you like to get one of these? Are they too rough-and-rustic?
Saturday, I went to Crown Tournament in Æthelmearc again. This one was waaaaay down in the Barony of Blackstone Mountain in BY GAWD West Virginia. We were just there two weeks ago for Blackstone Raid – same site even! – but my friend Bjarki is on the Beat Everyone’s Ass Tour of Æthelmearc this year, so I’m going along – actually a bunch of us went down to support him and help out – to help him in his quest for a crown by heralding him into the lysts.
I’ve done a good bit of this over the last few years, and I am not known for any one particular thing (other than being loud and enunciating clearly). This is probably because I don’t like to do the same thing twice. I have bragged couples into court before the Crown in German and Pig Latin, sung in Gregorian chant and Irish traditional filk, bragged in just the consort, only mentioning the combatant as a parenthetical footnote, and a bunch of other stuff. I try and make every time special for the combatant and their consort; typically all I ask them is, “Serious or comedic?” and go from there. They have no idea what I’m going to do until I start.
This time, though, my man Bjarki is a Viking, and Vikings mean skaldic verse. This was new territory for me. I wrote some lines down and called my lifeline: Master Magnus hvalmagi, an East Kingdom Laurel for, conveniently, Norse poetry. You can read his stuff (and his brewing adventures) here: https://thedraughtsaredeep.wordpress.com/
I shot him my first attempt, and he confirmed that it was, in fact, absolute garbage. A dildo filled with syphilis. A poopy bowl of rotten chocolate custard. Just bad.
But, him being the stand-up guy he is, he attempted to assist me, and after a longer time than I’d like to admit, messing with syllable counts and beats-per-line and weird rhymes, I ended up with this. Anything that’s good here is due to him, and all mistakes are my own (and published despite his sage advice and teaching).
Lordly, comes from Coppertree To Blackstone for Winter’s throne Bearing honor, not belt-wearing Lyst-vying, light-stepping, foes dying
Mighty, comes from Coppertree Red-brand swings in skillful hand A bear, to be Sylvan heir Patriarch of Æthelmearc
This isn’t great, hell it’s not even correct or good, but it gets across what I wanted to say and sounds vaguely like it’s in some kind of Norse meter and structure. I guess I’d say it’s vaguely a Drottkvaett, if I had to pick something, but the rhyme scheme isn’t right. It was enjoyed and complimented at crown, so I guess that’s a win. Maybe I’d bust this out again at a drunken bardic circle.
PS. Bjarki was dead last in the Order of March, and made the semifinals. He’ll get the next one.
Photo by Alaxandair
FOLLOW-UP:
Six months later, I gave him this at the next Crown Tournament.
Noise of bold battle Beats boundless green hills Hersirs come hungry Hawk-red banners with silver Cierech our dróttning Draws devotion from all Arnthor konungr watches Waiting to give dwarf-ring
Desired by sundry Skilled sword cinches boon Bjarki foe-hammer Head held high with Winter While blood-lettings run Red rivers down hillsides Hear me, Æthelmearc Alas for your fates
At Gulf Wars this year, my good friend Bjarki impressed King Gareth and Queen Juliana so much at the Viking deed of arms that they gave him a silver ingot. He wasn’t sure what to do with it, so came to me. I told him we oughtta make something out of it. My first thought was a belt tip, but turns out that my research shows those were usually cast, not forged, and I’m straight garbage at casting. We didn’t really make any decisions, and he stuck the ingot into my jewelry bag for safekeeping.
We both promptly forgot about it for a couple weeks.
Then he decided he wanted to fight in Crown Tournament. His current girlfriend is lovely, but not super-interested in the SCA, so he’s been fighting for a Pelican from the other end of the kingdom – she’s great and it’s a good arrangement (bumps him up high enough on the roster for crown that he doesn’t have to challenge in). He wanted to give her a gift, and we remembered the ingot. We talked a bit, and he decided that giving her a Mjolnir was what he wanted.
I thought first that I’d see if I could cast one. Let’s see how that went first:
I carved a Thor’s Hammer into some soapstone for a mold, and heated up a bunch of scrap silver in my crucible with a MAPP gas torch.Starting the pour. This never works for me. Already a mess and I can tell this is a fail.Eeeew.Not much to do but keep pouring at this point.Gross.Big stupid muffinhammer.Straight garbage. See that little ingot of silver on the anvil to my right? Gonna start over with that, because that’s actually Bjarki’s ingot. I had so little faith that this casting try would work I didn’t melt that one in with the scrap silver I had.
Anyways, yeah, total fail. I honestly just need to put more effort into learning the right way to cast silver – it’s a lot different than casting pewter, which I have a pretty good handle on. So anyways, I snatch up that little ingot of Bjarki’s and start hammerin’.
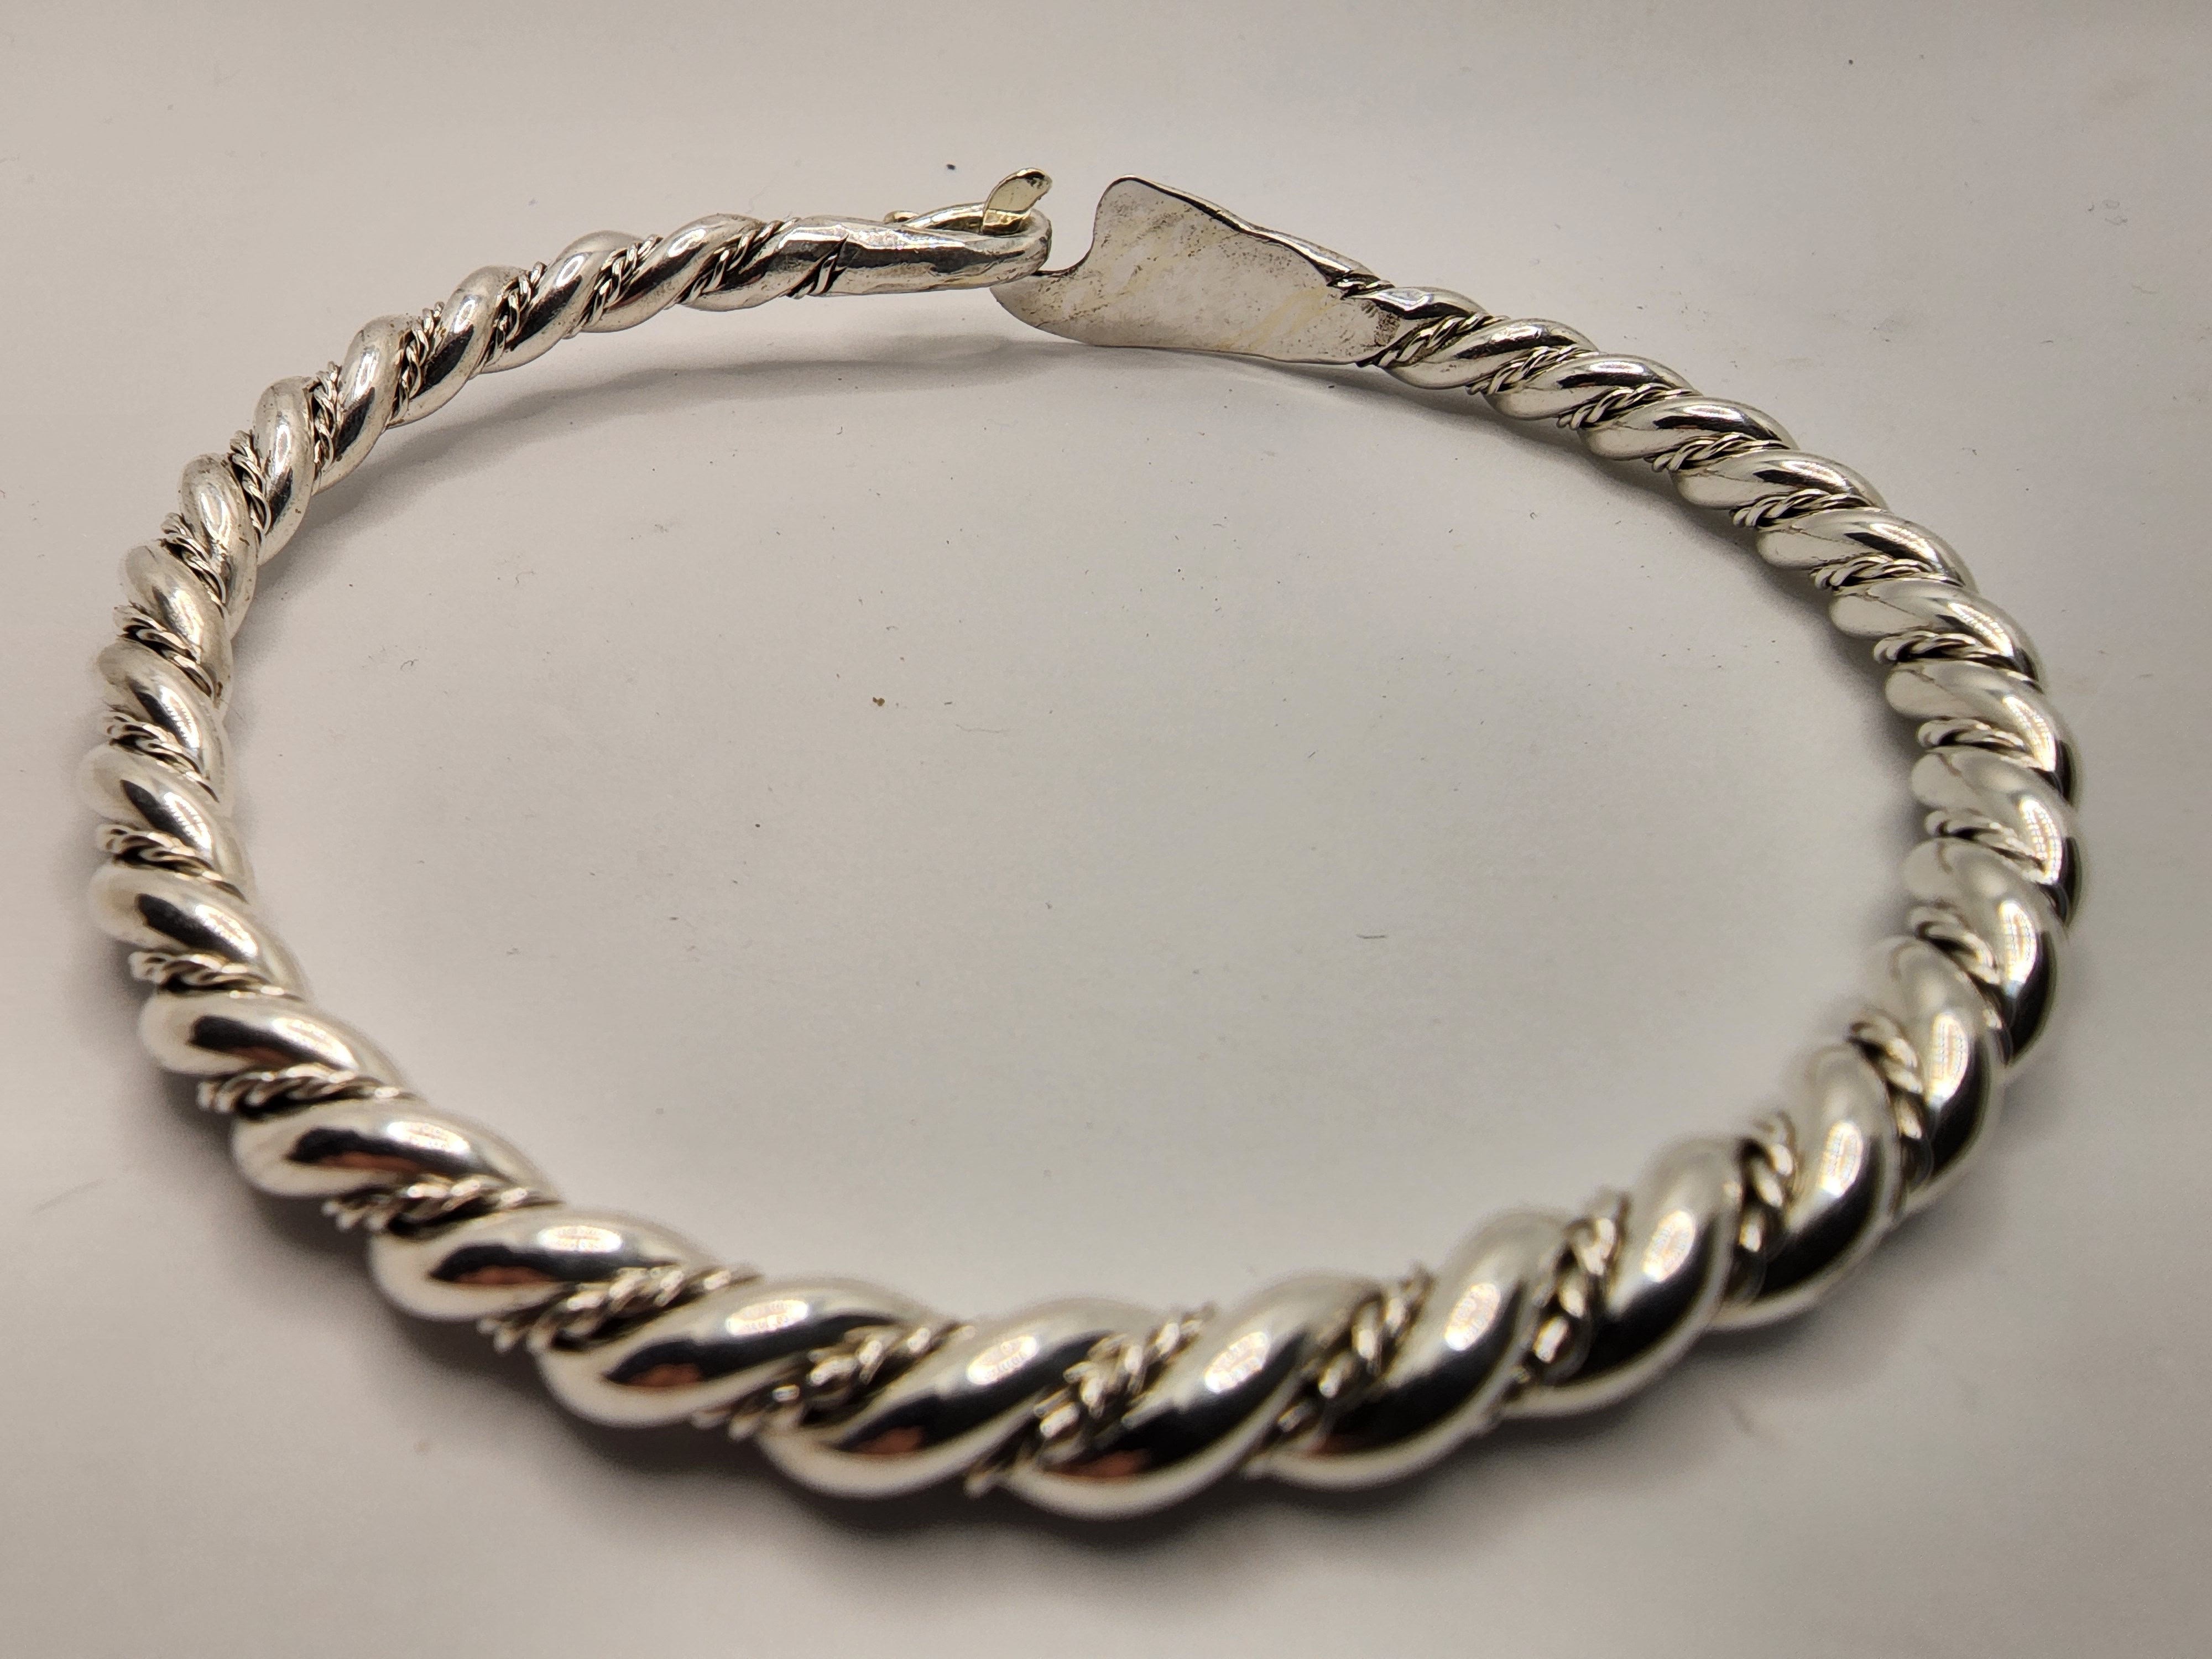
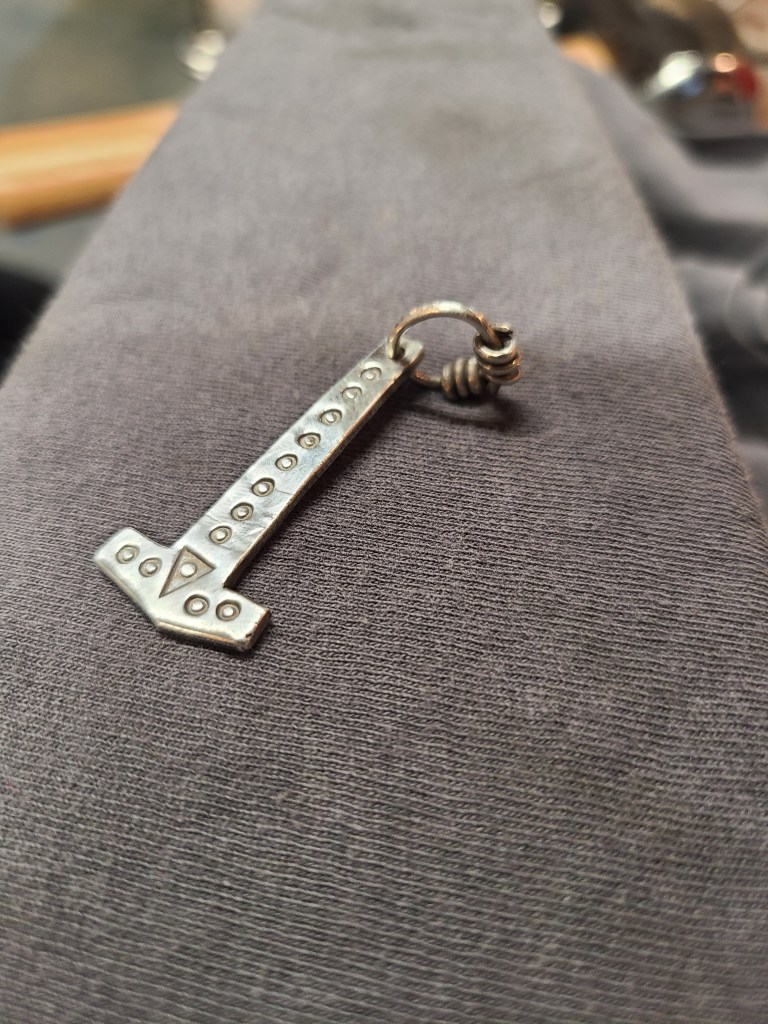
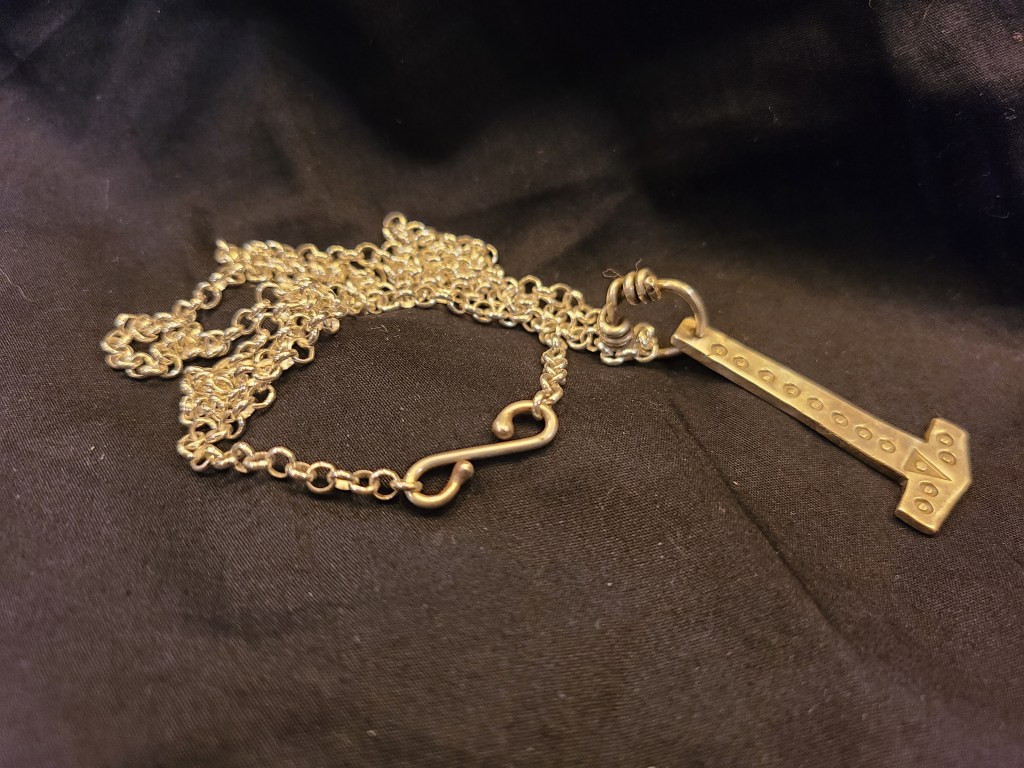
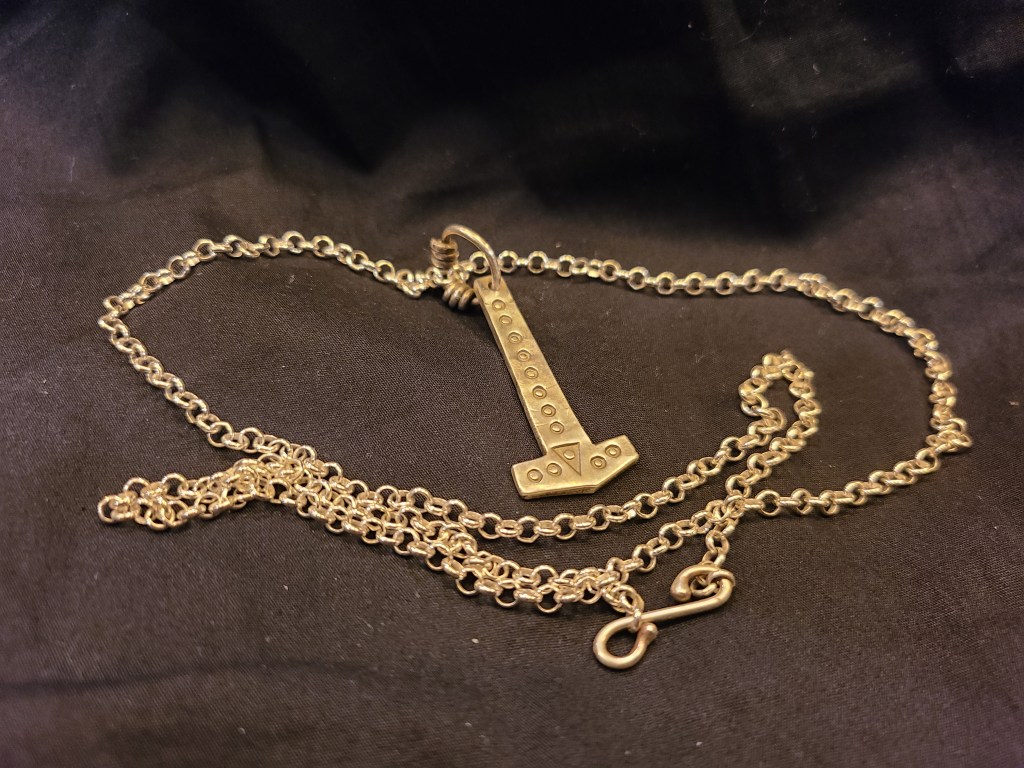
As usual, I use a hammer with one face rounded and polished clamped in my vise as an anvil, and use another hammer with a rounded and polished face to draw the ingot out, but striking glancing blows. This makes the hammers act like a rolling mill. After each pass with the hammer, the ingot has to be annealed to soften it again. Silver work-hardens; you can only hit it once or twice before it becomes too hard and you run the risk of it cracking. Still drawing it out. I’m pretty sure I’m not smart enough to forge the whole hammer, so I’m going to cheat a bit. My high-tech quenching tank, with red-hot silver being dunked after annealing. It makes a fun hissing noise. Silver, unlike ferrous metals, doesn’t harden when heated and quenched. That’s enough flattening. I sketched a long-handled Mjolnir onto it with a pencil – you can sorta see it there. Then I got out the jeweler’s saw and started trimming. This is very tedious but very precise. I’ve lopped off the end, now sawing up the handle. The Vikings would never have sawn silver – you’re wasting it. Everything they did was cast or hammer forged from cast ingots. I’m in a hurry though.Still sawing my way up the long handle of the hammer.Bunch more sawing and I end up with this. I gave it a final anneal, then a rough cleanup with a 220 grit sanding sponge.I used some small files to round off all the edges and clean up some saw marks. I don’t feel bad about this like I do the sawing- files are period, they found some in the Mastermyr tool chest.I sanded the faces with a 220 grit sanding sponge before I took it to the buffer for a quick initial polish.Using handmade Viking-style stamps to decorate the face. You only get one chance to make a first impression…Switched over to a tiny circle-dot stamp I made tonight for this project. More cheating – I used a Whitney punch to make a hole in the end of the handle.Had some silver wire, used a small hammer to draw the ends out a little for a more authentic look. If I was hardcore I’d have drawn this wire by hand myself. Tonight I ain’t about that life though. Annealed the wire then wound the ends around itself. There are lots of historical finds with this kind of terminus.Used a tiny buffing wheel to shine it up after annealing.Finished with the hammer – but it’s got to be worn!Once it was done, naturally I had to decide it needed more. I had a bit of fine silver rolo chain in my stash. “Rolo” chain describes a fairly archaic and simple type of chain where the links are all simple round or oval links. I cut 24″ of it, hung the Mjolnir on that, and fashioned a closure of silver wire to join the ends of the chain.The clasp is a simple piece of silver wire that I melted one end of to get it ball-shaped, then threaded the chain onto it, then melted the other end.
No documentation because this is a gift, but it’s loosely based on this one found in Denmark:
The original archeological find from Rømersdal, Bornholm, Denmark. Dated to 790-1100 CE. Picture retrieved on 4/16/2022 from the Danish National Museum site: https://samlinger.natmus.dk/do/asset/9412
I can’t see the backside of it, so I don’t know if there’s a pierced hole or a forged curl back there. The ring goes the wrong way for it to lay flat anyways, so I like my version better.
Further reading on Viking stamped jewelry and decorations can be had here:
This is the documentation for my Spring 2022 Queen’s Prize Tourney entry, a silver arm ring made in Viking style, after a piece from the Cuerdale hoard.