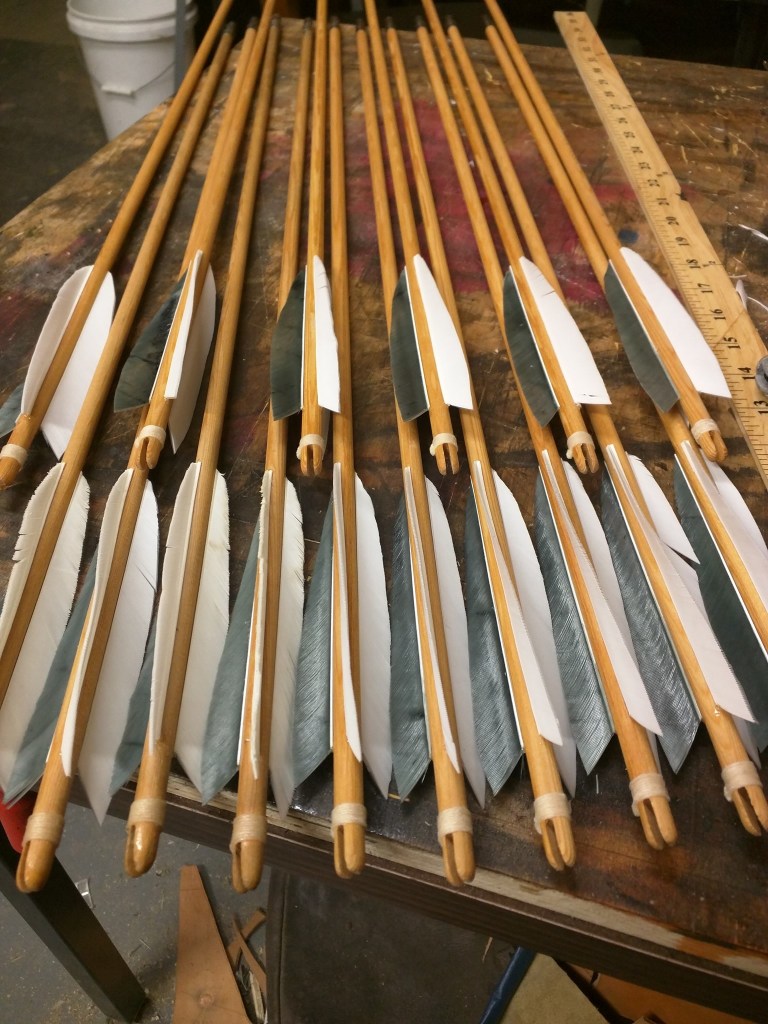
If you’re a serious archer in the SCA, at some point you end up making your own arrows – I go through about four dozen a year when I’m shooting heavily. Not everyone continues to do so, but making your own arrows is something of a rite of passage for lots of folks. It seems simple enough at first glance, then it seems terribly daunting when you actually start to look into it in depth, then it becomes easy for real once you’ve made a half-dozen dozens or so. At this point, I’ve probably made going on a hundred dozen arrows since 2018; about half for me and half for others. I’m not a full-time vendor who is selling hundreds of dozens a year, but I’m not just making a couple dozen a year for personal use, either. I hesitate to call myself an expert, rather, I simply believe I’m extremely competent at it.
Moving on, it turns out that making arrows really takes just two things: being able to do neat, precise work – and throwing hundreds of dollars at tools. To that end, I spent a lot of time dicking around with and wasting money on various jigs and tools and saws to make self-nock arrows (the medieval kind we’re required to shoot in SCA Period Archery). In the end, this machine is all I need now.
Here’s how it works and how it’s put together:
Parts list:
3/32″ flute bit for 1/4″ collet trim router: https://www.amazon.com/dp/B00004T7B3
Trim router: https://www.harborfreight.com/power-tools/routers-cutout-tools-lathes/24-amp-trim-router-62659.html
You’ll also need some kind of stable, wood-topped table to mount your router to. Sadly, the cheap Harbor Freight one I have is no longer sold. You can either use an existing workbench, build something, or buy some kind of stable table for this.
If I had to do it again, I might just mount my router on a rectangle of 5/8″ plywood, maybe 12″x12″, and bolt/clamp/screw/hinge/socket/slot that onto the side of an existing workbench or heavy table in the shop. That way you can put it away when you’re not using it. A couple of T-nuts sunk into the top of your workbench would work great for this, along with a couple 2″ bolts with fender washers through the board you’re mounting.
Finally, you need the jig. I’ve put it here for you to grab – just the 11/32″ version: http://www.mvgc.net/11-32-inch-nock-guide.stl (mvgc.net is my own domain so this is a safe file).
If you need other sizes, take that one to TinkerCAD (https://www.tinkercad.com) and alter it. If you can’t figure out how to do that, and I know you, hit me up. If you don’t have a 3D printer, or access to anyone locally with one, and we’re friends, hit me up – I’ll print you a couple and mail them to you or hand them off at an event.
If we’re not friends, I’ll still help you, but probably not for free. That doesn’t mean money, necessarily, so go ahead and ask. If I’m not busy I might just hook you up.
The end product of all this is arrow nocks that are perfect every time: correctly-sized, uniform, and consistent – everything you need for accurate ammunition!