I accepted a scroll assignment to make a scroll for my friend Sir Halfdan Dansson, for his induction into the Order of the Millrind, Æthelmearc’s grant-level order for service: AEthelmearc College of Heralds – Order of Precedence – Millrind
I’ve done a few “traditional” scrolls lately, and have even been working on my uncial hand, but that wasn’t the direction I wanted to go with this one. Sir Halfdan is a carver of runestones and a transliterator of futhark runes (https://docs.google.com/document/d/1vcfbsQuZx6OzD8o8-gBUIfJny57ZU91A1nPDC-bl4_s/edit?usp=sharing), and I had an idea to combine my ancient decorative metal stamping techniques with his teachings on rune-writing and put it in the form of a runestone – but metal.
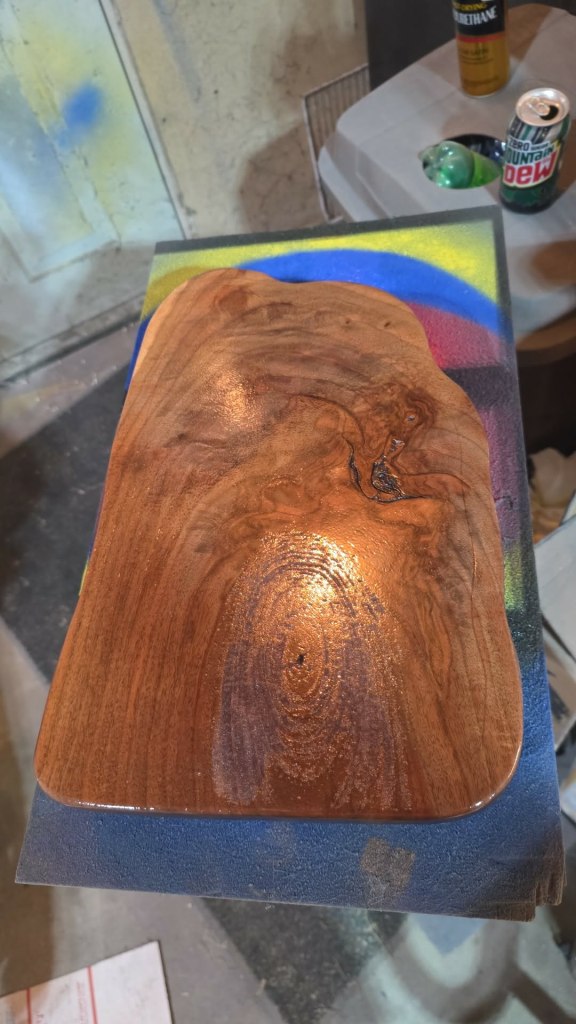
I got to work with an interesting slab of knotty black walnut from my family’s lands, and a piece of 20 gauge sheet copper.
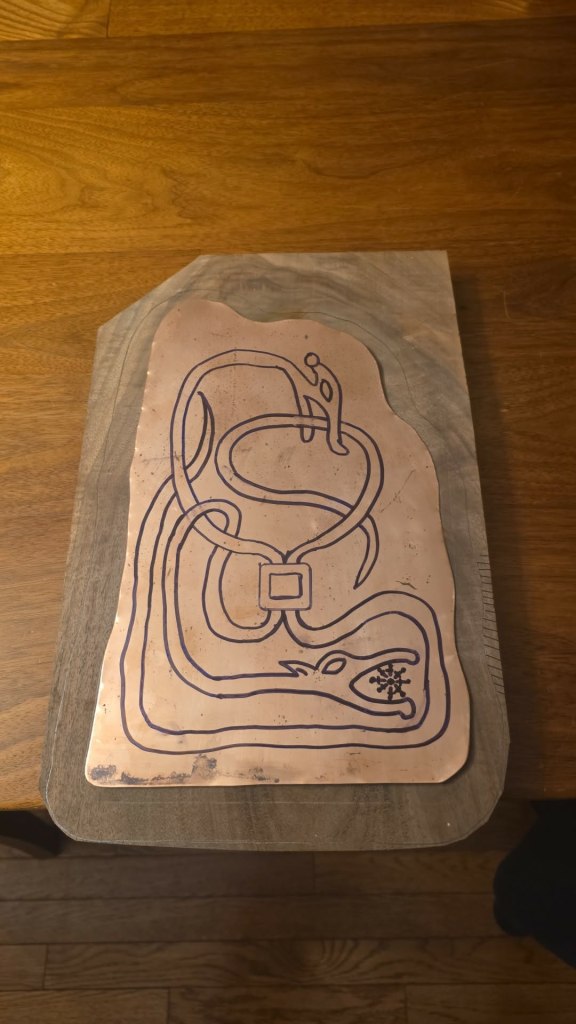
I started doodling to get a pleasing shape. The square in the middle is a stylized representation of the order’s badge.
I hacked the copper into a runestone-ish shape with some shears and traced the outline of it onto the board. I used some wing dividers to draw a second outline a half-inch out from the edge of the copper. I started to cut the board down to shape, but it’s 5/4″ thick and I promptly broke the blade on my little 10″ bandsaw. Fortunately, my father is a carpenter, and so I went to his house to use his tools to complete the wood portion of the “runestone”. I roughly sawed it out on his substantially beefier bandsaw, used a drum sander to get the profile correct, and hit the top and bottom edges with a 1/4″ roundover bit in the router table. I did a little hand-sanding with a 220 grit sanding sponge and it looked good to me.
I got home and started to apply coats of satin polyurethane to it after sanding – no stain, just wood and poly. It got about eight coats of poly over four days.
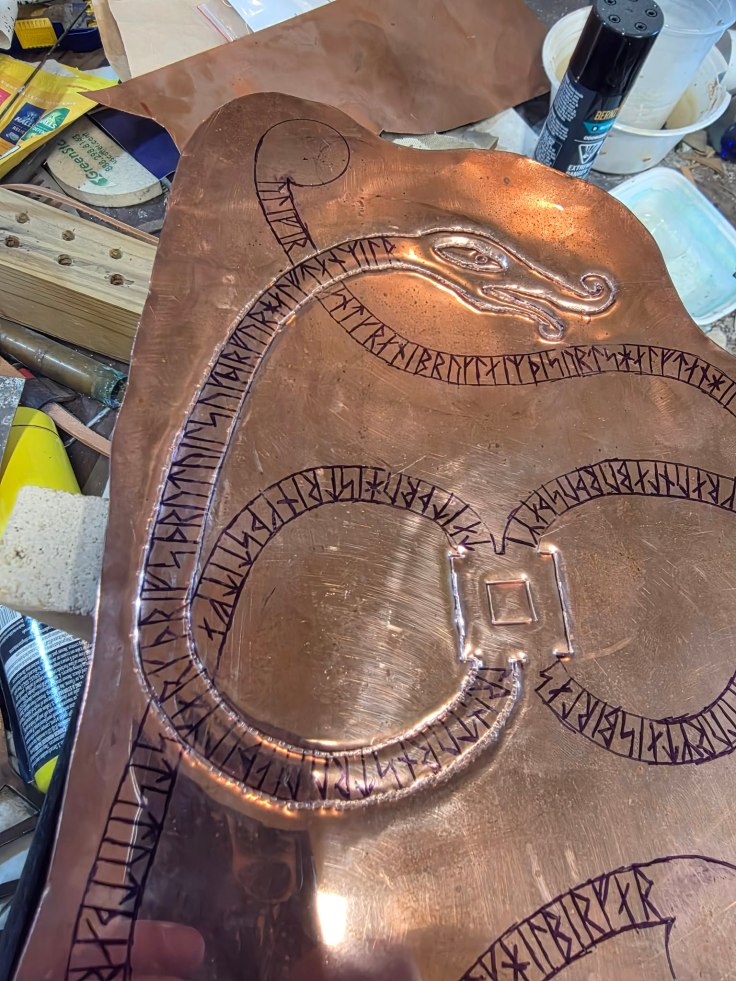
While that was happening, I decided I didn’t like my initial attempt at drawing the Norse Urnes-style dragon beasts (there was too much snake and not enough runes to fill them both), so I wiped the metal off with some rubbing alcohol (which removes Sharpie ink very efficiently), washed the copper, and started drawing again, simpler this time.
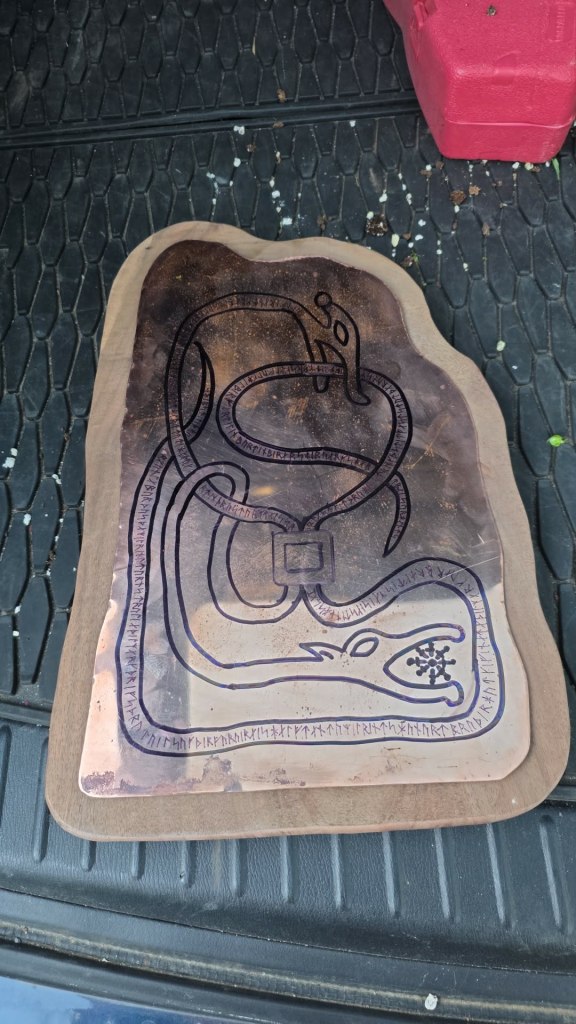
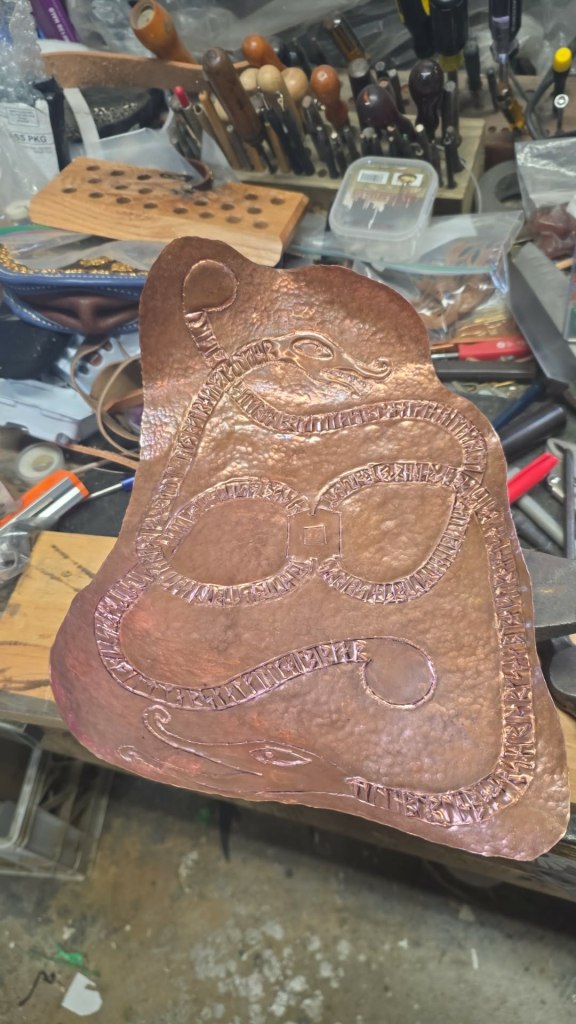
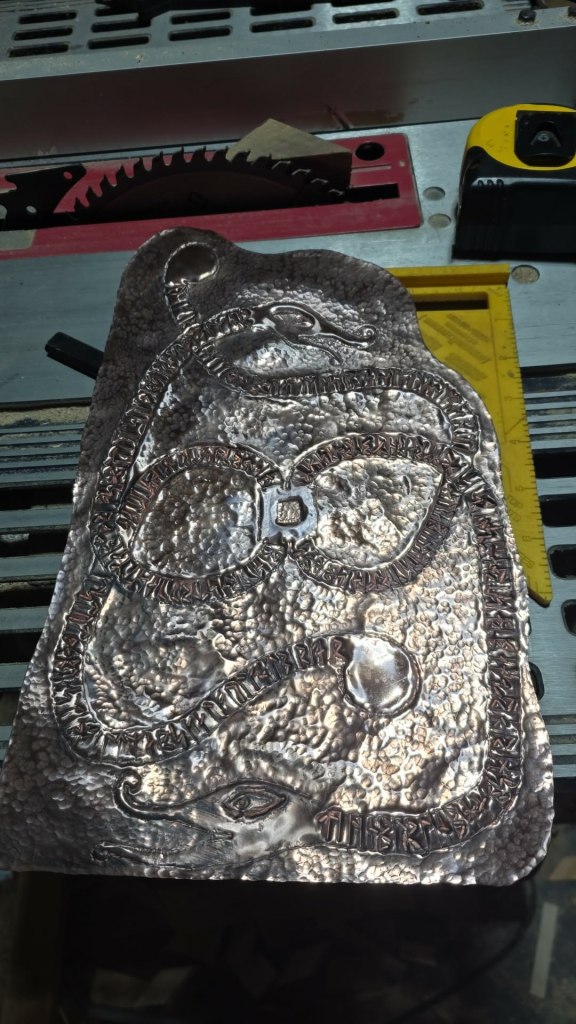
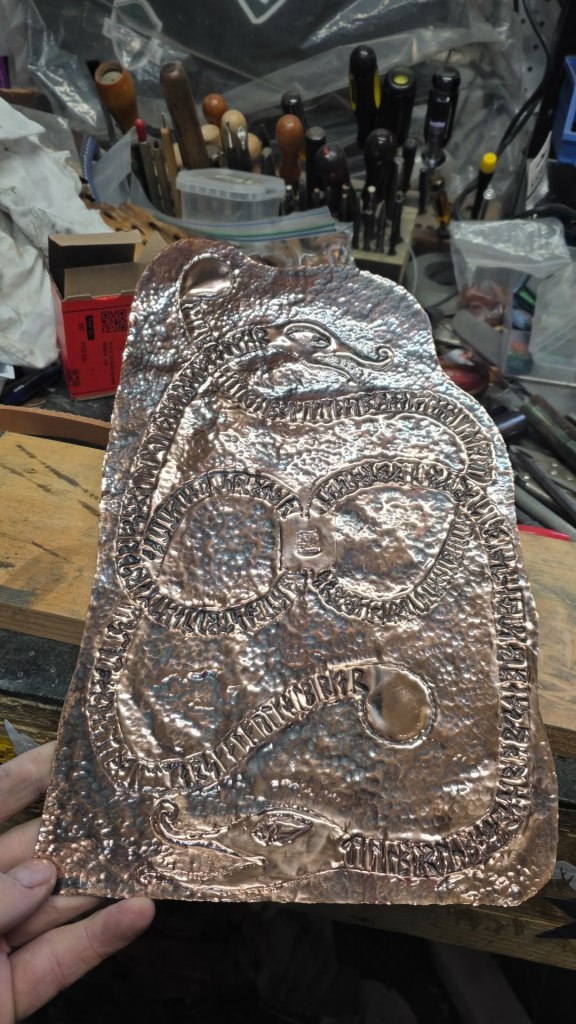
Once I was happy with that, I started hitting it. I used two bar stamps, one 1/2″ wide and one 1/8″ wide. I did the beast first, then went back and did the runes. Finally, I used a small round ball stamp and the ball side of a ball-pien hammer to add the hammered texture. I placed my maker’s mark in the beast’s eyes as the pupils.
I did the stamping of the beast outline on a piece of soft pine board, so that I’d get very deep deformation of the metal.
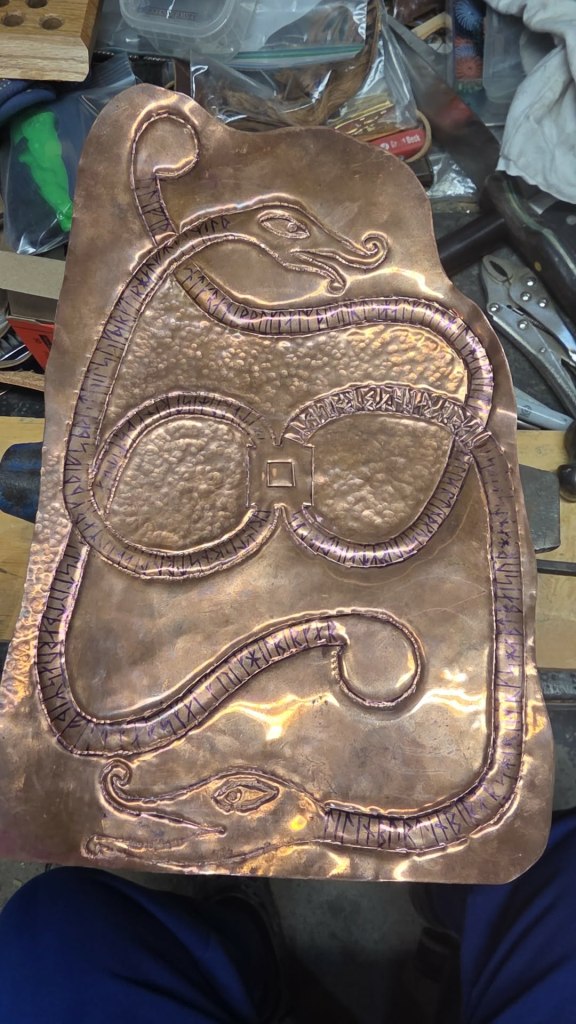
I did the stamping of the runes and the hammered texture on my small fifteen pound anvil.
All the hammering caused a lot of deformation of the metal. When I was done, the piece looked like a taco shell. It was also quite stiff – all the hammering had work hardened the metal quite strongly.

Fortunately, once I annealed the metal with a torch, it got quite soft again. I was able to easily beat it back into submission with a rawhide mallet on a wood workbench top. It flattened out nicely.
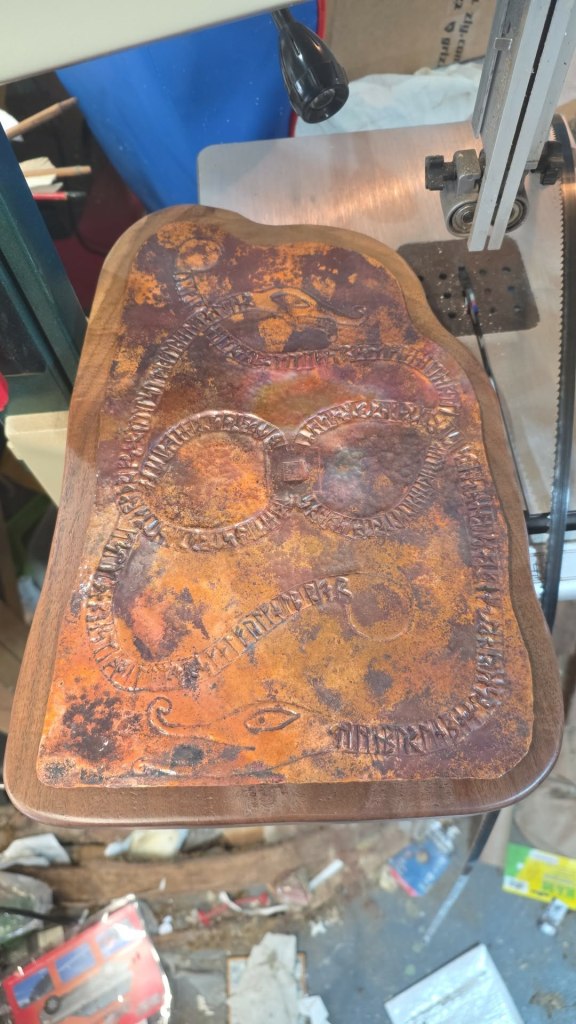
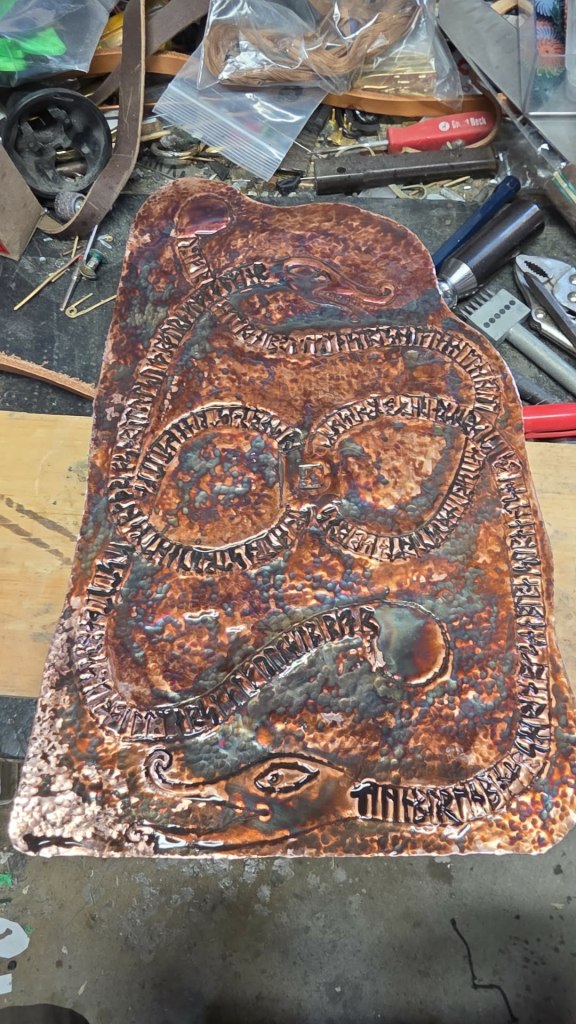
All that heating of the metal resulted in a lot of ugly forge scale though. This was easily remedied in a pickling bath. Pickling copper is probably the easiest cleanup to do, and the safest.
To remove the forge scale created during annealing, I used a traditional mild pickle made from white vinegar and kosher salt. When copper is heated in air, the surface reacts with oxygen to form layers of copper oxides – first reddish cuprous oxide, then the darker black cupric oxide commonly called forge scale. The acetic acid in the vinegar reacts with those oxides and dissolves them into the solution as copper acetate, while the dissolved salt provides chloride ions that accelerate the process by helping break down the oxide layer more efficiently. The solution eventually develops a blue-green tint, which comes from dissolved copper compounds suspended in the bath. You can’t really see that here because I pickled in a blue plastic tub.

This is the chemistry:
First:
Then at higher heat/longer exposure:
Putting the metal in vinegar (actually weak acetic acid (CH₃COOH)) looks like this: Cu(CH3COO)2+H2O
I chose this simple pickle because it is gentle on the underlying metal and preserves the hammered surface texture, rather than aggressively stripping the copper clean.
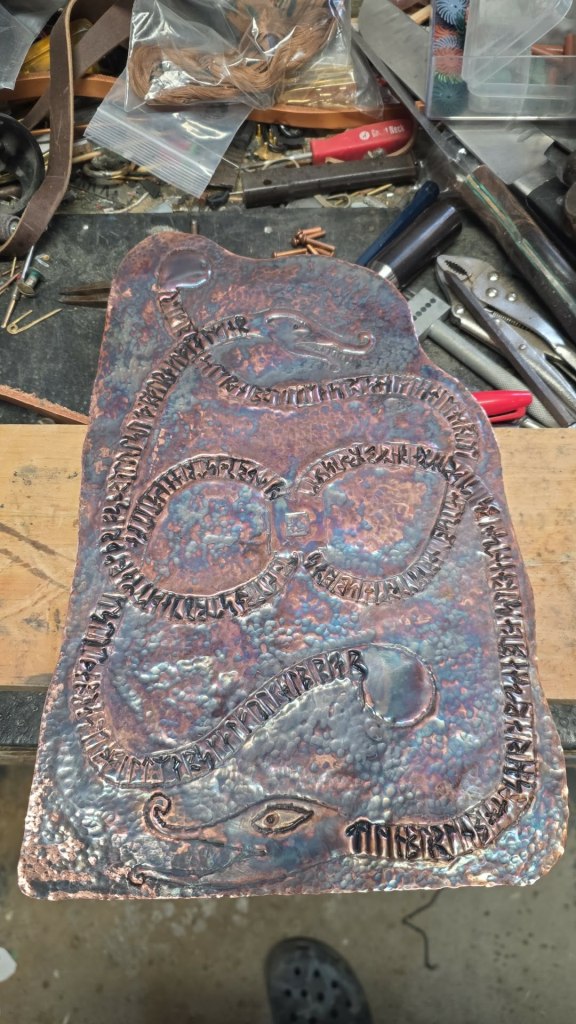
After pickling, the piece was thoroughly rinsed and dried before further tooling and finishing. This cycle of annealing, oxidation, pickling, and planishing left the copper with a complex, light-catching surface that helped give the final piece the feel of a worked ceremonial object rather than a modern polished plaque.
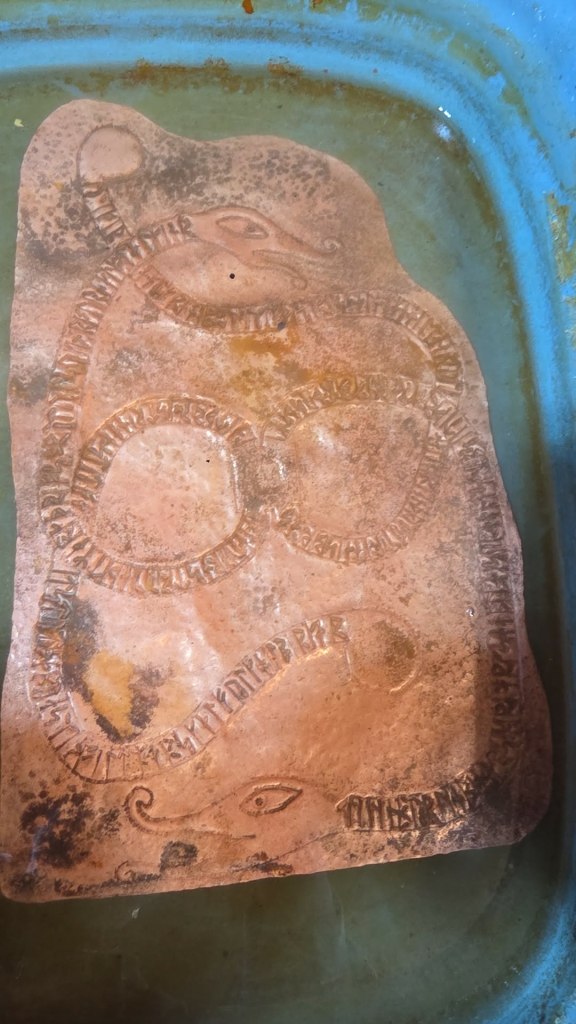

I let it soak for about ten minutes, then scrubbed it with a stiff toothbrush, put it back in the pickle for ten minutes, scrubbed, etc. until it was clear of all forge scale.
That little spot that looks different in the bottom left corner was particularly stubborn, and I used a brass wire brush to scrape some forge scale off that spot. It did scratch up the copper a bit more than I liked, but that mostly buffed out in later steps.
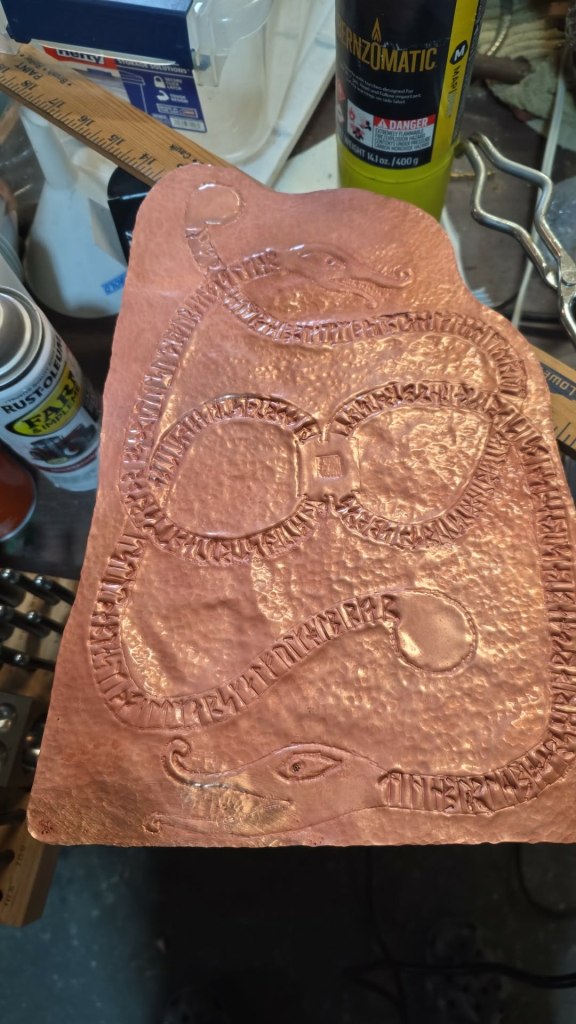
Next, I took the whole thing to the pedestal-mounted buffer and polished the whole thing with some green polishing compound. It got REAL shiny here. It also got clogged up with buffing compound – a totally normal and expected thing – which is pretty simply remedied with a stiff bristle toothbrush (I use GI rifle cleaning brushes) and some mineral spirits.
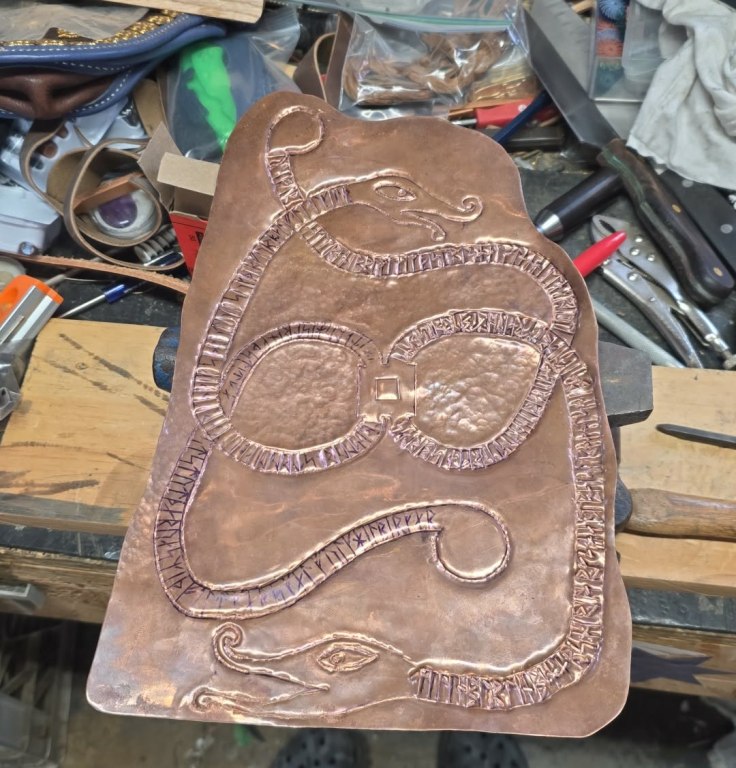
Here it is after cleanup:
At this stage, the piece was pretty, but lacked any kind of depth. The jeweler’s trick here is to use a chemical blackener/antique solution to add a dark patina, then to polish the raised areas again. This leaves the recessed areas, like the stamped-in runes, a dark color, while brightening up the raised areas.
I used this Jax Black product. It’s a liquid that I applied with a small paintbrush to the entire piece.
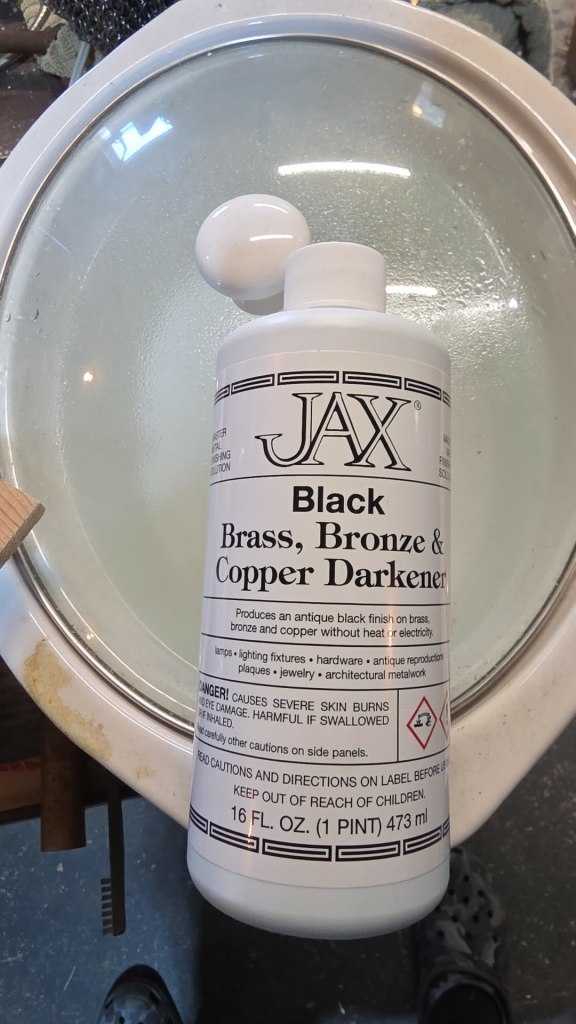
I painted it on and let it sit for about fifteen minutes. Then I washed it off with hot water and dried the piece.
To polish the high spots, I just hand-rubbed it with a Sunshine polishing cloth (https://www.amazon.com/Sunshine-Polishing-Cloths-Jewelry-Cleaner/dp/B01N7S2UK1).
After that all that was left was to mount it on the board I had prepared earlier. I needed to make sure that all the deformation from hammering hadn’t made the piece too much larger than the original, but it still fit fine.
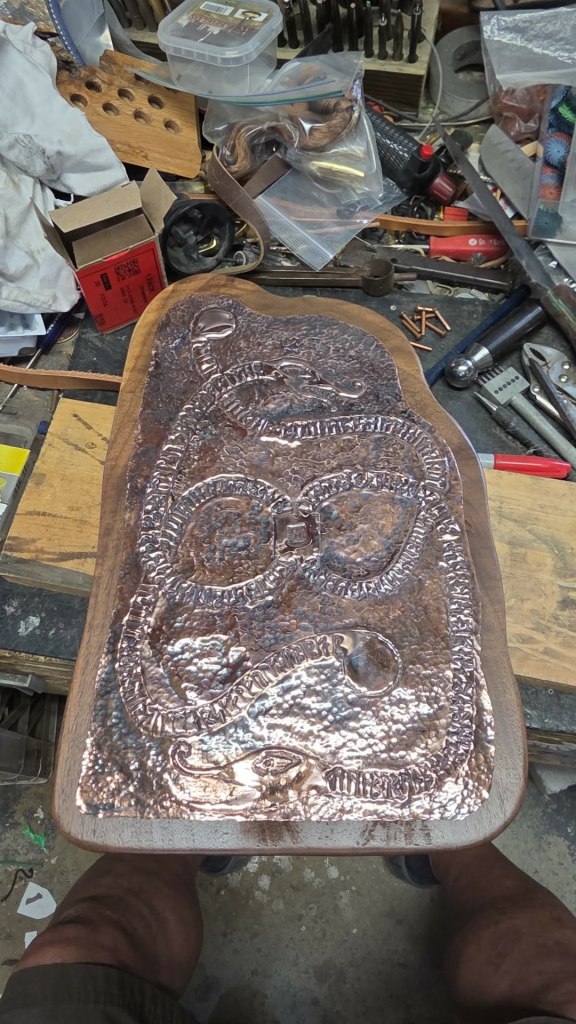
I used a handful of domed head copper rivets to attach the copper plate to the board. I punched some perimeter holes with my Whitney punch (a hand punch tool that makes holes in metal, very common in metal shops) and clamped the plate to the board.

I drilled a hole into the board through the punched holes in the metal, squirted a glob of super glue into the hole, and jammed in a copper rivet. I drilled the holes 1/64″ smaller than the rivet shank diameter so that it was a tight fit – I tapped them in with a rubber-headed hammer.
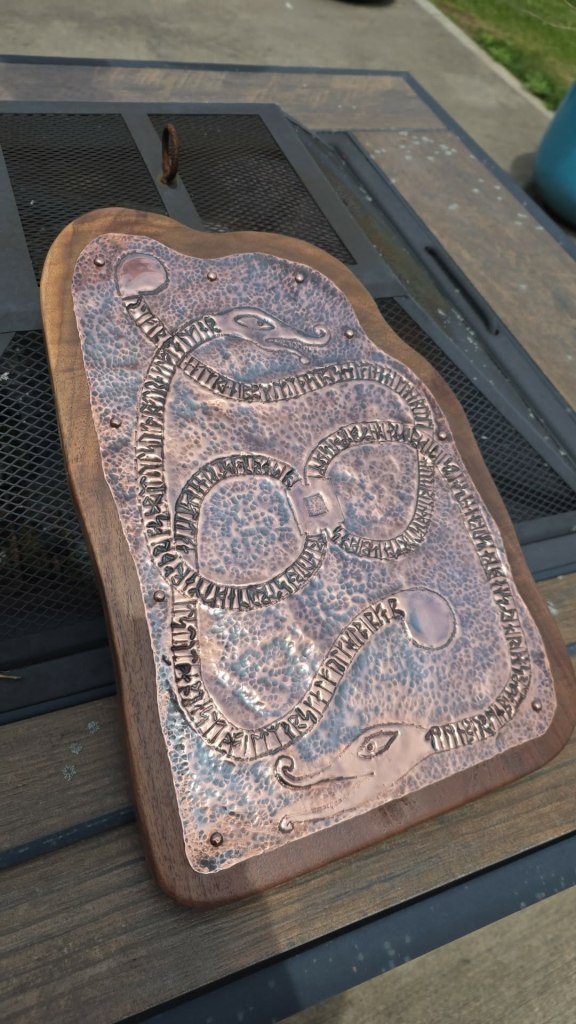
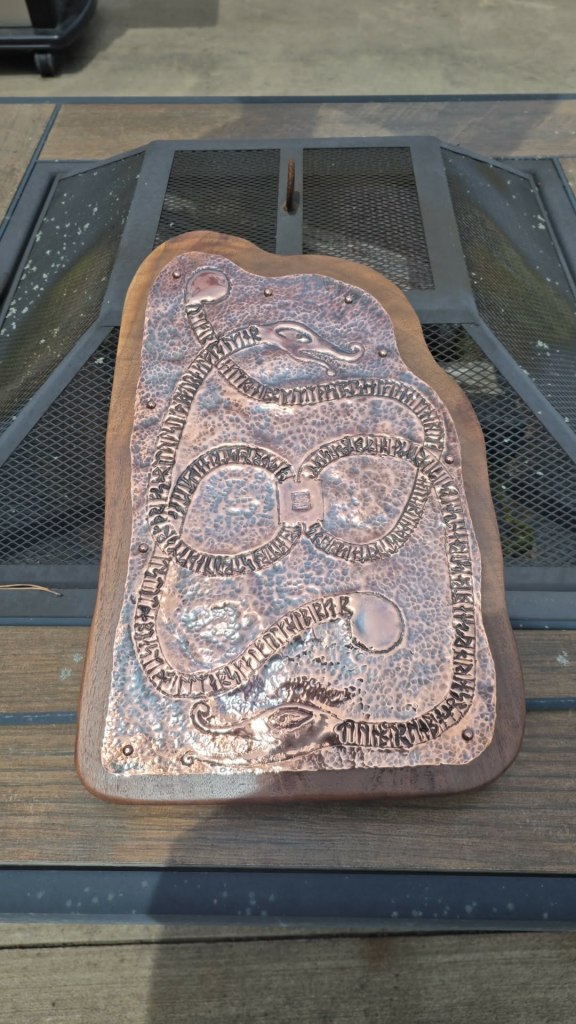
The final product looked like this:
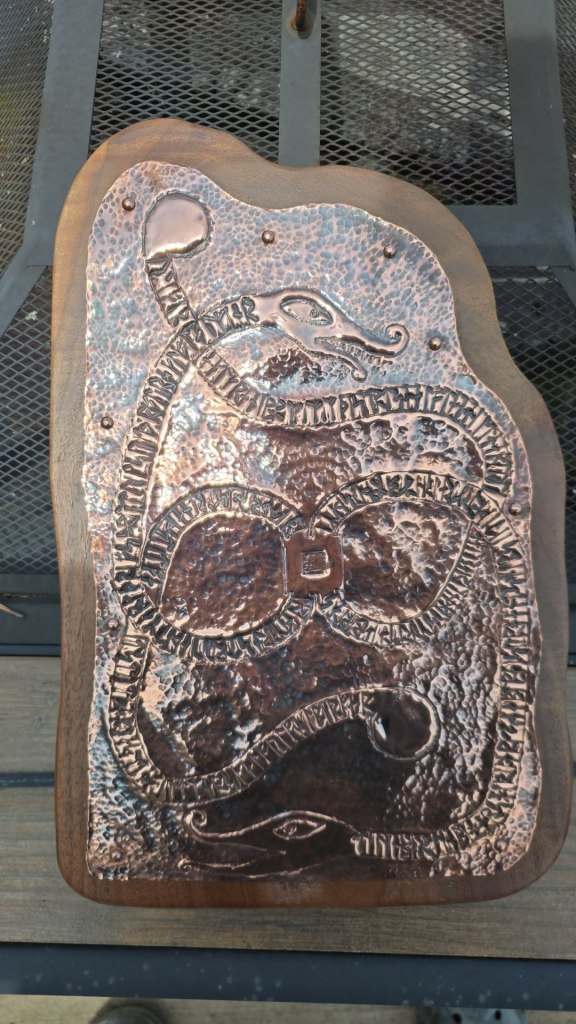
The runes read thusly:
Oliver and Grainne proclaim these words:
Halfdan held hard duty,
hall-warden through storm-days;
spear-law stayed through his strength,
steadfast stood the rune-smith.
Field-marshal, folk-helper,
fair-dealing burden-bearer;
shire-work shaped by sure hands,
ship-steady through crown-labor.
Thus the Millrind turns truly.
Æthelmearc thrives through toil such.
Therefore We raise Halfdan
to Millrind’s honored brotherhood.
Given at Æthelmearc War Practice,
May sixteenth, A.S. LXI.
My transliteration went like this, as per Sir Halfdan’s teachings:
Opening
Oliver and Grainne proclaim these words
oliver ant grani proklaim this wurds
ᚢᛚᛁᚠᛁᚱ ᛅᚾᛏ ᚴᚱᛅᚾᛁ ᛒᚱᚢᚴᛚᛅᛁᛘ ᚦᛁᛋ ᚢᚢᚱᛏᛋ
Verse 1
Halfdan held hard duty
halfdan held hard duti
ᚼᛅᛚᚠᛏᛅᚾ ᚼᛁᛚᛏ ᚼᛅᚱᛏ ᛏᚢᛏᛁ
hall-warden through storm-days
halwarden thru stormdais
ᚼᛅᛚᚢᛅᚱᛏᛁᚾ ᚦᚱᚢ ᛋᛏᚢᚱᛘᛏᛅᛁᛋ
spear-law stayed through his strength
spirla staid thru his strength
ᛋᛒᛁᚱᛚᛅ ᛋᛏᛅᛁᛏ ᚦᚱᚢ ᚼᛁᛋ ᛋᛏᚱᛁᚾᚴᚦ
steadfast stood the rune-smith
stedfast stood tha runsmith
ᛋᛏᛁᛏᚠᛅᛋᛏ ᛋᛏᚢᛏ ᚦᛅ ᚱᚢᚾᛋᛘᛁᚦ
Verse 2
Field-marshal, folk-helper
fild marshal folk helper
ᚠᛁᛚᛏᛘᛅᚱᛋᚴᛅᛚ ᚠᚢᛚᚴᚼᛁᛚᛒᛁᚱ
fair-dealing burden-bearer
fardeeling burdenbarer
ᚠᛅᚱᛏᛁᛚᛁᚾ ᛒᚢᚱᛏᛁᚾᛒᛁᚱᛅᚱ
shire-work shaped by sure hands
shirwork shapt bai sur hands
ᛋᚼᛁᚱᚢᛅᚱᚴ ᛋᚼᛅᛒᛏ ᛒᛅᛁ ᛋᚢᚱ ᚼᛅᚾᛏᛋ
ship-steady through crown-labor
shipstedi thru kraunlabor
ᛋᚼᛁᛒᛋᛏᛁᛏᛁ ᚦᚱᚢ ᚴᚱᛅᚢᚾᛚᛅᛒᚢᚱ
Verse 3
Thus the Millrind turns truly
thus tha milrind turns truli
ᚦᚢᛋ ᚦᛅ ᛘᛁᛚᚱᛁᚾᛏ ᛏᚢᚱᚾᛋ ᛏᚱᚢᛚᛁ
Æthelmearc thrives through toil such
athelmark thrivs thru toil such
ᛅᚦᛁᛚᛘᛅᚱᚴ ᚦᚱᛁᚠᛋ ᚦᚱᚢ ᛏᚢᛁᛚ ᛋᚢᚴ
Therefore We raise Halfdan
therfor wi rais halfdan
ᚦᛁᚱᚠᚢᚱ ᚢᛁ ᚱᛅᛁᛋ ᚼᛅᛚᚠᛏᛅᚾ
to Millrind’s honored brotherhood
tu milrinds honurd brotherhood
ᛏᚢ ᛘᛁᛚᚱᛁᚾᛏᛋ ᚼᚢᚾᚢᚱᛏ ᛒᚱᚢᚦᛁᚱᚼᚢᛏ
Date line
Given at Æthelmearc War Practice
given at athelmark war praktis
ᚴᛁᚠᛁᚾ ᛅᛏ ᛅᚦᛁᛚᛘᛅᚱᚴ ᚢᛅᚱ ᛒᚱᛅᚴᛏᛁᛋ
May sixteenth A S sixty one
mai sikstinth a s siksti wun
ᛘᛅᛁ ᛋᛁᚴᛋᛏᛁᚾᚦ ᛅ ᛋ ᛋᛁᚴᛋᛏᛁ ᚢᚢᚾ
When I wrote the runes on the copper with my bar stamps, anywhere there is a repeated letter, I only used one rune, and I omitted all spaces between words. For example, in verse one:
Halfdan held hard duty
halfdan held hard duti
ᚼᛅᛚᚠᛏᛅᚾ ᚼᛁᛚᛏ ᚼᛅᚱᛏ ᛏᚢᛏᛁ
I did not repeat the ᛏ rune when writing “hard duty”. When I wrote it, it looked like this: ᚼᛅᛚᚠᛏᛅᚾᚼᛁᛚᛏᚼᛅᚱᛏᚢᛏᛁ. This is in keeping with the practices of the period.